TyrantDesigner
Art! Hot and fresh.
While showing a designer friend of mine how to make chisel highlights on lettering for cut vinyl I figured I would throw up a little tutorial here too since I've seen this question a few times.
This is done in photoshop and I will assume you all know layers, and basic features of anything cs+
Lets start with the basic font, In figure 1 I chose hobo as a starting point (lots of curves for the example). The overall document was around 20 inches @ 300 dpi ... when you re-vector this later you will want this a little large ... it's always easy to reduce points ... never a short time to add and fix them. (inkscape is the best for b/w vector tracing illustrations and graphics you have done ... and is opensource ... I completely recommend this)
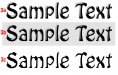
After I get the initial text the way I want it (curves, arcs, distortions, typeface, etc) I have duplicated the text into two items, figure 2 is the base item, it has a stroke positioned around the center of the edge to thicken it ... this will give us a border around the final highlights.
In figure 3 I set a hard chisel on the black text and brought it to the epicenter of the letter ... this will give us the highlight in figure 4 when properly layered.
Now to the real magic, starting with figure 3a (our base chisel) I then merge the text with a background layer that contains a fill ... for this example in 3b I chose a grey background to see it. after that is one object, I do a gausian blur at 5 px to blend in the highlights (prevents dark ridges and noise in the final) , then go into my levels and slide the 3 sliders till they are almost touching (preferably on the dark side of the scale so all the highlight turns completely white) then, just go to select color range, choose your black shadow and cut it out (select>inverse selection > delete) then throw back onto your base with a stroke, In this one I also did a color overlay on the base to be white so when the shadow goes on top of the base it will have white highlights (figure 4)
total time to chisel this way, 2 minutes ... time to write this up, 12 minutes.
Now when you finally vector this out again you can tweak a few points, force some hard eges and the such but really other than a few corners that disappear because of the curve of lettering it's all done.
This is done in photoshop and I will assume you all know layers, and basic features of anything cs+
Lets start with the basic font, In figure 1 I chose hobo as a starting point (lots of curves for the example). The overall document was around 20 inches @ 300 dpi ... when you re-vector this later you will want this a little large ... it's always easy to reduce points ... never a short time to add and fix them. (inkscape is the best for b/w vector tracing illustrations and graphics you have done ... and is opensource ... I completely recommend this)
After I get the initial text the way I want it (curves, arcs, distortions, typeface, etc) I have duplicated the text into two items, figure 2 is the base item, it has a stroke positioned around the center of the edge to thicken it ... this will give us a border around the final highlights.
In figure 3 I set a hard chisel on the black text and brought it to the epicenter of the letter ... this will give us the highlight in figure 4 when properly layered.
Now to the real magic, starting with figure 3a (our base chisel) I then merge the text with a background layer that contains a fill ... for this example in 3b I chose a grey background to see it. after that is one object, I do a gausian blur at 5 px to blend in the highlights (prevents dark ridges and noise in the final) , then go into my levels and slide the 3 sliders till they are almost touching (preferably on the dark side of the scale so all the highlight turns completely white) then, just go to select color range, choose your black shadow and cut it out (select>inverse selection > delete) then throw back onto your base with a stroke, In this one I also did a color overlay on the base to be white so when the shadow goes on top of the base it will have white highlights (figure 4)
total time to chisel this way, 2 minutes ... time to write this up, 12 minutes.
Now when you finally vector this out again you can tweak a few points, force some hard eges and the such but really other than a few corners that disappear because of the curve of lettering it's all done.


 I'm gonna try that on a gothic type font and see how it turns out.