This is what I posted on another board. I don't have any photos of the build as I was just winging it.. I had in mind what I wanted to do then just went about the shop looking for parts.. (This was just a prototype/Test for a large machine I am planning on building.
I did buy the stepper and another gecko controller from Keling and Gecko ..
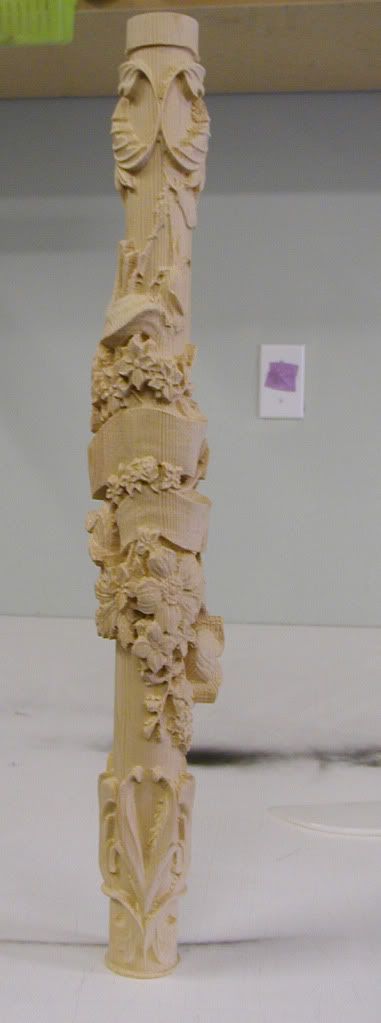
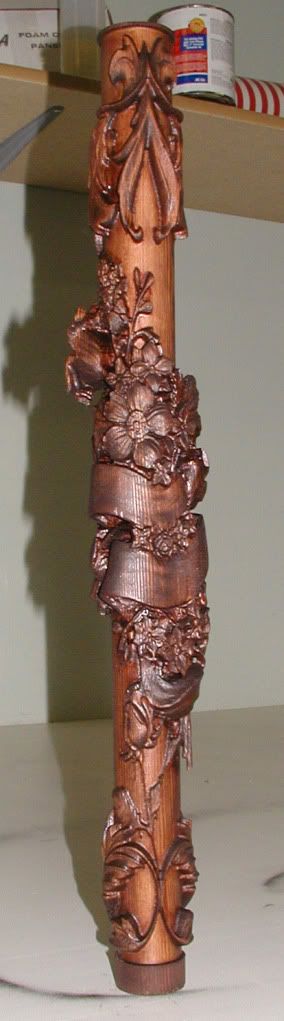
This design was done in Artcam. I just laid out my Flat blank to the Diameter/width with you PI*r2 formula. so it worked out that mt 4x4 once turned was 3.25 which gives me a 10.210 Circumference so I made my blank 10.210w x 22t. Did all my layout. Just imported some stock stuff I had into AC.
Wrote all my codes, then used a program called CnC wrapper. (Slick program for $25) and it converted my codes to run the indexer. I did it as my X axis converts to my B Axis and it changes it to degrees.
Pretty simple actually.
I also use a program called Rhinocam that will do continuous 4 and 5 axis machining that way I can machine stuff in full 3d with undercuts.
I am in the process of developing/Building a machine. (My Vertiroute Series)that will be able to machine items out a full blocks of 4ft x 4ft x 10ft or longer material.(Foam or HDU).. Once I Get my patents # I will post more details on it along with some other specialized CnC tools I have designed.
Since I've been a little slow I'm putting my down time to good use. (Kinda)
The Rotary axis is an Old Sherline 4 Inch Rotary Table with a 2 to 1 reduction allowing me to use a stepper as that gives me a .09 degree resoultion which is great for items up to 8" or so. I had this from an old mill setup.
(The next setup may be all servo driven as the resolution is much higher but very high resolution can be achieved with steppers and the right gear reductions at the cost of speed.)
The Stepper motor was new I bought New from Keling is a Nema 23. And I had to buy a Gecko Driver that I installed into the shopbot controller.
http://www.kelinginc.net/StepperMotor.html (They're a great source for do it yourselfers as you can buy parts or whole kits)
As for the Limit switch. I had one on there but was useless as you said all it does is go round and round so I took it off and just reset my zero once I get the blank installed.
Wanye You could use the lathe chuck but would have to modify it to accept the drive shaft from the motor.. For a direct drive system along with a mounting plate. Pretty easy task with a lathe and mill.
I would look at transmission setup using a gilmer belt. (Toothed belt) with corresponding gears to increase the resolution you can get them at all different resolutions. This may be the setup I use on the big machine so I don't have to buy such honken big motors. (Or even a car timing chain.)
As for the piece at hand. I started with a scrap chunk of 4x4 from an old pallet. Did my roughing/Round with a 1/2" bit.. I got a little aggressive by trying to go to fast and lost about 5 degrees so I had to slow it down. (Tried it round the board at 20ips OOPS)
Did my roughing cuts with a 1/4 flat with a .08 offset then the finish cut was done with a 1/8 ball bit with a 8% overlap.. I did do a section with a 1/16" ball bit but really didn't see much improvement so I stopped. Total time machining the part was about 8 hours.
I machine the item along the Y Axis. By doing this it gave the rotary tables stepper a break instead of always turning. The Y carriage would cut then rotary would turn 1/2 degree then the y would go back. with the x axis never moving.This is called indexing.
For continuous machining whereas all 4 axis move at the same time you need special programs designed for this. I use one called Rhinocam that's an add on for Rhino 3d and that's a whole other monster to get into. I will post some samples of that next week.
Hope all this make sense.. There's a reason I will never write a book.