• I want to thank all the members that have upgraded your accounts. I truly appreciate your support of the site monetarily. Supporting the site keeps this site up and running as a lot of work daily goes on behind the scenes. Click to Support Signs101 ...

ACM Installation on Wall

estunum

New Member
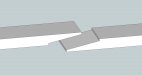
We've had a wall mural gone bad 3 times now and wondering if there's anything else we might be missing. The mural is 10' x 10'. The substrate is 3/16" ACM, with a vinyl print applied on it. The print has an anti graffiti film instead of our normal laminate. ACM was applied to the wall with screws, then the vinyl applied over it. ACM doesn't come that big, so we had to place two panels, 5 ' x 10' each. Where the panels meet is the issue.

First time around, the client wasn't happy with how the seam showed there. Understandable, we didn't forsee that the ACM would not be perfectly flush so it tented in some places.

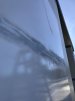
Our solution was apply construction adhesive behind the joint as much as possible. Sand down the ACM to make it as flush as possible, then apply bondo to smooth it all out. Seam was still visible a little but client was happy. Days later, what you see on the photo happens.

I assume it's the material expanding and contracting? Bondo didn't hold and just cracked by the looks of it. This mural faces west, so it gets A LOT of sun. Another thing I noticed is that our installer may have just screwed it place along the edges, because if you touch the center of either of the 5' x10' panels, you can push it down maybe 1/4". Is is just that the panels have too much give?

My suggestion from the very beginning was to just cut the vinyl where the panels meet, so we'll have to suggest that again, that it will be something they simply will have to deal with. If there is something else however, I am all ears. a solid 10' x 10' panel would be ideal, but none of our vendors carry it, probably doesn't even exist.
 

Attachments

  • image001.jpg
    image001.jpg
    80.6 KB · Views: 558
  • image003.jpg
    image003.jpg
    178 KB · Views: 488
  • IMG_1654.JPG
    IMG_1654.JPG
    2.6 MB · Views: 500
  • IMG_1656.JPG
    IMG_1656.JPG
    3.4 MB · Views: 499

Modern Ink Signs

Premium Subscriber
You are 100% correct. Panels flex and bondo breaks.

To minimize the panel flex, we’ve adhered a piece to the back at the seam. This will help keep the seam flush.

Managing expections is what you should have done to begin with. The client should have been made aware that there would be a seam and will be noticed. From you pic of the entire thing the seams are noticeable but acceptable (the cracking withstanding)


Another option would have been to have a frame made and utilize and flex face. This is the route I would have gone
 

DerbyCitySignGuy

New Member
You're probably never going to be able to completely eliminate the seam.

Out of curiosity, why not just use RoughRAP or something similar and apply directly to the wall?

ACM is going to expand and contract in heat and cold. It's unavoidable. Physics.
 
If we don't want seams to show as much with ACM, we just use a 2-3" strip of aluminum at each butt seam and apply two strips of VHB tape all the way down them to join the two sheets. Just pre-install the aluminum strip on the adjoining edge of one panel, then mount the next panel with a few screws but allow enough flex to reach in and pull the plastic off the second strip of VHB tape and press it into place before you drive the last few screws in.
 

eahicks

Magna Cum Laude - School of Hard Knocks
Either the above mentioned flexface in a frame, or simply apply vinyl to the wall as a mural, using a concrete vinyl or what I've used before, a very high tack vinyl like Arlon DPF8000. You'll see the texture of the wall somewhat, but seams will not show and you only have one layer to contend with instead of vinyl and another substrate fighting each other.
 

2B

Active Member
What are you trying to do?
  • Fix what is there?
  • Re-Do the project with minimal seams?
  • Re-Do the project so there are no seams?

seamless, you need a flex face or banner tension system.

Minimal Seams, have full a full frame mounted to the wall and the panels mounted to that
NOTE; you need to make sure there is a brace behind the seamed panels and that runs the full length of the seam

What is there, add more screws around the seam to help keep them together as close as possible. the seam will still become visible over time

Why was 3mm used for this project?
Have you ever paneled before?
even with the most careful planning, whenever you panel substrate you run the risk of a seam being evident
 

CanuckSigns

Active Member
the issue is due to the vinyl bridging over the seam, if you apply the vinyl then slice the seam it will look much better, just like how it's done on a trailer wrap. If the insist on a seamless design you will need to look into a tension frame with a banner.
 

rossmosh

New Member
This is the type of job where it's important to ask a bunch of questions and be able to give a bunch of info based on experience. From what I can tell there are three options to handling this job.

1. Do what you do. Let them know the seem will be visible up close.

2. Buy some sort of banner type system.

3. Paint the damn image on the wall. I know this not an in-trend way of doing things, but I can't help but think how much easier this job would have been if you cut a vinyl mask and painted the image on the wall. Would outlast all the other options too.
 

visual800

Active Member
my self if no seam was to be shown (or less seam) I would have made an aluminum frame for this and placed panel in it and butted them. you can NEVER trust a "flat"wall when seaming it will bite your ass everytime. You have watsed a lot of time and energy on this sign......we have all been there done that.
 

Billct2

Active Member
Lots of good advice.
If a seam is ok, just knifing it would solve the problem.
Mounting direct to the wall should have thicker panels
Next step up, panels mounted to a frame are more stable.
Banner frame is a good option and wall vinyl is too.
 

Marlene

New Member
You may have to change material for your backer panel and do an overlapping joint to make it more like one piece.
 

Attachments

  • scarf joint.jpg
    scarf joint.jpg
    109 KB · Views: 442
3. Paint the damn image on the wall. I know this not an in-trend way of doing things, but I can't help but think how much easier this job would have been if you cut a vinyl mask and painted the image on the wall. Would outlast all the other options too.

This is the best option, by a long shot.
 

ddarlak

Go Bills!
WOW.....

Digital Printers made people dumb....

simple wall graphic.....should have been painted on wall, collect money, huge profit.
 

Brandon708

New Member
What I always do is print an extra 2" strip to go over the seam in the middle. It hides the seam and help hold the two panels together.


Another thing you can do to make sure it doesn't move is add a 2" to 6" strip on the back (kinda like the vinyl you apply to the front) out of .040 aluminum using VHB tape to hold the two panels together.
 

eahicks

Magna Cum Laude - School of Hard Knocks
What I always do is print an extra 2" strip to go over the seam in the middle. It hides the seam and help hold the two panels together.
I don't get the point of this....you get 2 seams then; the seam of 2 boards, then another vinyl seam 2" from that seam. You should be fine with the material butted up together as the only seam, provided you have a way to keep them from separating.
 

estunum

New Member
Thank you all for the advice, it confirms several things. Lesson learned.

Despite my lack of experience, my suggestion from the very beginning was to paint the thing. We are good at making large stencils, we make them all the time for gym floors and inflatables but higher ups didn't want to deal with the hassle. Matthews paint would have perfect as their concern was vandalism.

The flex banner would work great, but vandalism is an issue. It's for a middle school and kids would just slice it. So that was never an option.

When I heard there was going to be panels, I knew where the panels met, the vinyl needed to be cut. That's what we do with everything else, but trying to cater to this whole "no seam" idea got us into a lot of trouble.

I'll bring all of this information to the bosses and see how they want to move forward. I still want to paint it, we'll eat the entire cost plus the re dos, but will meet their expectations the best. Next option is to take it down and brace where they meet the entire length. I'll look into the suggestions about applying the graphic directly to the wall, with a high tack vinyl. I've personally used 3M IJ8624 on brick and stucco, and the result was amazing. That vinyl would be overkill for this as the wall is minimally textured. It's essentially painted cement.
 

rossmosh

New Member
Why is vinyl a good idea but paint isn't?

Let's just pretend someone takes a rattle can and sprays some graffiti on it. Okay. You go into the janitor's closet, pull out the left over paint and you fix the damn wall. Absolute worst case scenario, they call you up. Otherwise the town/school maintenance staff can handle it. Maybe they get an art teacher involved.

With vinyl, they HAVE to call you up. They'll pay you to cut the new material. They'll pay you to remove and replace with the new stuff. Where is the benefit?
 

neato

New Member
3. Paint the damn image on the wall. I know this not an in-trend way of doing things, but I can't help but think how much easier this job would have been if you cut a vinyl mask and painted the image on the wall. Would outlast all the other options too.

It is in trend, just not with sign shops that limit themselves to printers and cutters.

I've never personally painted a wall graphic/sign, but I would have tackled it in this case as simple as this art is and as nice a surface the wall is.
 
Top