• I want to thank all the members that have upgraded your accounts. I truly appreciate your support of the site monetarily. Supporting the site keeps this site up and running as a lot of work daily goes on behind the scenes. Click to Support Signs101 ...

Any tips on taking pictures so that everything sizes up the same?

Andy D

Active Member
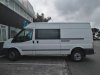
For example, when I take a picture of a semi truck, so that I can superimpose graphics onto
it for proofing... I can size up the cab door, but everything else will be off from the size
I know they should be. I know this is a normal thing that happens due to the fact that
everything is different distances.(and I never use panoramic if I can avoid it)

I have taken multiple pictures and had Photoshop put them together, with mixed results.
Just wondering if anyone has tips or tricks for this.
 

bannertime

Active Member
I hope whoever originally wrote it chimes in, but someone once mentioned taking the picture from as far back as possible to prevent lens distortion. Something about keeping the object in the middle 1/3rd or 2/3rd of the objective. Also if you have a cab that is offset from the box, then sizing to the box will make the cab small and sizing to the cab will make the box too big. So for proofing you'll have to estimate that, but the production file should be just the box and just the cab.
 

2B

Active Member
I also, remember a thread about photos, cannot remember if this is one in question though
https://signs101.com/threads/how-to-design-perfect-template-outline-vector.112057/#post-1149234

we have found that taking 1 photo is NOT going to work. break the area down into grids and ALWAYS try to keep the X and Y-AXIS as perpendicular & parallel to the intended subject.
also placing a known item in the photo, again using both the X and Y-AXIS in the same image helps A LOT
see example
 

Attachments

  • IMG_2570.JPG
    IMG_2570.JPG
    1.8 MB · Views: 325

Andy D

Active Member
I hope whoever originally wrote it chimes in, but someone once mentioned taking the picture from as far back as possible to prevent lens distortion. Something about keeping the object in the middle 1/3rd or 2/3rd of the objective. .

Make perfect sense, thanks! I wonder if you take a picture from a distance and zoom in, does it limit distortion? I guess taking from a distance at a high dpi and cropping on the computer would be the best option.
 
Last edited:

Andy D

Active Member
break the area down into grids and ALWAYS try to keep the X and Y-AXIS as perpendicular & parallel to the intended subject.
also placing a known item in the photo, again using both the X and Y-AXIS in the same image helps A LOT
see example
You would think there would be an app to do this and speck sizes.
 

bannertime

Active Member
Make perfect sense, thanks! I wonder if you take a picture from a distance and zoom in, does it limit distortion? I guess taking from a distance at a high dpi and cropping on the computer would be the best option.

Correct. It's pretty common in the film industry to shoot the scenes wide and crop in production. We just have to do it for different reasons.
 

equippaint

Active Member
I always design to the picture to get it close and adjust to the measurements as they don't lie. Working straight from a photo is much harder than working from measurements. My preference is to box everything and work within the boxes.
 

signbrad

New Member
Make perfect sense, thanks! I wonder if you take a picture from a distance and zoom in, does it limit distortion?

Yes, it does.
A camera lens is curved and a photo is flat. So, edges of a photo will always show the greatest distortion because of this curvature. The viewing angle is much greater at the edges of an image viewed through a lens than at the center. Hence, the least distortion is always at the center. By photographing from farther away you put more of the subject in the area with less distortion.

It is also possible to manipulate a photo to remove much of the distortion. I routinely do this in Signlab using the Vertical Perspective tool in the Distortion menu.

I first draw a square or rectangle sized to a known area on the photograph. Then I lay it over the photo with a clear fill. Then simply move the nodes on the photo using the Perspective Tool to line up the known area on the photo to match the rectangle. It doesn't take long.
These same tools can also square up a photo taken at a bad angle.

The scale of the resulting photo will be fairly accurate, though the overall shape of the picture will be odd-looking. Simply clip the picture with a solid filled box for a finished look.

There are also tools in Photoshop to correct lens distortion. Mike Jackson wrote an article in a recent SignCraft magazine addressing the topic.

Brad in Kansas City
 

Johnny Best

Active Member
I use a full frame Nikon camera with a 35mm prime lens. If you stay at the same level as the object you are shooting it is pretty accurate. A 50mm lens also can be used but when you get into zoom lens is when the distortion starts to happen. If you're taking a pic of a tractor-trailer with a 35mm you don't have to be far back to get it all in. If you are shooting with a 300mm prime then you need to back way out. I also use a 18-300mm lens but since it is a zoom it is not as accurate at 35mm as the 35mm prime lens.
If you mark measurements on the trailer or take good field measurements of it, you can adjust in Photoshop to get an accurate pic. I prefer field measurements and take a pic with my phone or camera and draw out to scale in Illustrator so it is more accurate for my needs for layout.
 

Gino

Premium Subscriber
I understand your question, but if this is only for proofing and not making actual prints or cuts, does it really matter if you're accurate down to a quarter inch or not ?? For over 40 years, I've been using any sh!t camera or phone camera and it's always worked for showing customers and proofing. However, once accepted, nothing is ever done for actual cutting, painting or printing without getting physical measurements with the vehicle in our place and creating real files.
 

Andy D

Active Member
I understand your question, but if this is only for proofing and not making actual prints or cuts, does it really matter if you're accurate down to a quarter inch or not ?? For over 40 years, I've been using any sh!t camera or phone camera and it's always worked for showing customers and proofing. However, once accepted, nothing is ever done for actual cutting, painting or printing without getting physical measurements with the vehicle in our place and creating real files.

Gino, you're right & I normally do the same. However, there has been many situations it would be very helpful to size up an image using a couple measurements, and then use that image
to get a decent measurement for other areas...for example: I have gone to distant sites and had not thought to get a particular measurement at the time, and would rather not make that trip again
prior to production of the graphics.
 

Bobby H

Arial Sucks.
Photographs are never going to be fully accurate as a source for laying out signs, vehicle graphics, etc. At best, when all the appropriate steps are taken shooting the photograph and adjusting in Photoshop, the image is only going to be close to survey measurements, not perfect. If you proportionately scale the image to match a vertical measurement the horizontal measurement will be off a little bit (or a lot). The issue gets worse when the image subject is something with a wide aspect ratio, such as a building elevation or truck trailer.

The big problem is optical perspective. There is always some degree of foreshortening present and that increases the farther away you get from the viewpoint center. A telephoto zoom lens can reduce the effect, but it won't get rid of it entirely. Plus, depending on the make of the lens, it could introduce pincushion distortion into the image.

There's nothing wrong with superimposing designs over photographs. But there's no substitute for having an accurate survey and composing the design within those bounds rather than trying to design directly over a photograph.
 

Dan360

New Member
Have you considered the Spike measuring tool? Our sales reps just take a bunch of pics when they go out with it and then get all the measurements back at the shop. Perspective doesn't really matter and it's pretty accurate.
 

Andy D

Active Member
Have you considered the Spike measuring tool? Our sales reps just take a bunch of pics when they go out with it and then get all the measurements back at the shop. Perspective doesn't really matter and it's pretty accurate.

Yes I have. So it lives up to the hype and you have had good results?
 

Dan360

New Member
It's good when used properly, it does have some issues with it. But generally it's been a good tool that saves time and lets the sales team focus more on talking to the client rather than taking measurements and writing them down. It's not always EXACT, but with a safety margin and some bleed it saves having to measure most jobs. I think where it really shines is quoting.
 

Bobby H

Arial Sucks.
We have a Spike setup at our shop. Our sales manager uses it to get "quick and dirty" measurements, particularly if it's something like a cabinet well out of reach. It tends to work best with something like a large iPad rather than a tiny phone screen. The person taking the photo still has to make sure he's taking the picture straight-on and not at an angle. For projects, like replacing faces in an existing sign cabinet the measurement and other details will have to be confirmed once landing the sale.
 

RavenSigns

New Member
If you have enough distance, I’d suggest zooming in from afar. It would flatten the lens distorsion. If you have Adobe Lightroom, you can pick your camera lens and it will straighten the distorsion.

If I’m in a hurry and the job does not require high accuracy, usually tape horizontal and vertical yardsticks to take quick shots with my phone, and zoom in to get rid of lens distorsion as much as possible.

Never really needed more accuracy on a box truck.
 

burgmurk

New Member
I made this magnet for quick and dirty vehicle measurement.
it's enough for most work, It's rare i get a job that requires more precision.
If i do need the precision, i'll take proper measurements, draw it flat in illustrator, then stretch that graphic onto a photo to create proofs, rather than working directly on a (distorted) photo.
 

Attachments

  • IMG_20180430_104435.jpg
    IMG_20180430_104435.jpg
    1.1 MB · Views: 244

Andy_warp

New Member
You are fighting perspective. There are more factors than "zooming in" with a telephoto lens from far away.
Did you know the ancient romans built many of their structures and monuments out of square and plumb so they "looked" straight?

Sorry, but an app won't make it go away.
 
Top