• I want to thank all the members that have upgraded your accounts. I truly appreciate your support of the site monetarily. Supporting the site keeps this site up and running as a lot of work daily goes on behind the scenes. Click to Support Signs101 ...

Can't get SP540V to print then cut with cropmarks... automatically or manually

signmeup

New Member
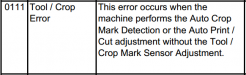
I can't get my SP54V to cut to crop marks. I don't think the issue is it can't find the marks. It doesn't even look for the marks... you can’t even set the crop marks manually and have it follow them. It just sets service call 0111 as soon as click "print".

I installed a new crop mark sensor but no joy. The sensor works to calibrate the voltage test. I set it to 2.6v which is within specs of 2.5 + -.2v. If I move the carriage the voltage changes as the eye is moved from the black square to the white vinyl.

Maybe a software issue? Maybe I’m not manually setting the marks correctly? The only way it will cut anything is if “crop marks” are not turned on in Versaworks.


Adrian
 

Ragnabrok

New Member
set the base point out onto the vinyl a bit more, try the outlevel check at a few different places across the platen. I'd imagine it's the cut carriage cable losing its connection at certain bend points.
 

signmeup

New Member
Wait a minute... the cable to the cutter head is ancient. It's the print head cable that's new. Thanks for the idea Ragnabrok.

Adrian
 

signmeup

New Member
No matter what I set the voltage to it changes to a different value as soon as I check it again. Wiggling the cable doesn't have any effect that I can see. I guess I'll try a new cable unless anyone has any other ideas.

Adrian
 

Ragnabrok

New Member
how are you setting the voltage? there is a potentiometer on the cut carriage board, you turn it while it is on the printed square getting the reading. That and the reading drops somewhat quickly as the ink dries.
 

signmeup

New Member
Yes, that is how I set it. I'm surprised they say to set it while the ink is drying and that the reading will drop as it drys. It doesn't seem like a very scientific way to make an adjustment.

The cut cable is only a few weeks old it turns out. The plastic pieces on either side are old and dirty but the guy I bought the printer from just replaced the cut cable.

I noticed it reads a lot higher voltage if I place a piece of black vinyl under the sensor. The reading stays steady.

Since the ink would be quite dry by the time I laminated the print and put it back should I let it dry and set the voltage then? Or set the voltage with a pre-dryed and laminated sample of black printing?

Adrian
 

Ragnabrok

New Member
normally it would be the reading it first picks up immediately after printing that it's calibrated to, but by the book is sometimes a guideline. Vinyl + laminate combos can interfere with picking up crop marks. i've seen people cover crop marks with masking tape, laminate, then cut off the laminate over the tape and peel off, leaving un-laminated crop marks.

Fuzzy crop marks can cause it as well, if the edges aren't crisp it seems to miss them entirely.

it won't damage the printer to turn up the value a bit as well, maybe at 2.8v it's happier, if that allows you to cut then it's all good.

One more thing to check, the crop mark reader should have a filter in front of it, a sheet of what looks like whiteish mylar or lexan film. That being super dirty, or missing will affect how it functions as well.
 

Attachments

  • cropmark.PNG
    cropmark.PNG
    84.2 KB · Views: 298

asd

New Member
i have an sp300v with the same problem a few years ago an we had to replace the servo board on the printer to make work again
 

signmeup

New Member
normally it would be the reading it first picks up immediately after printing that it's calibrated to, but by the book is sometimes a guideline. Vinyl + laminate combos can interfere with picking up crop marks. i've seen people cover crop marks with masking tape, laminate, then cut off the laminate over the tape and peel off, leaving un-laminated crop marks.

Fuzzy crop marks can cause it as well, if the edges aren't crisp it seems to miss them entirely.

it won't damage the printer to turn up the value a bit as well, maybe at 2.8v it's happier, if that allows you to cut then it's all good.

One more thing to check, the crop mark reader should have a filter in front of it, a sheet of what looks like whiteish mylar or lexan film. That being super dirty, or missing will affect how it functions as well.

Thanks so much for your help. I will look at the filter. The thing is that it's not so much that it can't find the marks... it never even looks for them. Granted I have never seen one of these printers look for, find, and cut with crop marks so I'm at a disadvantage there.

Adrian
 

signmeup

New Member
Kinda frustrating. I talked to a technical service department and I just don't seem to be able to explain to anyone that the machine does not look for the crop marks.

It does not wander around looking for marks and give up
... It does not look for them at all

Error code 0111 says to adjust the voltage to the sensor. I did this.

I would like to know if the voltage setting is incorrect(it isn't) will the machine try to find the crop marks?
Adrian
 

Ragnabrok

New Member
That error code says that one of the crop tool adjustments hasn't been performed. One would be the outlevel check which you've done, the other the crop-cut adjust in service mode. One of the options for that is the auto adjust, which should fill in any missing values to get it to cut.

Why those values are missing is a good question, either the board was reset or replaced at one point, and the setting never given. Boards get a value of "***" when they are reset, but would need some kind of numerical value to work, even a 0. It might also need the auto print-cut alignment to fill in a missing value.
 

Attachments

  • 0111.PNG
    0111.PNG
    33.8 KB · Views: 223

signmeup

New Member
OK... I did the auto adjust and it tried to find the crop marks!! Progress!! Thanks!!

Now I just need to get it to see the marks. I like it when a plan starts to come together...

I'm going to try a higher voltage setting on the sensor. The tech said to set it after the ink had dried for a longer period and also to set it to 2.7 volts. I'll report back. Thanks again!!

Adrian
 

signmeup

New Member
It works!!

I redid the voltage/sensor test I let it sit and dry until the sensor voltage stopped dropping (went down to 1.2v) and set it to 2.7volts. Tried it on some crop marks and it worked like a champ!

Thanks Ragnabrok! They will sign songs about you in my village for many years!

Adrian
 

signmeup

New Member
It just died again. Printed 90 % of a job and quite. Now the computer can't find it. "not connected" it says.

I'm about to lose a potential great new customer because I can't deliver the goods...

Adrian
 

signmeup

New Member
WTF?! seconds later it finds it and says it's connected!? I swear this thing is possessed! Wish me luck
 

Ragnabrok

New Member
Weird stuff happens in networks with static IP's only on one end. Changing the ip address for the printer can help. Some routers give more issues than others, hard to tell why it would have briefly dropped.
 
Top