• I want to thank all the members that have upgraded your accounts. I truly appreciate your support of the site monetarily. Supporting the site keeps this site up and running as a lot of work daily goes on behind the scenes. Click to Support Signs101 ...

CJV30-160 -- ERROR 202 -- Help!!!

espace-visuel

New Member
Hello everyone,
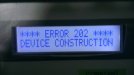
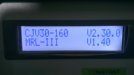
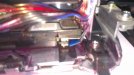
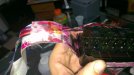
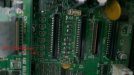
After having cleaned the head with a syringe, I accidently poured the cleaning fluid on the print head and touched the electronic component and cables .. after reboot the machine, I receives the error code 202 .. I changed the cables but still the same problem .. it do more than two weeks I'm down, please help me. my machine MIMAKI CJV30-160 with the original head. thank you
 

Attachments

  • 05IMAG3140.jpg
    05IMAG3140.jpg
    328.6 KB · Views: 2,049
  • 03IMAG3143.jpg
    03IMAG3143.jpg
    315.5 KB · Views: 1,116
  • 02IMAG3144.jpg
    02IMAG3144.jpg
    278.3 KB · Views: 907
  • 01IMAG3145.jpg
    01IMAG3145.jpg
    300 KB · Views: 899
  • 04IMAG3142.jpg
    04IMAG3142.jpg
    313.5 KB · Views: 995
  • IMAG3111.jpg
    IMAG3111.jpg
    38.2 KB · Views: 948
  • IMAG3115.jpg
    IMAG3115.jpg
    46.1 KB · Views: 1,070

wunder

New Member
have you installed the metall Frame behind the printhead ? i dont see it at your pictures....there ist a small piece too must be installed i know...
 

Solventinkjet

DIY Printer Fixing Guide
Most likely, there is ink in the terminal where the cables plug into the print head. I would clean everything as well as you can and check the terminals to see if they have ink in them. You can try to clean the terminals out but most likely you fried the head. Normally error 202 happens if you install the wrong type of head or the long trailing cables are damaged. In your case there is probably a short in the connection to the print head which is causing the error.
 

espace-visuel

New Member
Most likely, there is ink in the terminal where the cables plug into the print head. I would clean everything as well as you can and check the terminals to see if they have ink in them. You can try to clean the terminals out but most likely you fried the head. Normally error 202 happens if you install the wrong type of head or the long trailing cables are damaged. In your case there is probably a short in the connection to the print head which is causing the error.


Thank you for your reply VanderJ .. can you show me how to clean the terminals?
in the case of a short circuit in the connection to the print head, what procedure should I do?
 

SightLine

║▌║█║▌│║▌║▌█
The ends of the flat cables that plug into the print head must be clean as well as the connector on the head they plug into. On the head connector itself that is not easy to clean. You would probably need to remove the head to get at it good. Of course be very careful not to touch the nozzle plate. Personally, I'd remove the head, remove the manifold from the head, then use an old toothbrush to thoroughly clean the top of the head and the connector with isopropyl alcohol. Again, be careful not to hit or touch the bottom nozzle plate and avoid getting any alcohol into the ink chambers of the head while the manifold is off. Make sure the alcohol is all dried/evaporated and put it back together. You want to keep the head out as little as possible as well to avoid the ink in it drying out as much as possible. Might even wet a paper towel with solvent cleaning solution and set the head on that to help keep the nozzle plate moist.

Also - just to be sure, you did reconnect the small head memory ID board too right? If that board also got ink all over it I'd probably clean it too.

Worst case - the wet ink on the head shorted the head when you powered the machine up and fried the head. Much worse worst case, that wet ink shorting things also possibly damaged the slider and/or main boards.

I'd have to say though - you said you got cleaning fluid on things. The photos look like an ink explosion all over everything. That is a complete mess and I'm not at all surprised you are getting an error. I cannot show you how to do any of this though. If you understand these things then you are capable of doing these things, if you are unsure then you probably need to get a tech in there who can.

Also - in the second photo the head cables are not even connected to the head. One other consideration as well - if the head cables have been sharply bent where the blue reinforcing piece is on them there is a good chance the cables are internally cracked and damaged which will also cause this error. The flat head cables are delicate and if at all possible should never be creased. Mimaki even had a tech notice on them at one point to add a padded reinforcement in a couple of spots and a warning about creasing them.
 

espace-visuel

New Member
The ends of the flat cables that plug into the print head must be clean as well as the connector on the head they plug into. On the head connector itself that is not easy to clean. You would probably need to remove the head to get at it good. Of course be very careful not to touch the nozzle plate. Personally, I'd remove the head, remove the manifold from the head, then use an old toothbrush to thoroughly clean the top of the head and the connector with isopropyl alcohol. Again, be careful not to hit or touch the bottom nozzle plate and avoid getting any alcohol into the ink chambers of the head while the manifold is off. Make sure the alcohol is all dried/evaporated and put it back together. You want to keep the head out as little as possible as well to avoid the ink in it drying out as much as possible. Might even wet a paper towel with solvent cleaning solution and set the head on that to help keep the nozzle plate moist.

Also - just to be sure, you did reconnect the small head memory ID board too right? If that board also got ink all over it I'd probably clean it too.

Worst case - the wet ink on the head shorted the head when you powered the machine up and fried the head. Much worse worst case, that wet ink shorting things also possibly damaged the slider and/or main boards.

I'd have to say though - you said you got cleaning fluid on things. The photos look like an ink explosion all over everything. That is a complete mess and I'm not at all surprised you are getting an error. I cannot show you how to do any of this though. If you understand these things then you are capable of doing these things, if you are unsure then you probably need to get a tech in there who can.

Also - in the second photo the head cables are not even connected to the head. One other consideration as well - if the head cables have been sharply bent where the blue reinforcing piece is on them there is a good chance the cables are internally cracked and damaged which will also cause this error. The flat head cables are delicate and if at all possible should never be creased. Mimaki even had a tech notice on them at one point to add a padded reinforcement in a couple of spots and a warning about creasing them.

thank you for your reply "SightLine", I will try to implement your recommendations and to transmit the result .. I hope I have not destroyed the mainboard or the cursor. Once again thank you for your help
 

wunder

New Member
Thats the error from SM

202  ERROR 202 
DEVICE CONSTRUCTION
Head unconnected.
FFC broken or poor connection.
An error occurred in head unit memory.
Turn off the main power, and turn it on a little later.
If the error occurs again, carry out the followings.
1. Refer to 7.2.3 Electrical Troubleshooting, and
replace the following parts if it has damaged.
•.Check the head and head FFC cable.
•.Check the HDC FFC cable.
•.Replace the ink slider PCB assy. (See 6.5.9)
•.Replace the main PCB assy. (See 3.4.1)
2. Check the head memory cable.
3. Replace the head memory.
 

espace-visuel

New Member
after cleaning with a toothbrush, the connector and head with isopropyl alcohol the problem is not solved:banghead::banghead::banghead:
 
Last edited:

espace-visuel

New Member
Thats the error from SM

202  ERROR 202 
DEVICE CONSTRUCTION
Head unconnected.
FFC broken or poor connection.
An error occurred in head unit memory.
Turn off the main power, and turn it on a little later.
If the error occurs again, carry out the followings.
1. Refer to 7.2.3 Electrical Troubleshooting, and
replace the following parts if it has damaged.
•.Check the head and head FFC cable.
•.Check the HDC FFC cable.
•.Replace the ink slider PCB assy. (See 6.5.9)
•.Replace the main PCB assy. (See 3.4.1)
2. Check the head memory cable.
3. Replace the head memory.


Head unconnected = Head connected
FFC broken or poor connection = New FFC
An error occurred in head unit memory = ?
Turn off the main power, and turn it on a little later = no result
If the error occurs again, carry out the followings.
1. Refer to 7.2.3 Electrical Troubleshooting = When we measure a resistance between the test pin TP1 to TP8 and GNDon the main PCB ASSY to determine the COM circuit condition, Measured value of each test pin should be in the range of 17Kohms to 18K ohms, all tests are OK except TP2 with 15,36K ohms, it means that the main PCB ASSY is damaged? :frustrated:
attachment.php
 

Attachments

  • IMAG3167_Modif.jpg
    IMAG3167_Modif.jpg
    67.7 KB · Views: 2,752

espace-visuel

New Member
Eeprom

Good evening everyone,
After having changed the print head (original), and the head memory, the machine starts with this message: "HEAD-1.EEPROM CHECK" and then boot normally. Can you please explain to me what does this message? Thank you in advance.
 

Solventinkjet

DIY Printer Fixing Guide
It looks like for some reason the machine is running a head memory check before it boots. I have seen it after replacing a head but it usually goes away after the first boot. Although it may be abnormal for you to see this message every time you boot up, I wouldn't worry unless it comes up with a memory error.
 

espace-visuel

New Member
It looks like for some reason the machine is running a head memory check before it boots. I have seen it after replacing a head but it usually goes away after the first boot. Although it may be abnormal for you to see this message every time you boot up, I wouldn't worry unless it comes up with a memory error.

Hi VanderJ, how are you?
exactly, i see this message every time i boot up ... what is the solution to not having this message ?!!!
 

shifil_mimak

New Member
good evening everyone,
after having changed the print head (original), and the head memory, the machine starts with this message: "head-1.eeprom check" and then boot normally. Can you please explain to me what does this message? Thank you in advance.


did u take the "parameters backup" before replacing the print head,,,,,if yes,,then make sure u reloaded the same back to machine after fixing the new head...also check that u have entered the head id printed on the new head (if it is original),,,gud luck :)
 

espace-visuel

New Member
Head installation

did u take the "parameters backup" before replacing the print head,,,,,if yes,,then make sure u reloaded the same back to machine after fixing the new head...also check that u have entered the head id printed on the new head (if it is original),,,gud luck :)

Thank you, infinitely "shifil, I solved the problem by introducing the reference of the Head ID
 
Top