• I want to thank all the members that have upgraded your accounts. I truly appreciate your support of the site monetarily. Supporting the site keeps this site up and running as a lot of work daily goes on behind the scenes. Click to Support Signs101 ...

Contour Cutting with Manual Registration Marks

czwalga

New Member
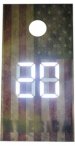
Ok... So the below graphic is what was printed by someone else (not using flexi). I've added the registration marks via AI, my VE Q100 picks up the registration marks fine. I'd prefer to just do it direct from AI as it would be easier, but apparently the Q series is not compatible with cutting master.


My question is, how can I add contours to this graphic in flexi and get everything to cut properly.


My steps were this:
1. Import the AI file into flexi, make the dimensions in flexi exactly the same as the outside of the registration marks

2. Add the contours I want cut in flexi. (The graphic below does not show the contours)

3. Do the automatic ARMs on my cutter, let it recognize all 4 marks (which it does).

4. Send file to production manager and remove any kind of spacing or margins.


It 'kind of' works. It's off anywhere from 1/16" to 1/4" depending on the direction. On this particular graphic I have a lot of leeway and its no big deal... but on future ones it needs to be accurate. Am I just getting lucky and this process isn't going to work at all? If so how can I cut something that isn't printed in Flexi.

attachment.php
 

Attachments

  • flag.png
    flag.png
    646.6 KB · Views: 592

czwalga

New Member
The contours i'm cutting are not shown on the graphic. I import the contours from a dxf in flexi. Really I have a base file that I use, because the contours are the same no matter what graphic is behind it.


I cut out the segments, that overlay on the board like this.

attachment.php
 

Attachments

  • wrapnlboards-2T.jpg
    wrapnlboards-2T.jpg
    10.2 KB · Views: 404

Jester1167

Premium Subscriber
If you have a large quantity, I would start by checking multiple prints for overall size of the print and positioning of the registration marks. If they were printed at different times, temperatures or on machines they could be inconsistent. If the prints are consistent you should be able to reverse engineer it if your cutter and ARMs is consistant. You may want to expand or reduce your contour to give yourself a little more margin of error (depending on what your trying to accomplish).
 

bob

It's better to have two hands than one glove.
You're doing at least one thing wrong but even if you did it right it probably wouldn't matter. While there are special cases, generally it's difficult, if not impossible, to contour cut something that wasn't printed by the same software that's doing the cutting.

A better, and a whole hell of a lot more controllable, method would be...

1. Import the image

2. If the registration marks do not exist then create your own registration marks in Flexi [if memory serves, for Graphtec make then ~1"x1" and ~.35mm wide] and place then at the corners of an arbitrarily sized rectangle that's 1/2"-1" or so larger than the image. Remember the exact dimensions of the bounding rectangle.

If they do exist determine then EXACT dimensions of the rectangle that they describe.

3. Add whatever cut paths you need. Make then some color other than the color of your registration marks. Note that none of these need be tagged as 'contour cut', this is going to be a straight cut job.

4. If necessary print the registration marks you added in step #2.

5. Load the print into your plotter and use the plotter's local Auto Registration Mark reading function to detect the marks. If the Auto mode fails {highly unlikely if you did everything right] then use the manual mode, it never fails. When the plotter finishes detecting the registration marks it will display the X and then the Y distances that it detected. Using the up/down arrows and Enter key correct these measurements such that they are exactly the same as the size of the bounding rectangle references in step #2 above.

6. Send the cut job using NO OFFSET, NO MARGIN, & NO WEED BORDER. Cut just the color of your contour objects.

This should cut them more or less exactly where you put them. The point here is that you're doing the cutting manually and are not using Flexi's contour cutting facilities at all.
 

czwalga

New Member
You're doing at least one thing wrong but even if you did it right it probably wouldn't matter. While there are special cases, generally it's difficult, if not impossible, to contour cut something that wasn't printed by the same software that's doing the cutting.

A better, and a whole hell of a lot more controllable, method would be...

1. Import the image

2. If the registration marks do not exist then create your own registration marks in Flexi [if memory serves, for Graphtec make then ~1"x1" and ~.35mm wide] and place then at the corners of an arbitrarily sized rectangle that's 1/2"-1" or so larger than the image. Remember the exact dimensions of the bounding rectangle.

If they do exist determine then EXACT dimensions of the rectangle that they describe.

3. Add whatever cut paths you need. Make then some color other than the color of your registration marks. Note that none of these need be tagged as 'contour cut', this is going to be a straight cut job.

4. If necessary print the registration marks you added in step #2.

5. Load the print into your plotter and use the plotter's local Auto Registration Mark reading function to detect the marks. If the Auto mode fails {highly unlikely if you did everything right] then use the manual mode, it never fails. When the plotter finishes detecting the registration marks it will display the X and then the Y distances that it detected. Using the up/down arrows and Enter key correct these measurements such that they are exactly the same as the size of the bounding rectangle references in step #2 above.

6. Send the cut job using NO OFFSET, NO MARGIN, & NO WEED BORDER. Cut just the color of your contour objects.

This should cut them more or less exactly where you put them. The point here is that you're doing the cutting manually and are not using Flexi's contour cutting facilities at all.

Bob, is the bounding rectangle inside the registration marks Г. <--- There or is the bounding rectangle at the top left point on the mark.
 

bob

It's better to have two hands than one glove.
Bob, is the bounding rectangle inside the registration marks Г. <--- There or is the bounding rectangle at the top left point on the mark.

From corner to corner. The registration mark exists so that the plotter can detect the corner. Use Flexi's measurement tool to measure the X distance between the vertical bars and the Y distance between the horizontal bars. Make sure that the registration marks are aligned such that they form a perfect rectangle.

reg_marks.jpg
 
Top