• I want to thank all the members that have upgraded your accounts. I truly appreciate your support of the site monetarily. Supporting the site keeps this site up and running as a lot of work daily goes on behind the scenes. Click to Support Signs101 ...

Need Help Cutting after print need advice!

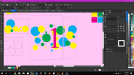
I've attached a screenshot of a job we are working on each different color is a varying opacity of white.
We are having to print and take to our plotter and cut the file after the print is complete our issue is the architect wants it contour cut right up against the design which is almost impossible for us to do she doesn't want any of the circles bleeding through the numbers but wants the circles that overlap everywhere else to show through. We've been throwing around all kinds of ways to do this haven;t come up with a really good answer. The circles that are by themselves we are able to put a contour around and print bigger pieces and save the smaller piece as a cut file. We've run out of ideas at this point if anyone cant suggest a way set the file up or anything it would be appreciated!!! Also I hope this makes sense.

I also included a picture of our sample.
 

Attachments

  • Screenshot (6).png
    Screenshot (6).png
    223 KB · Views: 374
  • IMG_4566.JPG
    IMG_4566.JPG
    1.7 MB · Views: 339
Last edited:

shoresigns

New Member
This is a pretty common problem for contour cutting that doesn't have a perfect answer. The best you can do is copy all the objects, send them to the back, then add a bleed to all of them and cross your fingers that you get an accurate contour cut on your plotter.
 

Solventinkjet

DIY Printer Fixing Guide
I used to deal with this type of thing back in my graphic design days for lithographic printing where you needed the bleed to overprint instead of get knocked out. Open the "Attributes" tool bar in illustrator. You will see an option to overprint fill and overprint stroke. Click on all of the circles and set them to overprint fill and then select the number and make sure overprint fill is off. Then you can go to the view menu and select "Overprint Preview" and it should show you a preview of how it will print. See the attached image. The way I created it was the blue circle is in the back, the red circle is above the blue one and set to overprint and the "1" is above all and set to no overprint. Notice how the blue shows through the red but not the yellow? I think that should get you going.
 

Attachments

  • signs101.png
    signs101.png
    7.7 KB · Views: 320

De.signs Nanaimo

New Member
This is a pretty common problem for contour cutting that doesn't have a perfect answer. The best you can do is copy all the objects, send them to the back, then add a bleed to all of them and cross your fingers that you get an accurate contour cut on your plotter.
Yes I agree with this, worst case you have a bit of colour left over near the junctions
 
We are now making a boundary line around the full section to be cut and adding an inner contour breaking it apart and using the inner contour as our cut file. So far that's been working.
 

burgmurk

New Member
Is this what you're trying to do? This is how we would do it.

View attachment 138965
I do my intersections like this, it can make the joins a little less noticeable if the cutter drifts.

I've tried 'no-bleed' cutting on summa, mimaki and roland cutters: summa gets a 9/10, mimaki 7, and roland 5.
If you just have little slivers of white you can trim them off by hand and nobody can tell the shape isn't 'perfect'
 

Attachments

  • Untitled.png
    Untitled.png
    14.7 KB · Views: 251

unclebun

Active Member
I do my intersections like this, it can make the joins a little less noticeable if the cutter drifts.

I've tried 'no-bleed' cutting on summa, mimaki and roland cutters: summa gets a 9/10, mimaki 7, and roland 5.
If you just have little slivers of white you can trim them off by hand and nobody can tell the shape isn't 'perfect'

Yeah, that's how we handle the bleed on intersections too.
 

shoresigns

New Member
I do my intersections like this, it can make the joins a little less noticeable if the cutter drifts.

I've tried 'no-bleed' cutting on summa, mimaki and roland cutters: summa gets a 9/10, mimaki 7, and roland 5.
If you just have little slivers of white you can trim them off by hand and nobody can tell the shape isn't 'perfect'
We've done it that way a few times before, but it's way more work since you have to do it manually, and our plotter is usually accurate enough.
 
Top