WildWestDesigns
Active Member
...that you can go from raster to embroidery to vector (or any combination that you can think of) with embroidery software?
This was touched upon in another thread. Unfortunately it was a derailment of that thread, so I thought that I would post it in it's appropriate section as not to many people may be aware of what can be done.
Most workflow in this area is going from a source file, either raster or vector to an embroidery file, rather it's a raw stitch file or a vector embroidery file. Embroidery vectors are similiar to graphic vectors with the exception that they store more information related to embroidery. Stitch count, stitch angle, push compensation etc. Otherwise they are like the vectors most of you use. Raw stitch files are like raster images. You can scale them up or down at most on average 5%. Some can do more, some less depends on the pattern.
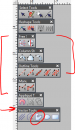
Attached is a screenshot of the typical tool flyouts that I use. The left bracket are for all of the embroidery digitizing tools that I commonly use. The right bracket are the tools that generate vector outlines when you use them. Those in the right bracket can be converted to regular vector objects, no different then what most of you are used to using.
The applique tool right below the left bracket is a unique one. It generates embroidery vector and a graphic vector at the same time to use as a cut file for a plotter or laser to cut the applique piece.
Now, I mentioned that raw stitch files (dst, pes, u?? etc) are like raster images. Well like raster images you can actually convert them back to vectors, either embroidery vectors or graphic vectors. If you go back to my screenshot, there is a tool bar on the bottom with one icon circled. Those tools are vector creating tools, vectors that everyone here is used to. The circled icon is our equivalent of the pen tool. It can be used in two different ways. One with handles like you would in Ai and Corel or you can use it where left click equals a straight line segment and a right click equals a curved segment. So with those tools, you can either go from a raster to just vector or you can go from a raw embroidery stitch file to a vector.
Now all this depends on the level of sophistication of your software, but you can actually go between all those various formats, using those tools. It is possible to go from a raw stitch file to a vector file and vice versa.
This was touched upon in another thread. Unfortunately it was a derailment of that thread, so I thought that I would post it in it's appropriate section as not to many people may be aware of what can be done.
Most workflow in this area is going from a source file, either raster or vector to an embroidery file, rather it's a raw stitch file or a vector embroidery file. Embroidery vectors are similiar to graphic vectors with the exception that they store more information related to embroidery. Stitch count, stitch angle, push compensation etc. Otherwise they are like the vectors most of you use. Raw stitch files are like raster images. You can scale them up or down at most on average 5%. Some can do more, some less depends on the pattern.
Attached is a screenshot of the typical tool flyouts that I use. The left bracket are for all of the embroidery digitizing tools that I commonly use. The right bracket are the tools that generate vector outlines when you use them. Those in the right bracket can be converted to regular vector objects, no different then what most of you are used to using.
The applique tool right below the left bracket is a unique one. It generates embroidery vector and a graphic vector at the same time to use as a cut file for a plotter or laser to cut the applique piece.
Now, I mentioned that raw stitch files (dst, pes, u?? etc) are like raster images. Well like raster images you can actually convert them back to vectors, either embroidery vectors or graphic vectors. If you go back to my screenshot, there is a tool bar on the bottom with one icon circled. Those tools are vector creating tools, vectors that everyone here is used to. The circled icon is our equivalent of the pen tool. It can be used in two different ways. One with handles like you would in Ai and Corel or you can use it where left click equals a straight line segment and a right click equals a curved segment. So with those tools, you can either go from a raster to just vector or you can go from a raw embroidery stitch file to a vector.
Now all this depends on the level of sophistication of your software, but you can actually go between all those various formats, using those tools. It is possible to go from a raw stitch file to a vector file and vice versa.