CSOCSO
I don't hate paint, I just overlay it.
Hi Everyone.
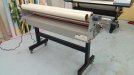
Here is a Do-It-Yourself write up about marrying an laminator with an incompatible rear wind up assembly.
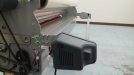
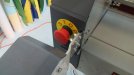
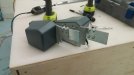
I just bought my new 1401cltw laminator and it didn't come with the rear wind up assembly. Called my supplier and they sent me the RSWU-1400A that was listed on their website as compatible with 1401 and 1402 laminators.
After receiving the rswu something looked odd. i called Royal Sovereign directly and spoke to a tech and they told me that there is NO rear wind up assembly available for the 1401CLTW.

I was really angry. If you ever worked with a laminator that has the rear wind up assembly you know that thing is a blessing.
Called my supplier. They looked in to it and called me back that they are really sorry and they will charge my card back and take care of the shipping.
I was like: Well, not so fast! I gotta make some calls!
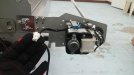
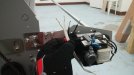
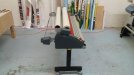
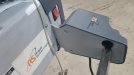
I called RS again and asked the tech, how can I hook up the RSWU motor to the laminator. He said there is no connection for it like on other laminators but sometimes techs plug in the motor to a regular 110V to test it. So i could just hard wire it to a regular 110v power source. I asked the tech what about the speed settings? He said not to worry about that. The cable coming out from the motor is only for the power. It does not get signaled about any speed. There is only 1 speed to the motor and the clutch will take care of the rest.
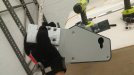
So I went to Home depot and after $30 dollars of metal bracket, bolts and nuts I was ready to do some magic.
Whatever you do, do it on your own risk! I do not want to be responsible whatever happens to you or your equipment
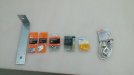
What you need:

1) Dremel or grinder ( not on the picture)
2)metal bracket (it needs to be 2" width and at least 7" long)
3)nylon lock nuts #10-24
4)machine screws #10-24 x 3/4 ( 1/2 might work too)
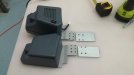
5)amp butt splices (12-10? not sure what is the number they go by. I was going by the visual size)
6) ft indoor extension cord. Something light weight with smaller diameter cords.
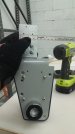
I bought the washer only for spacing but everything aligned up perfectly!
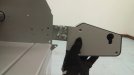
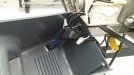
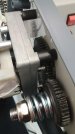
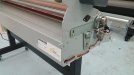
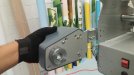
next step is to take off the side plastic panels. There are a few screws in the front and the back. nothing special.

we will use this 3 unused holes - one of the hole is smaller than the other two. drill it bigger to match the other 2 holes.

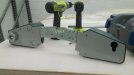
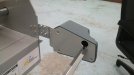
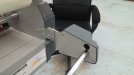
now take your metal bracket. Measure and mark 3.5". you need two of these

mark, drill - the metal brackets are nearly the same width as the piece they need to attach to. So just attach them perfectly parallel

For aesthetic purposes you should have the bolts face the other way around.
You will see later why

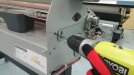
mark your holes. Make sure you having the bracket sitting parallel to the little triangle piece which is like half an inch under the bracket.

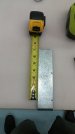
Once you have the marks measure one of the holes. Just one. Measure it from the shorter side and the longer side.
The left hole was 0.5 inch from the left longer side of the bracket. and around 3/4 inch from the top shorter side.

Measure and mark the same hole for the other bracket. Make sure you work mirrored. Always double check how these brackets will sit and face.

TO BE CONTINUE
Here is a Do-It-Yourself write up about marrying an laminator with an incompatible rear wind up assembly.
I just bought my new 1401cltw laminator and it didn't come with the rear wind up assembly. Called my supplier and they sent me the RSWU-1400A that was listed on their website as compatible with 1401 and 1402 laminators.
After receiving the rswu something looked odd. i called Royal Sovereign directly and spoke to a tech and they told me that there is NO rear wind up assembly available for the 1401CLTW.
I was really angry. If you ever worked with a laminator that has the rear wind up assembly you know that thing is a blessing.
Called my supplier. They looked in to it and called me back that they are really sorry and they will charge my card back and take care of the shipping.
I was like: Well, not so fast! I gotta make some calls!
I called RS again and asked the tech, how can I hook up the RSWU motor to the laminator. He said there is no connection for it like on other laminators but sometimes techs plug in the motor to a regular 110V to test it. So i could just hard wire it to a regular 110v power source. I asked the tech what about the speed settings? He said not to worry about that. The cable coming out from the motor is only for the power. It does not get signaled about any speed. There is only 1 speed to the motor and the clutch will take care of the rest.
So I went to Home depot and after $30 dollars of metal bracket, bolts and nuts I was ready to do some magic.
Whatever you do, do it on your own risk! I do not want to be responsible whatever happens to you or your equipment
What you need:
1) Dremel or grinder ( not on the picture)
2)metal bracket (it needs to be 2" width and at least 7" long)
3)nylon lock nuts #10-24
4)machine screws #10-24 x 3/4 ( 1/2 might work too)
5)amp butt splices (12-10? not sure what is the number they go by. I was going by the visual size)
6) ft indoor extension cord. Something light weight with smaller diameter cords.
I bought the washer only for spacing but everything aligned up perfectly!
next step is to take off the side plastic panels. There are a few screws in the front and the back. nothing special.
we will use this 3 unused holes - one of the hole is smaller than the other two. drill it bigger to match the other 2 holes.
now take your metal bracket. Measure and mark 3.5". you need two of these
mark, drill - the metal brackets are nearly the same width as the piece they need to attach to. So just attach them perfectly parallel
For aesthetic purposes you should have the bolts face the other way around.
You will see later why
mark your holes. Make sure you having the bracket sitting parallel to the little triangle piece which is like half an inch under the bracket.
Once you have the marks measure one of the holes. Just one. Measure it from the shorter side and the longer side.
The left hole was 0.5 inch from the left longer side of the bracket. and around 3/4 inch from the top shorter side.
Measure and mark the same hole for the other bracket. Make sure you work mirrored. Always double check how these brackets will sit and face.
TO BE CONTINUE
Attachments
-
 64705005.jpg30.7 KB · Views: 378
 -
 20160719_134505.jpg22.4 KB · Views: 289
 -
 20160719_134537.jpg42.2 KB · Views: 292
 -
 20160719_134541.jpg41.9 KB · Views: 296
 -
 20160719_135745.jpg37 KB · Views: 291
 -
 20160719_141816.jpg27.5 KB · Views: 296
 -
 20160719_143708.jpg39.2 KB · Views: 278
 -
 20160719_144059.jpg49.7 KB · Views: 296
 -
 20160719_144404.jpg42.2 KB · Views: 286
 -
 20160719_144552.jpg46.6 KB · Views: 285
")