• I want to thank all the members that have upgraded your accounts. I truly appreciate your support of the site monetarily. Supporting the site keeps this site up and running as a lot of work daily goes on behind the scenes. Click to Support Signs101 ...

Embroidery questions...

Moze

Precision Sign Services
I have some shirts I purchased off Amazon....60% cotton, 40% polyester, fairly thin.

I'm going to get my logo embroidered on them but don't have a clue what's needed for embroidering. I'm going to use a local shop, so they'll obviously know what's needed but I'd like to get a little educated ahead of time.


- Any reason those shirts wouldn't work for embroidering?

- What kind of digital file is required?

- Anything else I should be aware of?


Thanks!
 

JgS

New Member
You're all set. Your shirts sound fine. If they have a small thread count you may worries about your logo getting distorted.
But in most cases if the right stabilizer is used it will hold everything together.

As for the logo, a high res jepg with as little colors as possible will do fine. They will have software to convert it.
 

Moze

Precision Sign Services
Thank you for the response.

Attached a larger version of my logo. Does it contain too many colors? Any parts that won't work for embroidering?
 

Attachments

  • 3333 x 1598.jpg
    3333 x 1598.jpg
    39.3 KB · Views: 157

John Thomson

New Member
I think you may have to simplify your logo for it to be embroidered.........beveled fonts and colour fades are nice when printed but are not able to be embroidered.

Any vector file can be used by an embroiderer.

john
 

WildWestDesigns

Active Member
You're all set. Your shirts sound fine. If they have a small thread count you may worries about your logo getting distorted.
But in most cases if the right stabilizer is used it will hold everything together.

As for the logo, a high res jepg with as little colors as possible will do fine. They will have software to convert it.


Nooooo. No auto conversion. You want it to be digitized, not converted. A vast difference. The difference between live trace/power trace and manually tracing it with the pen tool. I can't tell you how many bad production files have come from auto conversion. The actually end look may be decent (I stress "may" here, even the expensive software I have will still mess up on the visual look if I let it convert to embroidery and if you don't know how to fix it, it will look bad embroidered), but the pattern itself might take 40 minutes to stitch out versus 20 (or less) due to lack of proper pathing. This happens and most people, even embroiderers don't realize that they are loosing money on the production floor (which is more money, then spending a little more on the one time fee of digitizing).

With regard to the amount of colors. That isn't an issue versus size and thickness of the objects of the design. Even if your machine only has 15 needles (translates to 15 colors), all you have to do is enter in a stop code and swap out the pre-determined slots for the new colors or some machines will stop for you already and tell you where to put the new colors. Yes, doing that extra bit will more then likely cost extra, but it can be done and easily, those that don't usually don't want to mess with it. I've done up to 22 colors for one pattern for a hat.

If they have a small thread count you may worries about your logo getting distorted. colour fades are nice when printed but are not able to be embroidered.


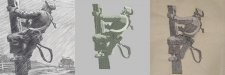
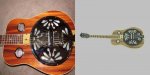
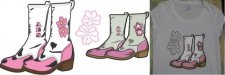
Actually they can look nice.

Attached are some that I've done. There are limitations to this though, but they can be done and can be done to look nice.

With regard to small stitch counts, that's not actually correct. If you have distortion, it's typically due to hooping technique, not enough (or right) type of stabilizer, or poor digitizing. Not utilizing underlay, stitch angles, and push compensations correctly depending on the type of fabric uses. Yes, type of fabric/weave plays an important part, which is why "one size" doesn't fit all with an embroidery pattern. Sometimes different needles, stabilizer and/or machine speeds can help, don't get me wrong, but it isn't advisable. However, if you are going to use multiple fabrics (and say hats as well (or think that you will eventually)), let the digitizer know now as it's easier to try to compensate for everything now, then it is later on after destroying garments. Think of an embroidery pattern as a printer profile.


Moze about your logo specifically:

For a normal logo crest. I would be worried about the size of "Sign Services". Thin small text (while it is block, which is good), doesn't really translate well, unless your embroidery shop also slows the machine down, uses a 65/9 needle and a lighter weight thread (which is available in white). Even then there might be some issues. Most don't like to change out though. This is just an initial look though, I would need to put it in my software to measure it at 1:1.

Now, I know I showed blends, but in this case, it won't work. The blend goes into too many objects that would actually look better as satin stitches, not fills. If you notice where I did the blending in the attached photos, those are fill stitches, not satin.

Beveling, like already mentioned, is going to need to go. Beveling and drop shadows, do not translate well into embroidery, regardless of how well they have been digitized.

The measure tick marks will also need to go, unless you want them to be running stitches, not really all that nice looking compared to satin stitches, but they do have their place. Just not here.

As to file formats, EPS 3 or 8 are safe as any high res raster file. One thing you have to keep in mind is that gradient information in vector formats doesn't translate into the embroidery view, if you want gradients or blends to be seen, it will have to be a high res raster file. It has to do with how the program does auto conversion, this is probably why some people think you can't do blends. It doesn't translate well through auto conversion, because vectors (which are typically the safest for auto conversion versus raster files) with gradients aren't typically read as efficiently by digitizing software (or sometimes totally ignored).

Now Moze, one thing that I would add out of concern for your comment here:

. I'm going to use a local shop, so they'll obviously know what's needed but I'd like to get a little educated ahead of time.

That's not always the case. Just like the sign industry, there are a lot out there that don't know what's going on. Why something doesn't look good, or why you wouldn't do this, that or the other etc.


EDIT to Add: I noticed the garments that you bought, if you bought the thin stuff, stabilizing and digitizing are even more important. Certain stitch angles on weaves without the proper amount of stabilizer will cause the fabric to do what we call "spooning". The pattern will be too dense and the center will bow inward and the edges will curl upward (like a spoon). This isn't good. Enough light weight tear away stabilizer can mitigate a stitch heavy design (yours will have quite a bit of fill stitching in it), but if those angles are at the same angles as the weave, it will take a lot of stabilizer to mitigate that.
 

Attachments

  • Garage.jpg
    Garage.jpg
    21.1 KB · Views: 120
  • Lineman.jpg
    Lineman.jpg
    31 KB · Views: 170
  • dobro.jpg
    dobro.jpg
    39 KB · Views: 116
  • Cowgirl boots.jpg
    Cowgirl boots.jpg
    30.3 KB · Views: 122
Last edited:

WildWestDesigns

Active Member
I took it into my software using your attached logo. Sizing the design at 3.9" width (scaled proportionally), which is the most that I would typically do on a logo crest, your small text comes in at .17".

Most fonts like to be upwards of .25"s. Some can handle .20"-.25", but only one can handle between .18"-.20" and that's a booger to get to look right.

I did attach the screen shot of a blown up "S" on the small copy, but you can't actually read the small measurement of the "S" that I've circled to show that it was at .17", but I can send that screenshot.

If you want that to be on there, it's going to need to be adjusted accordingly, it won't be able to be like how it appears though.
 

Attachments

  • Moze.jpg
    Moze.jpg
    64.5 KB · Views: 149

SightLine

║▌║█║▌│║▌║▌█
Listen to Evan (WildWest)..... this man knows what he is talking about when it comes to embroidery. I've learned quite a lot over the past few years and one thing I've learned for sure. Every logo is different and will need certain adjustments made. Yeah - that thin text. Change it to a thicker font - even add a stroke and expend that if you have to. Yes, it will not be quite "right" on the shirts but it will be embroidered fairly small and of course shirts have texture and movement which really mitigate someone noticing the minor changes. The logo will still be perfectly recognizable and 99% of people will not even notice that it is slightly different than usual. As mentioned, the bevels need to go. I'd also ditch the stroke on the name and all of the drop shadows. I'd probably thicken the gold border as well as the outer black border and the center vertical lines in the level and as Evan said the measure tick marks. Another option for those might be to reduce the quantity of them while making them a good bit thicker and a little more spaced out - not sure on that though - I'd have to play with them to see if they would still be recognizable for what they are. Ours was a bit simpler but still made some changes before I had Evan digitize it for us. As an example the attached shows our logo (somewhat newly redesigned by Bruce Bowers) as it is normally used and the bottom as modified for digitizing.

The first several I had digitized for customers for embroidery was trial and error. I've gotten a bit better now at figuring out what things would be best changed before I send one to Evan to digitize. Also as he mentioned, the number of colors really can be a lot but if you run a larger multihead embroidery machine - having to change threads in the middle of something can be a bit tedious and takes a bit of time. That will cost you. However most commercial machines are going to have 10+ needles and most logos will not need 10+ colors. We have a 4 head 15 needle machine of our own now and almost never have to remove the white, black, or red thread but if we had to do a 15 color job not using black, white, red - that is a good 30 to 45 minutes just to change out 60 spools of thread (getting 4 of every new color, putting all the current loaded thread on the rack, etc) and then threading 60 needles.... Another catch on multihead machines, for every color used you need a separate spool of thread for each of the machines heads. We have one customer who has 2 somewhat odd colors in their logo, we had to buy 8 spools (4 of each of the 2 odd shades of blue) of thread just to run their job. I've also learned in the past couple of years that we have to pretty much stock multiple types of stabilizer and keep some water soluble topping on hand. Cotswold has their Tech Weave cutaway one which we use now that was specifically designed for stabilizing the popular super thin moisture wicking sports fabrics. Works really well and some of those fabrics are getting thinner and thinner. Had some recently - felt like I was trying to hoop pantyhose!

Evan - nice examples! I see that spangler being put to good use on the last one. :thumb:
 

Attachments

  • sldemb-1.jpg
    sldemb-1.jpg
    69.5 KB · Views: 165

royster13

New Member
I have some shirts I purchased off Amazon....60% cotton, 40% polyester, fairly thin.

I'm going to get my logo embroidered on them but don't have a clue what's needed for embroidering. I'm going to use a local shop, so they'll obviously know what's needed but I'd like to get a little educated ahead of time.


- Any reason those shirts wouldn't work for embroidering?

- What kind of digital file is required?

- Anything else I should be aware of?


Thanks!

Do you allow your customers to supply their own substrates????
 

WildWestDesigns

Active Member
Another option for those might be to reduce the quantity of them while making them a good bit thicker and a little more spaced out - not sure on that though - I'd have to play with them to see if they would still be recognizable for what they are.

That might work. Might just do one section, space them out some more and thicken them up. The one thing that I would be worried about is if they accidentally blended with the bottom fill. Depending on how thick those tick marks are, they may or may not have underlay (if they do it would be a center run more then likely, edge runs you run the risk of underlay peeking out of the coverstitches when they are too thin). If they don't have underlay and if the stitch angle of the fill is the same as the lettering (0°), there is a good chance of blending.

Evan - nice examples! I see that spangler being put to good use on the last one. :thumb:

Thanks. For some reason, my favorite is still the Twisted Love one. Even did metallic thread for the barbwire and I hate working with metallic thread. That was also done on performance fabric and it too has blends (stems of the roses).
 

Attachments

  • Twisted Love.png
    Twisted Love.png
    818.4 KB · Views: 210

WildWestDesigns

Active Member
Do you allow your customers to supply their own substrates????

Unfortunately, there are a lot of differences between how y'all do things and how things are normally done in the embroidery industry. Some won't accept outside garments, the majority will. You have to understand though, that the risk of something happening to those garments or if you use one file on a multitude of different fabric types (also supplied by the customer), is all on the end customer. No promises on the final product if customer supplies a portion or all of the inputs.

If they don't have this stipulation, then customer supplied garments are usually charged vastly higher then if it's purchased through the embroiderer. Sometimes both.

It's just like doing digitizing (rather it's flat rate or by stitch count (what I do)), it doesn't matter if you work 5 minutes or 5 hrs on a design, it's the same price. Ironically our programs also cost vastly more then Adobe programs (you could get the perpetual license Master Suite new 5 times over and still have change versus what you would pay for the software that I use).
 

Moze

Precision Sign Services
Thank you all very much for the detailed responses, I really do appreciate you taking the time to explain things. It's an industry I (obviously) know nothing about and as suspected, there's a lot more that goes into it than I would have guessed.

Royster, it looks like your "????" was answered...
 

John Thomson

New Member
Now, I know I showed blends, but in this case, it won't work. The blend goes into too many objects that would actually look better as satin stitches, not fills. If you notice where I did the blending in the attached photos, those are fill stitches, not satin.

Beveling, like already mentioned, is going to need to go. Beveling and drop shadows, do not translate well into embroidery, regardless of how well they have been digitized.
Although I do embroider I am certainly no expert but after quick look at the logo in question it was clear that the colour fade and bevel were not something I could do.

john
 

WildWestDesigns

Active Member
Although I do embroider I am certainly no expert but after quick look at the logo in question it was clear that the colour fade and bevel were not something I could do.

john

What made me say what I did about blends is because I read your original comment like you couldn't do blends period on this or any other design. I could have read that wrong though. I agree with you that this one, it shouldn't be done, not that it couldn't be done, but on this one, with the way that it is design, it wouldn't translate well.

Bevels and drop shadows never translate well into embroidery, regardless of how well they are digitized. It has to do with the digitizing process and in the end, they just don't visually translate.
 
Top