• I want to thank all the members that have upgraded your accounts. I truly appreciate your support of the site monetarily. Supporting the site keeps this site up and running as a lot of work daily goes on behind the scenes. Click to Support Signs101 ...

First truck lettering with cut vinyl in panels

VinylLabs.com

New Member
Hey guys, I'd like to know your thoughts and tips/tricks on installing vinyl that has been cut in panels.

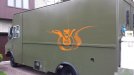
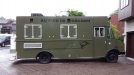
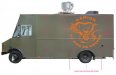
I have a job to do, where I am installing a very detailed 8x6 decal onto a truck, My cutter is 24" wide, so I have to cut in 4 strips. I'm planning on making a overlap of .5 inches.

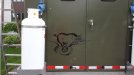
The job is very detailed (it has a distressed look, so lots of tiny holes and jagged edges)

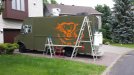
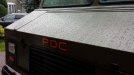
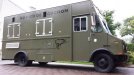
The truck has a trim from the front of the truck to the back, so I have cut the panels vertically (will be installing from top of truck, down)

what's the best way to line up the graphics? should I use the hinge method, peel back the top then squeegee it downwards? will the vinyl line up all the way down? I'm using avery a7 orange, and Ive attached a picture.

any tips or tricks would be appreciated, like i mentioned its my first multi-panel job I've accepted, and even though the job is 11 yards, I only have 17 yards left in stock for the weekend.
 

Attachments

  • Untitled-1.jpg
    Untitled-1.jpg
    29.6 KB · Views: 99

Malkin

New Member
I would use horizontal seams, not vertical, and install the bottom one first, then work up. 1/2" seam is probably over kill, we usually use 1/8" on cast vinyl, though 1/4" might be ok too.

Further, in this design you only need to seam the logo art, all the copy can be cut seamless, just break apart the arcs and rotate to fit as much as possible on your 24" roll, you might even use less vinyl this way. Proper use of little registration point will help you reassemble the design with no guess work.
 

Fred Weiss

Merchant Member
This is a .1" overlap of 11.5" panels using cast Edge printed 3M vinyl applied from the bottom up.

394Gas_Grill_Van_07.jpg

The trick for getting it to line up perfectly is to mask each panel leaving about .25" unmasked at the bottom of the second panel and all above it for visibility and then applying it with a wetting solution. If you're using air release film, apply it dry. Use a soft squeegee for the overlap and then work up from the overlap on the masked portion with a normal squeegee.

As you can see, it lines up perfectly.
 

VinylLabs.com

New Member
I would use horizontal seams, not vertical, and install the bottom one first, then work up. 1/2" seam is probably over kill, we usually use 1/8" on cast vinyl, though 1/4" might be ok too.

Further, in this design you only need to seam the logo art, all the copy can be cut seamless, just break apart the arcs and rotate to fit as much as possible on your 24" roll, you might even use less vinyl this way. Proper use of little registration point will help you reassemble the design with no guess work.

Thanks Malkin, I ended up cutting them in horizontal strips like you mentioned. One of the seams was on the moulding, so I moved it up, and now the bottom panel should cover the moulding.

I will try to install it as you mentioned. The good news is that I now have a backup! As I mentioned the job was supposed to be 11 yards, leaving 6 yards of backup orange in case I mess up, instead I used substantially less vinyl than I expected, which has given me a bit of a confidance boost.

This is a .1" overlap of 11.5" panels using cast Edge printed 3M vinyl applied from the bottom up.

View attachment 90584

The trick for getting it to line up perfectly is to mask each panel leaving about .25" unmasked at the bottom of the second panel and all above it for visibility and then applying it with a wetting solution. If you're using air release film, apply it dry. Use a soft squeegee for the overlap and then work up from the overlap on the masked portion with a normal squeegee.

As you can see, it lines up perfectly.


I wish I had seen your post, Fred, before I masked them :( I will attempt to line up the bottom as you have described, but with the masking still on the bottom.

Crossing my fingers, the truck should be here in half an hour!
 

phototec

New Member
Two things are very important, the proper layout for the best yield of material and second application registration. As mentioned already, horizontal panels starting at the bottom will be better for this job due the the raised trim that runs horizontal near the lower part of the graphic.

I would cut the panels as shown in my attached examples which include small diamond shape registration marks used to aid in alignment during application, they can later be removed.

The bottom panel will need to be installed FIRST because of the raised trim along the side panel, then apply the next panel working your way up the side and aligning the diamond registration marks on top on the first ones, you can make the overlap what ever you want, I would do 1/4". In my example, I allow 1-1/2" over lap of the panels to allow space for the diamond reg marks.

Another tip if using regular app tape, is to cut the diamond in half for the second and following panels, this allows you to align the diamonds better because the app tape is not transparent.

My layout only requires 20' of material at 24" wide, if I understand the graphic is 8' wide and 6' tall.
 

Attachments

  • Panels with diamond reg marks.jpg
    Panels with diamond reg marks.jpg
    53.5 KB · Views: 93
  • Panels with diamond reg marks applied to truck.jpg
    Panels with diamond reg marks applied to truck.jpg
    52.7 KB · Views: 74

French guy

New Member
Un voisin proche

Salut je suis de la rive sud de Montréal et j'ai un coupeuse de vinyle de 48'' si tu veux l'utiliser tu es le bienvenue

Merci

Mario
 

VinylLabs.com

New Member
Salut je suis de la rive sud de Montréal et j'ai un coupeuse de vinyle de 48'' si tu veux l'utiliser tu es le bienvenue

Merci

Mario

Merci beucoup Mario, mais j'ai coupé tous ;) maintnant il reste que je appliqure tous les decals!

on a side note, I started to get a mini panic attack because I started washing the truck, and when I went to wipe down with IPA, it ate away at the paint. I think the paintjob was done with a spraycan, or rolled on :( the area I applied IPA (back door) looks faded.
 

VinylLabs.com

New Member
Hi guys! Just following up.

I did the lettering over the weekend. the lip on the side of the truck killed me! ha! I wet installed it, but it kept on lifting up with the transfer tape and was really a pain in the back. the strip runnign the lenth of the moulding took twice as long to install as the other three parts.

I'm proud on how well I got the panels to line up, I made a mistake of accidentally leaving out the registration marks, but they came out perfectly.

The client is really happy and came over the next day to pick it up. I was really excited about this job. I don't have a picture with the "camion" on top, since it started to rain, I installed it after the rain died down. Thanks for all the help guys!

How much would you have charged for this job?
 

Attachments

  • 2013-06-15 19.10.27_resize.jpg
    2013-06-15 19.10.27_resize.jpg
    61.6 KB · Views: 97
  • 2013-06-16 10.52.52_resize.jpg
    2013-06-16 10.52.52_resize.jpg
    36.5 KB · Views: 86
  • 2013-06-16 12.23.34_resize.jpg
    2013-06-16 12.23.34_resize.jpg
    74.4 KB · Views: 98
  • 2013-06-16 14.21.10_resize.jpg
    2013-06-16 14.21.10_resize.jpg
    48.4 KB · Views: 75
  • 2013-06-16 14.21.26_resize.jpg
    2013-06-16 14.21.26_resize.jpg
    42.5 KB · Views: 99
  • 2013-06-16 14.23.44_resize.jpg
    2013-06-16 14.23.44_resize.jpg
    65.5 KB · Views: 83
  • 2013-06-16 14.24.08_resize.jpg
    2013-06-16 14.24.08_resize.jpg
    43.5 KB · Views: 86
  • 2013-06-16 14.24.27_resize.jpg
    2013-06-16 14.24.27_resize.jpg
    58.8 KB · Views: 105
  • 2013-06-16 14.24.45_resize.jpg
    2013-06-16 14.24.45_resize.jpg
    52.6 KB · Views: 87

splizaat

New Member
Looks good...great job man. The good thing about logos that are very dirty and grungry or very detailed with jagged edges, etc is that if something doesn't line up PERFECT, you can always knife it so it lines up and with a million jagged lines, the chances anyone will notice are slim.

stick to a .25" overlap or smaller as suggested here and horizontal panels.
 

VinylLabs.com

New Member
Looks good...great job man. The good thing about logos that are very dirty and grungry or very detailed with jagged edges, etc is that if something doesn't line up PERFECT, you can always knife it so it lines up and with a million jagged lines, the chances anyone will notice are slim.

stick to a .25" overlap or smaller as suggested here and horizontal panels.

Thanks Man,

I didn't even have to trim any of the overlaps! I've settled on beginners luck ;) they are overlapped 0.200inches.
The only thing I'm worried about now, as someone mentioned in the portfolio board) is the client pressure washing the truck.
 
Top