bolt 2" aluminum angle to the structure and weld angle to the aluminum backer and run a self tapper to mate them.
I prefer this method over the store-bought cleats. It is easy and quick. And if you don't want a 2-inch standoff, use 1-1/2" angle. Use heavy angle such as 1/4-inch wall.
A middle cleat may not be necessary, especially since a .090" backer is being glued to the back of the HDU, stiffening it considerably.
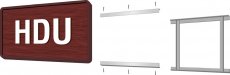
Further, the two cleats that mount to the wall can be made into a one-piece H-frame that can be attached to the wall as a unit, as in the drawing below. Once the H-frame is secured to the wall, the sign is mounted to the frame. The H-frame eliminates the necessity of making careful vertical measurements on the wall in an effort to make sure that all mating pieces line up.
In the picture, the two pieces that attach to the back of the sign can be flipped, so that the vertical leg on the top piece points up and the vertical leg on the bottom piece points down. I should have drawn it this way to begin with, but this was an improvement that was made after the design was done years ago. Flipping the pieces allows you to use 'structural' angle instead of the more expensive 'architectural' angle. 'Structural' has an inside radius the length of its inside corner that would prevent the mating pieces from nesting closely if installed the way I've drawn it. Structural angle is also stronger than architectural.
This entire assembly can actually be built and mounted on the back of the sign in the shop. Before the two independent angles are mounted permanently to the back of the sign, pre-attach them to the top and bottom of the frame with TEK screws, then attach the entire unit to the sign back. If you use Lord adhesive or some other high bond glue for the permanent bond, be careful that the removable part, the H-frame, does not get accidentally glued to the back along with the independent top and bottom pieces. At the job site, simply remove the frame from the back of the sign and mount it by itself to the wall, making sure it's plumb and level. Then slide the sign onto the frame and put the TEK screws back in place from top and bottom. If the frame is mounted level, the sign will be level. It may help to use an extension driver for putting the screws back in.
This method of installation has the additional advantage that it circumvents any problem caused by uneven bricks.
Another point. For the vertical pieces of the frame, use smaller dimension angle, say 1-1/4" or 1", so they don't prevent the back of the sign from resting flush against the bigger top and bottom angle pieces of the H-frame.
It is possible that there would be no room to easily access the sign from the bottom to drive screws, perhaps because the sign is to be mounted low on the wall or a planter is in the way. In this event, the H-frame can be reconfigured so that the vertical pieces of the H are closer to the side edges of the sign, allowing TEK screws to be driven in from the sides and top instead of the bottom and top. This would mean, of course, pre-gluing vertical lengths of mating angle on the sign back near its side edges.
Using a back frame like I've described shortens the time spent on site. Installers like it, especially in cold weather.
Brad