• I want to thank all the members that have upgraded your accounts. I truly appreciate your support of the site monetarily. Supporting the site keeps this site up and running as a lot of work daily goes on behind the scenes. Click to Support Signs101 ...

Half of our black just dropped out

TimToad

Active Member
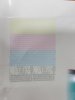
The other day after a routine day of printing, I noticed some print/cut prints that should have been a rich black were a little banded so I ran a test print and this is what popped up.

Its a Roland VP-540 VersaCamm and I have a caps and damper kit on hand if anybody thinks it could be one of those that is causing this. I've done a few machine and manually head cleanings and its not getting any better.
 

Attachments

  • 20180708_112619.jpg
    20180708_112619.jpg
    864.2 KB · Views: 259

Solventinkjet

DIY Printer Fixing Guide
Yeah start with the cap and change the dampers if they are over a year old. It's probably just time to do some preventative maintenance.
 

TimToad

Active Member
Yeah start with the cap and change the dampers if they are over a year old. It's probably just time to do some preventative maintenance.

Thanks, we had subscribed to the "if it ain't broken, don't fix it too much" mindset for too long. Any important tips on changing all of them out that isn't on a few of the videos I see out there?
 

Solventinkjet

DIY Printer Fixing Guide
Thanks, we had subscribed to the "if it ain't broken, don't fix it too much" mindset for too long. Any important tips on changing all of them out that isn't on a few of the videos I see out there?

Dampers: Mostly make sure to change out the o-ring on the damper between the damper and ink line and don't drop the o-ring! Use a screwdriver as a lever to push the damper off the head as straight as you can so it doesn't break the manifold. Wet the nipple on the manifold with cleaning solution before installing the new damper so it slides on nice and smooth.

Cap tops: There is a proper orientation for the cap to be installed so just compare to the ones next to it before latching it down. Forceps work very well to grab the tube of the new cap top to pull it through to where you need it. Otherwise it can be difficult. While you are in there you might as well flush cleaning solution through the pump tubes to make sure they aren't clogged. Wet the cap top after it's installed to make a good first seal. Also, clean the bottom of the head to make sure where the cap top meets the bottom of the head is nice and clean but avoid the nozzles.
 

TimToad

Active Member
Dampers: Mostly make sure to change out the o-ring on the damper between the damper and ink line and don't drop the o-ring! Use a screwdriver as a lever to push the damper off the head as straight as you can so it doesn't break the manifold. Wet the nipple on the manifold with cleaning solution before installing the new damper so it slides on nice and smooth.

Cap tops: There is a proper orientation for the cap to be installed so just compare to the ones next to it before latching it down. Forceps work very well to grab the tube of the new cap top to pull it through to where you need it. Otherwise it can be difficult. While you are in there you might as well flush cleaning solution through the pump tubes to make sure they aren't clogged. Wet the cap top after it's installed to make a good first seal. Also, clean the bottom of the head to make sure where the cap top meets the bottom of the head is nice and clean but avoid the nozzles.

Thanks for the help. The kit I purchased included new pump tubes so I was planning on replacing them all. It looks like my weekend project is all planned.

Unrelated question: Do you all sell anything for GERBER Solara ION flatbeds?
 

Solventinkjet

DIY Printer Fixing Guide
Thanks for the help. The kit I purchased included new pump tubes so I was planning on replacing them all. It looks like my weekend project is all planned.

Unrelated question: Do you all sell anything for GERBER Solara ION flatbeds?

We don't do anything with Gerber.

Good luck and have fun!
 

TimToad

Active Member
We don't do anything with Gerber.

Good luck and have fun!

Oh, I hear ya on that. We inherited the printer when we bought the business knowing about its end of life predicament. For what we paid for it, we've made our investment back in huge multiples over four years time. We've kept it running well and for its age it actually performs as well as we could ever expect.

We're just trying to milk it until we know all the parts and ink supply runs out.

Looking at a Mimaki JFX200 as a replacement at some point, but not sold yet on any particular brand.
 

Andy D

Active Member
Yeah start with the cap and change the dampers if they are over a year old. It's probably just time to do some preventative maintenance.

Vander, do print heads in printers like Roland or Mimaki ever have voltage issues? Different printer, but his black nozzle test looks similar to mine, when I have to increase voltage on a UV head.
 

Solventinkjet

DIY Printer Fixing Guide
Vander, do print heads in printers like Roland or Mimaki ever have voltage issues? Different printer, but his black nozzle test looks similar to mine, when I have to increase voltage on a UV head.

I hear about people who run dye sub inks adjusting voltages on their machines but I'm not sure what that entails. The only Mimaki, Roland, Mutoh printers I have been trained on that covered changing voltages were the UV printers. Most of the DX series heads have set voltage requirements to fire but the thing that changes is the wave form of the signal which the firmware controls. So Mimaki Roland and Mutoh kind of assume you are running solvent or aqueous inks and adjust the wave form in the firmware accordingly.
 
Top