• I want to thank all the members that have upgraded your accounts. I truly appreciate your support of the site monetarily. Supporting the site keeps this site up and running as a lot of work daily goes on behind the scenes. Click to Support Signs101 ...

** Help ** Mimaki JV33 clogged printhead {pics}

oggy

New Member
Hi everyone

I have a Mimaki JV33 printer which has a clogged black printhead. When I do a test draw the black is misaligned and is over spraying. The other colors are fine though.

I'm running standard Eco ES3 OEM inks with the original printhead. I bought the printer new in 2012 and have only printed 1000m2 since then. I've had the printer serivced once since then with a new capping station and wiper blade.

I don't use my printer alot so I'm thinking what might have happened is that the black ink has dried up with little use?

I've tried multiple hard cleans and 2 overnight/socking nozzle washs but with no success. I get the same test draw everytime.

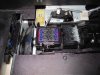
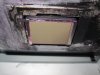
I know my printer looks a little dirty but even after I clean it, it still has the same problem.

I print mostly billboards so I can get away with having it like this (its been like this for 4 months), but when I do a job that requires small text the black looks horrible.

I've read about something to do with manual flashing with clean solution with a syringe through the printhead, but I coudn't find any instructions relating to the JV33.

Any help is appreciated :)
 

Attachments

  • clogged-black.jpg
    clogged-black.jpg
    110.8 KB · Views: 1,534
  • clogged-blackclose-up.jpg
    clogged-blackclose-up.jpg
    555.3 KB · Views: 1,280
  • head.jpg
    head.jpg
    450.8 KB · Views: 2,380
  • head2.jpg
    head2.jpg
    303.5 KB · Views: 1,577

heyskull

New Member
By the looks of things the head is not sealing properly against the cap. I would clean all the dried ink around the head.
For starters I would replace the cap top and make sure the pump is pulling through as the drain pipes can get blocked on the cap.
I have found that you have to deal with any missing nozzles quickly or the nozzles will block completely.
If it has been blocked for a while you may have to replace the head.

Manually flushing the print head comes with its issues as you can damage the print head completely if you don't know what your doing.
I personally have never manual flushed a DX5 head and I wouldn't be flushing it unless I had a spare one to replace it with as you wouldn't want to be left with no printer.

SC
 

SightLine

║▌║█║▌│║▌║▌█
If 2 overnight soaks did not clear it I'm not sure that much of anything else will. Manually flushing a DX5 head is risky as mentioned and not the same as flushing the older DX4 heads. Since you have already replaced the capping top I'd personally think that would not be the issue although it is possible. First of all you definitely need to keep things a LOT cleaner. It only takes 5 to 10 minutes to clean around the bottom of the head and head plate and around the capping station area. If they have never been replaced it might be time to replace the dampers for one and check that all the fittings are snug - don't over tighten them as they could deform the o-ring and cause leaks but if any have come a little loose than you could have a tiny leak allowing some air in which can cause dropouts. You can pull the lower cover around the capping station to inspect the pump and lines between the pump and the waste tank. Probably use a small bright flashlight and do a disway wash and you should see the fluid flowing through.

If you really want to manually try to flush the head, you will need to remove all the dampers and the head from the machine. Then you will need a DX4 head style damper, some tubing of the right size, a solvent resistant syringe and some cleaning fluid. You just push the damper onto the nipple on the manifold and VERY SLOWLY push cleaning fluid through the head. Removal of the head is not terribly hard to do but you have to be extremely careful to not damage anything and also must be very very careful not to damage or crease the 2 flat cables going to the head. If you fold those cables too hard right where they turn to plug into the head the thing wires inside will break and you will need a new pair of head cables.
 

Vinylman

New Member
Excellent example f posting a question!

Let me start by saying THANK YOU for doing such a thorough description WITH GREAT PICTURES to begin your request for assistance. This post would make a great mandatory read for ALL BEGINNERS regardless of the subject.

One of my pet peeves is poorly written questions with gaping holes in the description and wonky photos.

I think that the basic instructions that "heyskull" provided are great advise. IF, you are not VERY FAMILIAR with the cleaning process yourself, you can cause irreversible damage to the printhead by being overly aggressive with the syringe cleaning process.

Again IF you are very careful, and go S L O W L Y , you may be able to manually push cleaning solution down though the manifold on top of the printhead with a syringe and a short section of clear tubing attached to the nipples where the black dampers would be normally attached. Remove ONE BLACK DAMPER, put your tubing attached to a medium sized syringe onto the exposed nipple, and SLOWLY, GENTLY apply LIGHT pressure to the plunger on the syringe. BE VERY CAREFUL WITH THE NIPPLES they can crack causing additional difficulties.

ANOTHER TRICK I have used successfully is to move the print head all the way to the opposite side from the docking station [ where you should be doing the bottom of the head cleaning on a REGULAR BASIS] and GENTLY take a NEW foam swab SOAKED with fresh cleaning solution. First GENTLY clean around the perimeter of the print head [see your photo 4] the metal ONLY. Then take another NEW foam swab SOAKED with cleaning solution and PAT the print head surface. This action would be similar to "daubing" up and down on a flat surface. DO NOT SCRUB!!! DAUB ONLY. Leave the head wet, and return it to the docking station and do several HARD clean cycles. TEST PRINT and repeat till nozzels are clear.
 

AnthonyRalano

New Member
SolventInkJet has syringes for $6 if you do have to go that route. Grandma's diabetes syringes just don't work that well.
 

oggy

New Member
WOW! Thanks for all the helpful and fast responses.

I gave it a good clean again and then did what Vinylman suggested where you pat/daub the print head with a socked cotton swab. I did this three times with hard cleans after. It's still giving me the same test print everytime. I even did a few more nozzle washes for 10mins each with no successes.

The other suggestions are probably a little too advanced for me. I might have to get it serviced again with an experienced technician and let them decided if I need a new print head or not.

In the mean time I just have to avoid printing anything in black or just stick to doing billboards. :Big Laugh

Again, thanks for all the help. It's a great community here!
 

Vinylman

New Member
WOW! Thanks for all the helpful and fast responses.

I gave it a good clean again and then did what Vinylman suggested where you pat/daub the print head with a socked cotton swab. I did this three times with hard cleans after. It's still giving me the same test print everytime. I even did a few more nozzle washes for 10mins each with no successes.

The other suggestions are probably a little too advanced for me. I might have to get it serviced again with an experienced technician and let them decided if I need a new print head or not.

In the mean time I just have to avoid printing anything in black or just stick to doing billboards. :Big Laugh

Again, thanks for all the help. It's a great community here!

oggy: please tell us that you DID NOT use a "COTTON SWAB". The only recommended swab should be a soft FOAM swab. A cotton swab can and probably will leave small cotton fibers behind after using these to clean with. The fine threads, can easily get up into the fine nozzle holes in a print head, and render it useless.


Another possible solution to your clogged head. If you can purchase a pint can of a solvent known as MEK, Methol Ethol Ketone. Sometimes available from commercial paint suppliers. I have used this successfully several times.

Take a syringe filled with MEK. Do a typical maintenance procedure as manual suggests prior to your nightly shut down { before going home overnight}. BEFORE final docking of the print head fill the docking station as usual EXCEPT!! instead of pushing the function key TWICE to fill the docking station, ONLY PUSH "FUNCTION" ONCE. This will partially fill the docking station with factory cleaning solution. Now top off the docking station with the MEX from the syringe, and follow the normal docking sequence. Once the machine has returned to the docking station, turn the printer OFF. leaving the docking station in a full, sealed position. You DO NOT want the pump to remove the solution at this time. When you restart the printer in the morning go through your normal start up procedure, and do a test print. IF this works, it is because the MEK is a VERY STRONG and agressive solvent. It will also dry out VERY QUICKLY if left open to the atmosphere, this is why it is so important to add it as the last step before shutdown. That way, the custom solution you put in the docking station will be "sealed in" overnight to break down the dried ink that seems to be causing your head blockage. Hope this helps.

Please let the board know if this helps or not, the information MAY help someone else in the future.
 

oggy

New Member
oggy: please tell us that you DID NOT use a "COTTON SWAB". The only recommended swab should be a soft FOAM swab. A cotton swab can and probably will leave small cotton fibers behind after using these to clean with. The fine threads, can easily get up into the fine nozzle holes in a print head, and render it useless.


Another possible solution to your clogged head. If you can purchase a pint can of a solvent known as MEK, Methol Ethol Ketone. Sometimes available from commercial paint suppliers. I have used this successfully several times.

Take a syringe filled with MEK. Do a typical maintenance procedure as manual suggests prior to your nightly shut down { before going home overnight}. BEFORE final docking of the print head fill the docking station as usual EXCEPT!! instead of pushing the function key TWICE to fill the docking station, ONLY PUSH "FUNCTION" ONCE. This will partially fill the docking station with factory cleaning solution. Now top off the docking station with the MEX from the syringe, and follow the normal docking sequence. Once the machine has returned to the docking station, turn the printer OFF. leaving the docking station in a full, sealed position. You DO NOT want the pump to remove the solution at this time. When you restart the printer in the morning go through your normal start up procedure, and do a test print. IF this works, it is because the MEK is a VERY STRONG and agressive solvent. It will also dry out VERY QUICKLY if left open to the atmosphere, this is why it is so important to add it as the last step before shutdown. That way, the custom solution you put in the docking station will be "sealed in" overnight to break down the dried ink that seems to be causing your head blockage. Hope this helps.

Please let the board know if this helps or not, the information MAY help someone else in the future.

I did use a foam swab, I just called it a cotton swab.

I managed to get hold of some MEK solvent but unfortunately it has made the problem worse! The other colors have now become clogged. I tried doing regular cleans but with no luck.

Thanks for your help vinylman. I will get a professional technician to come have a look and will report back what they say.
 

oggy

New Member
## update ##

I got a qualified technician to come and inspect it. He opened it up and manually did the cleaning solution through the print head. He did it twice but was unable to unclogged the black nozzels. The technician told me I needed a new print head.

The other colors (CMY) unclogged by themselves after a week. So I'm just left with the black nozzels clogged.

I'm going to just run the printer as is (doing mostly billboards) until it fully fails then I'll get a new printhead.

Thanks to members who helped me out on this issue. Cheers.
 

Neil

New Member
If the black nozzles still look like the first pictures, then they're not too bad. Mostly firing but with some deflecting.
I'd reckon they will come back if you nurse them a bit.
Get some cleaning solution. NOT MEK it evaporates too quick and will destroy most everything.
Use it to clean your wiper. Change the wiper if it's old.
Clean your cap top. Change it if it's old.
Clean under the head. I use a signwriting brush ( a no. 10 sable ) soaked with cleaning solution and brush clean solution across the bottom of the head lightly to wet the nozzles. Don't worry, it is less harsh than the dirty wiper dragging across the head.

Fill the cap every night with the solution. Do a clean next morning and keep cleaning the cap top and head and wiper every day. Remove the black front cover to check the pump is working properly.
 

b6hs

Sign
I got a qualified technician to come and inspect it. He opened it up and manually did the cleaning solution through the print head. He did it twice but was unable to unclogged the black nozzels. The technician told me I needed a new print head.

The other colors (CMY) unclogged by themselves after a week. So I'm just left with the black nozzels clogged.

I'm going to just run the printer as is (doing mostly billboards) until it fully fails then I'll get a new printhead.

Thanks to members who helped me out on this issue. Cheers.

What a surprise !! Lol

your printhead look pretty good, do not think you need to change it
 
Last edited:

Out There

New Member
I had a similar looking test print for a couple months this winter. No matter what I did nothing fixed it. Just kept printing and spring arrived and the humidity went up...bang perfect test print.

These printers can be severely finicky :)
 
Top