• I want to thank all the members that have upgraded your accounts. I truly appreciate your support of the site monetarily. Supporting the site keeps this site up and running as a lot of work daily goes on behind the scenes. Click to Support Signs101 ...

HP L25500 Half of print blurry/not enough ink?

seattle

New Member
Hello, I have a problem (well many :)) besides the fact that this machine cannot match itself regarding colors.

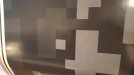
I am printing but the left half of the print is blurry and or not enough ink, the right half is ok. This is consistant on what I am trying to print. Ill attach some pictures.


Does anyone have any ideas? I tried heat thinking it was too hot, but it did nothing either way.

Thanks for any suggestions in advance
 

Attachments

  • 20180522_171657.jpg
    20180522_171657.jpg
    3.5 MB · Views: 210
  • 20180522_171654.jpg
    20180522_171654.jpg
    4.1 MB · Views: 162
  • 20180522_171651.jpg
    20180522_171651.jpg
    4 MB · Views: 171

ddarlak

Go Bills!
did you try different material? sounds like either heaters on one side is fading but more likely material is contaminated.
 

seattle

New Member
Hmm brand new foll or Arlon, but arlon sometimes is crappy. Ill check out new material, thanks for the tip
 

spooledUP7

New Member
This could be several things, and you didn't mention if this is an ongoing thing or just happened so it's hard to pinpoint what is going on. You also don't mention if this is just on one material or all.
Here is what I would do. What rip are you using too? I like that you are using the color bars, but where are the LM LC bars? If they are running inline with the CM then that may explain why the CM bars look a little fuzzy.
  1. Make sure my vacuum system is working 100%.
    1. Check the Ink Maintenance Kit for blockage in the tubes
    2. Check the vacuum filter
    3. Check the vacuum chamber for ink
    4. Is the ink funnel overly dirty?
  2. Inspect the drying system
    1. Are all the top fans spinning?
    2. Are there any obstructions within the fan units such as dust build up?
  3. Look at you output profile
  • This is where the rabbit hole begins, but it could explain your issues.
  • Try using HP Permanent Gloss Vinyl. This profile seems to work best
  • 10 pass bi-directional low ink
  • Create a preset of this profile before making any adjustments and only save adjustments to this preset. Name it whatever floats your boat.
  • Run a sample print as a baseline. Did it print perfect? If yes, then don't change a thing and just call it done. If no, then let's continue.
  • If it was crap then go back to your old profile, but if it was close then lets dial it in.
  • Pass count, directional and ink volume are going to greatly affect speed, clarity, and media ink saturation. A rule of thumb for me is protect the print heads from dying while getting the best print.
  • You need heat to dry the ink. The fuzzy edges can be caused by a lower temp on the left side of the printer. Raising the temp should fix this, but at the expense of heating the heads. So, I like to look at things that help either reduce temps or reduce the time the heads are under the heater.
  • A 10 pas bi-directional low-ink setup with 50c drye, 116c curing, 25-29mmH2C, Double P/H cleaning on would be a good starting place. This drastically lowers the drying temp while giving your print time to dry before the next pass. If you still see blur then try adding some Interpass delay. This will pause the print head carriage at both ends adding time for the ink to set. Just a warning though, doing this mid print may cause a visible change in the print so I recommend doing it on a test piece.
  • Run small runs. If you are doing a vehicle wrap or large long print I like to run them in chunks vs all at once. It seems that the small amount of time between one job finishing and the other beginning gives the heads time to cool and thus saves the print heads.
  1. Update the printer firmware. There may have been some quality control updates with newer firmware.
 
Top