• I want to thank all the members that have upgraded your accounts. I truly appreciate your support of the site monetarily. Supporting the site keeps this site up and running as a lot of work daily goes on behind the scenes. Click to Support Signs101 ...

HP26500 - warrior media jam, advice?

MikePro

New Member
always have an issue loading clear media. pinch rollers always find a way to catch the sticky-side and start peeling the material from the backing, which I've caught before & stopped the printer from loading.
BUT
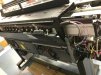
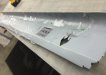
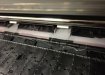
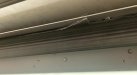
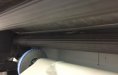
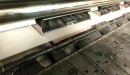
this time, during the media feed calibration, vinyl got caught-up in the rollers & fed backwards into the printer, jammed, and after removing the media it left a 12"x54" strip of clear vinyl INSIDE of the machine and I cannot get it out!!!!:frustrated:

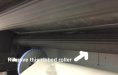
now the vinyl is just barely sticking out (and stuck-on) to the pinch rollers and barely dangling out the bottom where the media feeds-in.
are there any advanced-topics for substrate jam removal that I should be looking into?
pics attached, for reference, but it ain't pretty :(
 

Attachments

  • Screen Shot 2015-06-24 at 2.07.02 PM.jpg
    Screen Shot 2015-06-24 at 2.07.02 PM.jpg
    56.7 KB · Views: 59
  • Screen Shot 2015-06-24 at 2.06.57 PM.jpg
    Screen Shot 2015-06-24 at 2.06.57 PM.jpg
    25.9 KB · Views: 57
  • Screen Shot 2015-06-24 at 2.06.51 PM.jpg
    Screen Shot 2015-06-24 at 2.06.51 PM.jpg
    23.4 KB · Views: 57
  • Screen Shot 2015-06-24 at 2.06.44 PM.jpg
    Screen Shot 2015-06-24 at 2.06.44 PM.jpg
    48.2 KB · Views: 52

MikePro

New Member
awesome, managed to get most of it out but there's definitely a chunk still stuck to the backside of the loading-side and my fingers are too fat to get in and peel it out.
...which is why I'm still getting errors from the machine telling me that the media is loaded incorrectly... without any media being loaded! :frustrated:

any tips out there to get inside this beast and clean out this mess?
 
It is difficult to visualize where the jam is, based on your description, but if it helps, you can easily remove the ribbed black roller to gain better access to the area where the media enters the media path (see crude attachment for which roller I am referring to).

At the left side of the printer (control panel side) just in front of the roller you will see a small lever in the vertical (up and down) position. Flip this to horizontal, and you should be able to gently move the roller forward on the left side of the printer. Once it is clear of the housing, you should be able to pull it off the pin at the right side of the printer, and set it aside. Hopefully that gives you more access to the media jam. After the jam is cleared, put it back in place in the inverse order.

Just be gentle, as some of the parts inside of the roller are plastic and can snap if you force it when removing it - don't ask me how I learned this...hope this helps.
 

Attachments

  • loadroller.jpg
    loadroller.jpg
    49 KB · Views: 52
You just have to remove panels. I can send you a tech manual. That HP uses to fix that machine. It will tell you how to remove and put together everything on the machine.
 

MikePro

New Member
thanks guys! yeah, this is beyond simply pulling vinyl out of the machine anymore... it is applied & torn/webbed all over the media feed channel/intake-tray and most likely applied over the top of whatever sensor that detects media as you feed it in.
taking it apart wouldn't be the worth thing in the world. a PITA, i'm sure, but its the only option I have for a quick turn-around.
 

MikePro

New Member
$350 to simply show-up and +$700 just to get them in before the 4th of July.... and $175/hr after that.
guess that means I'm putting on my service-tech pants and gettin' it done myself! :supersmilie:wish me luck!
 

Attachments

  • Screen Shot 2015-06-26 at 12.28.07 PM.jpg
    Screen Shot 2015-06-26 at 12.28.07 PM.jpg
    69 KB · Views: 68
  • Screen Shot 2015-06-26 at 12.28.00 PM.jpg
    Screen Shot 2015-06-26 at 12.28.00 PM.jpg
    70 KB · Views: 65

MikePro

New Member
found the gremlin, and am currently throttling its neck!
tore up the machine a bit to get the "Center Guide" out & cleaned-up, along with the Media Sensor who's lever was stuck in the "ON" (or media-in) position thanks to the vinyl plastered all-over it.

now for the fun-part. ....putting it back together!

attachment.php
 

Attachments

  • Screen Shot 2015-06-26 at 3.32.44 PM.jpg
    Screen Shot 2015-06-26 at 3.32.44 PM.jpg
    37.8 KB · Views: 81
  • Screen Shot 2015-06-26 at 3.32.30 PM.jpg
    Screen Shot 2015-06-26 at 3.32.30 PM.jpg
    74.4 KB · Views: 65
found the gremlin, and am currently throttling its neck!
tore up the machine a bit to get the "Center Guide" out & cleaned-up, along with the Media Sensor who's lever was stuck in the "ON" (or media-in) position thanks to the vinyl plastered all-over it.

now for the fun-part. ....putting it back together!

attachment.php

Not to bad when you know what to take apart right. Hope everything works out.
 

neil_se

New Member
Damn, what a mess! The only vinyl I have problems with is Avery 1005, the pinch rollers always want to peel back the vinyl. I have to remember to lift the blue handle as soon as the sensor in the chute detects it being loaded (or just do a manual load).
 

MikePro

New Member
yeah I do that too. this mess came during the process of scanning the media and all the forward-back motions involved.
 

MikePro

New Member
Fairly simple, given my process of labeling/bagging/organizing everything along the way. The service manual was pretty good about breaking the machine-down into chapters, each chapter having it's own ordered steps of parts requiring removal: covers,panels,display,service station, scan motor, ink supply, primer valves, electronics module, input/output rollers, curing unit, output platen, media sensor, and finally center guide. So I just printed myself an organized pamphet and just read it backwards for reassembly.
I managed to skip a few steps as well, such as removing the ink supply station without actually disconnecting any of the lines by using bungee cords to hang the entire apparatus from a basket on the side of the left leg of the printer.
The hardest part was remembering how/where all the electrical connections connected to the boards, about 40 in total, as they all had to come out as well. I simply plotted a bunch of 1/8" decals, that I had pre-penplotted with #'s, to label each wire with it's corresponding port that I had also labeled.

one-evening of reviewing the manual, and about 3hrs of disassembly followed by 4-5hours of re-assembly/test printing. I had to do a LOT of printhead cleaning afterwards to get it back o 100%, as the carriage had to sit away from the service station for the entire time.
....and I still managed to find myself with one-extra screw, but I'm certain(fingers-crossed) it's just from one of the plastic covers that had two other screws holding it on :)
 
Top