• I want to thank all the members that have upgraded your accounts. I truly appreciate your support of the site monetarily. Supporting the site keeps this site up and running as a lot of work daily goes on behind the scenes. Click to Support Signs101 ...

I Need Some Installation Advice!

AceSignsOnline

New Member
So I don't currently have a wrap installer, which leaves me to do the tedious work wrapping this thing with a small crew of extremely inexperienced guys. I'll admit that I'm not the best when it comes to wrapping, but I can hold my own for the most part. Basically, I'm confident that this thing will come out looking good.

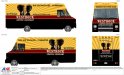
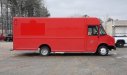
However, I have a couple of minor challenges that I'd like some of your input on before I begin the procedure tomorrow, and they come in the form of oddly-placed rivets as well as a riveted length of molding that spans the side of the entire truck (see attachments).

Currently, my plan is to use black 1080 to cover the bottom half of the truck, then do my prints along the top. These two materials will meet right above the molding along the side of the truck, meaning that the molding will be black by the time this wrap is done.

Also, the client has requested as few seams as possible, so the prints were done horizontally. I don't really have a problem with that, except that I've never had to tackle rivets with a horizontal print. Vertical panels over rivets, for me, are challenging enough.

So, I ask the experts here at Signs101... If you were in my shoes, what would your plan of attack be? I hope I've given enough info... Please call me out if I didn't. It has been an extremely long day in the sign biz.
 

Attachments

  • BigRedVanWrap (Proof_2).jpg
    BigRedVanWrap (Proof_2).jpg
    64.5 KB · Views: 100
  • photo (10).jpg
    photo (10).jpg
    47.9 KB · Views: 93
  • photo (9).jpg
    photo (9).jpg
    45.5 KB · Views: 83
  • big-red.jpg
    big-red.jpg
    58.1 KB · Views: 90

AceSignsOnline

New Member
Nothing, huh? :/ Alrighty, then... I suppose I'm on my own. After looking at it again this morning, I'm thinking I'll wrap the molding in separate panels.
 

GaSouthpaw

Profane and profane accessories.
Even with horizontal panels, I wouldn't really change my install method (i.e., whatever it is you do on rivets).
Personally, the way I learned was to apply normally while making sure to leave a "bubble" around the rivets (don't squeegee all the way to them). Once the entire thing is applied, go back and finish up on the rivets.
As for the molding, good question. If you can fit the separate piece in (and by that, I mean not having to use a bunch of extra material), doing it "stand-alone" would probably be best. That way you can work from the high point out.
 

rdmdarr

New Member
[video=youtube;2qfLQX1CpOk]http://www.youtube.com/watch?v=2qfLQX1CpOk[/video]

go to about the 3:30 mark. how we do it here.
 

HulkSmash

New Member
I would do them in vertical panels. This is the way to do it. go over that ridge like it's not even there.
 

MikePro

New Member
hard to explain without rambling, but ultimately... just be confident. That's the squarest/flatest/easiest wrap I've ever seen on a vehicle that involved rivots. you're golden.

i'm usually a fan of vertical tiles BUT you've got a natural break there in the print AND the body of the truck. good call to go with it.

horizontal panels, no alignments necessary, rock n' roll.
try not to double-wrap your rivots if possible, and decide if you want that black line to go all the way up to the top-line above the rivots or be cut just below the rivots and let your color tile wrap the rivots and overlap the black below them. Rivots wrap much nicer when you've got room to stretch excess material beyond them... you may want to go with wrapping the rivots and the rest of the bar above them and then run the baseline of the color print to ride just above the rivots, wrapping excess material upward and your final trim would only have to be across the top/sides of the truck.

rivots, +1 to pretending they're not even there & leaving a circular tent around them until you finish applying your tile.

I'll usually span the entire sheet over a line of rivots, draw my line with a squeegee on two sides (approx. 1-2" from the rivot), continue applying the rest of my tile, and then split the tent between two rivots in-half while working the bubble back towards the rivot in a circular motion. If larger spacing between rivots, i'll still ignore them but I'll squeegee my line between them as I travel left/right while working my way-back to connecting those horizontal lines and continue applying my graphic.

and regarding tools, love that roller!!! ...when I actually do use it. I have a wooden-handled stamper tool as well, kinda looks like a mushroom. same thing.
when it comes to wrapping tho', I always forget it in my toolbox and just pinch/rub my rivots like i'm giving someone a "titty-twister" and being nice enough to
 

AceSignsOnline

New Member
A quick update...

For the record, vertical is the way to go as far as I'm concerned. It's the industry standard method, and that's what I tell our customers. However, all of the prints had already been made before I was short a wrap installer and learned that I was stuck with the labor.

With that out of the way... I'm pretty impressed with the 1080 film. I have a love/hate relationship with 3M, and this product left me feeling pretty good about the whole project altogether. It is much more conformable than any other film I've used. Maybe it's because there is no laminate required. But in one piece, I was able to do the entire bottom half of the truck, trimming my excess material 1/2" above the long side molding. Thankfully, it responded to my torch like a champ and did exactly what I needed it to do.
 

AceSignsOnline

New Member
Also, I know that several of you all have mentioned the RollePro, which I have here at the shop. However, I'm of the understanding that it's mostly for rivets that are aligned vertically in columns - leave an open air channel through the rivet column, heat, roll, done. But the rivet patterns on this truck are in a zig-zag formation. Fortunately, they're pretty low-profile, so they haven't been challenging at all unlike the last trailer I did.

How much luck have you guys had using the RollePro in scenarios that do not involve vertical rivet columns?
 

SolitaryT

New Member
I've had limited success with the RollerPro. It's a good tool, but I'm kinda detail oriented, which leaves me with the old squeegee around the rivet trick. More time-intensive, but it covers those things nice.
 

Snydo

New Member
Those are baby rivets, i love the phillips head ones the most,the tall ones, complete with metal burs from overtightening at the factory. I had as much time into sanding down the burs as I did the actual intsall.
 

itljcloud

New Member
I wouldn't call that the easiest, but yes vertical panels.

The only thing hard about that truck is the horizontal fat half moon 'bumps' that are on the side. Three of them to deal with. Rivets by themselves are no problem and the humps by themselves are no problem, but together, it's kindof a pain. It made a panel that I could usually do in 30 mins last about 3 times as long. Just finished one a couple weeks ago. fuzioncraze.jpg
 

NateF

New Member
We had a shot a few months ago at doing an ice cream truck wrap. The truck was a similar model to this, but with a window and cooler vents also hacked into the side. Oh, and it had already been wrapped with come kind of cheap calendared film (it wouldn't conform around anything, so there were seams everywhere) and the paint underneath was all peeling. I didn't feel bad at all when some other guy who "owed them a favor" ended up doing the wrap instead. If not for the peeling paint, I might have been willing to tackle it, but I wasn't looking forward to dealing with those horizontal ribs in the body. Plus the truck we were looking at also had a couple vertical ribs.
 
Top