After the much research, a few damper wasted, and even calling Tech to come over and waiting for the secret to reveal, and
then nothing!!!!

May be someone know but not talking......

Obviously the trick isn't there, the tech rely on suction from the Mimaki to do the compression. He doesn't even know how to prime these dampers!!!!
Here is my own experiment I like to share with the forum, on JV33 dampers, to prime it completely without air inside of it, and take less than 1 minute to do. Once this information got out from this forum, it should help save some cost for JV33 owners

, and perhaps teaching some of those tech some new moves

:
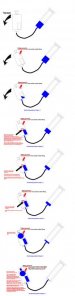
1 ) get the syringe ready-filled with the color you need to prime it connect the tube and enough ink in the syringe. You will need syringe with correct type of tubing, only need like 4-5 inches so you can have some distance between the syringe and the damper when you filling it, you need to make sure that the damper and syringe forming smiling face ( that is just my prefer on this but it doesn't have to be smiling face)
2 ) hold the compression damper upside down ( circular compartment need to be on the top, and facing away from you ) You will not be able to see the circular disc since you will be looking at the side that showing rectangular filter compartment facing you. While holding at this position, on the circular disc on the other; you will need to use one of your finger may be index finger and PRESS down the disc so when you filled the ink from the bottom to the top, when circular disc is pressing ink can flow to the top.
3 ) Tilting while filling the filter compartment first, right before ink reach to top compartment, this is where tilting is critical. Too much tilt the fluid will go too fast before the air. Tilt just enough for the fluid to push the air out of filter compartment completely. If you let go of the disc while doing this the air get juggle between the two compartments and the fluid will be splatter all over inside and you losing the 1 time easy fill opportunity once the fluid has adhere to surface inside damper the liquid seal forming and there is no easy way to get the air out!!!
See attach gif image of my quick diagram for this, and anyone has better ideas please do share, thanks.