• I want to thank all the members that have upgraded your accounts. I truly appreciate your support of the site monetarily. Supporting the site keeps this site up and running as a lot of work daily goes on behind the scenes. Click to Support Signs101 ...

Making a Zombie Sign

cnc602

New Member
Making a Zombie Theme Sign for work.
It will have Dibond Letters on standoffs.
Inlayed carbon fiber letters and a center
focus point using Dibond, Acrylic, Carbon Fiber and red vinyl on plastic.
Sign will be 6" x 22"
Will be using a 2550 CNC Router to make the sign.
See image for more detail.
 

Attachments

  • ZombieUnit-Sign-Idea-50px.jpg
    ZombieUnit-Sign-Idea-50px.jpg
    663 KB · Views: 230

Jillbeans

New Member
It would look a million times better if you reduced the size of everything to give more breathing room around the edges.
Love....Jill
 

cnc602

New Member
Ugh You guys are right, if I reduced the size of everything or make the wood back piece bigger it would frame it and make it look a lot better!
Unfortunately I've already cut the back piece and some of the letters. Plus I have to get this done for a tradeshow coming up soon the Shot Show.
However, will probably cut a bigger back piece after the show, would be easy since it's just wood and I'm using a CNC Router.
 

cnc602

New Member
Here are the photos of the wooden back piece.

Photo 1- Holes drilled for standoffs
attachment.php


Photo 2- Routed out the shape of the wood back piece
attachment.php

attachment.php


Photo 3 - Routed out the circle for the Zombie Scope
attachment.php


Photo 4 - Engraved the letters for the Carbon Fiber inlay letters
attachment.php


Photo 5 - Finished wood back piece.
attachment.php
 

Attachments

  • ZombieWood-1.jpg
    ZombieWood-1.jpg
    78 KB · Views: 298
  • ZombieWood-2.jpg
    ZombieWood-2.jpg
    82.3 KB · Views: 286
  • ZombieWood-4.jpg
    ZombieWood-4.jpg
    72.8 KB · Views: 295
  • ZombieWood-5.jpg
    ZombieWood-5.jpg
    90.5 KB · Views: 274
  • ZombieWood-6.jpg
    ZombieWood-6.jpg
    93.8 KB · Views: 286
  • ZombieWood-3.jpg
    ZombieWood-3.jpg
    84.3 KB · Views: 282
Last edited:

cnc602

New Member
Ok got some photos of the Dibond letters being cut on the CNC router.
Some people might know what Dibond is for those who don't know what Dibond is, it's a brand name
of a material consisting of a solid piece of polyethylene (plastic) sandwiched between
two sheets of aluminum. This make for a rigid aluminum like material but lighter. (I added links for more info)

Making the countersinks for the standoff screws
attachment.php


Close up of the tool and the countersink hole
attachment.php


Here are the cut Dibond letters. Vacuum boot for removing dust & debris, removed for a better photo
attachment.php


Close up of the routing tool used
attachment.php


Letters routed out still in the Dibond
attachment.php


Here are the letters again cleaned up a little
attachment.php


Attachments

  • ZombieDibond-1.jpg
    ZombieDibond-1.jpg
    82 KB · Views: 244
  • ZombieDibond-2.jpg
    ZombieDibond-2.jpg
    86.4 KB · Views: 288
  • ZombieDibond-3.jpg
    ZombieDibond-3.jpg
    100.5 KB · Views: 298
  • ZombieDibond-4.jpg
    ZombieDibond-4.jpg
    91.3 KB · Views: 304
  • ZombieDibond-5.jpg
    ZombieDibond-5.jpg
    98.1 KB · Views: 290
  • ZombieDibond-6.jpg
    ZombieDibond-6.jpg
    82.1 KB · Views: 266

cnc602

New Member
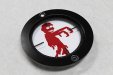
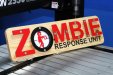
Ok got to work on the letter "O" in the word Zombie.
We are going to make it look like rifle scope with cross hairs.
Were using various materials to give it a dimensional look.

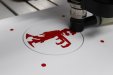
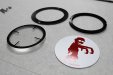
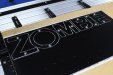
Layer 1 is a Zombie graphic made from sticker vinyl on plastic.
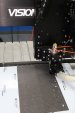
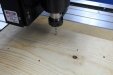
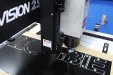
We used Print-To-Cut and an engraving head, how it works is a camera sees the registration marks (dots) on the application and uses it to align the cut to the graphic.
attachment.php


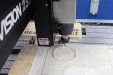
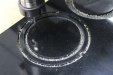
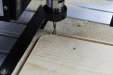
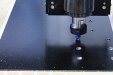
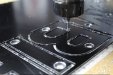
Layer 2 is a routed out piece of half inch acrylic, were using routing head for this.
It's a little bit of a mess because we removed the dust collection boot from the CNC router to show the routed area for a video I'm putting together.
attachment.php
attachment.php


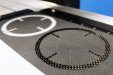
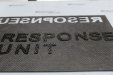
Layer 3 is the Crosshairs engraved out of Carbon-Fiber.
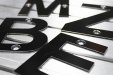
Please note, if your going to work with Carbon Fiber, use gloves and a mask.
You don't want to inhale or get the fibers on your skin.
attachment.php


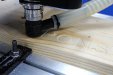
We also did the Carbon-Fiber letters that are going to be inlayed into the wood back piece.
attachment.php
attachment.php


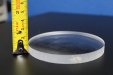
4th layer is a part that we added and was not in the original design, this acrylic part will help hold down layers 1, 2, & 3.
attachment.php


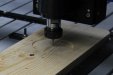
The 5th layer is the Dibond letter "O" that we routed out earlier.
Here are a photos of all the pieces.
attachment.php


Here is the Zombie Scope put together.
attachment.php


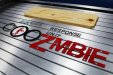
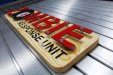
This Zombie Sign is practically done. I'll get photos of it put together either today or tomorrow.
 

Attachments

  • ZombiePrintToCut-1.jpg
    ZombiePrintToCut-1.jpg
    49.9 KB · Views: 290
  • ZombieAcrylic-1.jpg
    ZombieAcrylic-1.jpg
    93.2 KB · Views: 280
  • ZombieAcrylic-2.jpg
    ZombieAcrylic-2.jpg
    71.8 KB · Views: 274
  • ZombieCarbonfiber-4.jpg
    ZombieCarbonfiber-4.jpg
    82.7 KB · Views: 292
  • ZombieCarbonfiber-1.jpg
    ZombieCarbonfiber-1.jpg
    88.5 KB · Views: 280
  • ZombieCarbonfiber-3.jpg
    ZombieCarbonfiber-3.jpg
    99.9 KB · Views: 276
  • ZombieHolder-1.jpg
    ZombieHolder-1.jpg
    87.6 KB · Views: 208
  • ZombieHolder-2.jpg
    ZombieHolder-2.jpg
    104.7 KB · Views: 282
  • ZombieScope-1.jpg
    ZombieScope-1.jpg
    70.4 KB · Views: 257
  • ZombieScope-2.jpg
    ZombieScope-2.jpg
    71.6 KB · Views: 279

ExecuPrintGS

New Member
Awesome project.
How thick is that carbon you cut? Ive always wondered if we could cut carbon on our CNC (any advice on bit size and speed would be awesome, and where you got the carbon sheets) :rock-n-roll:
 

Jacob Singer

New Member
Awesome project.
How thick is that carbon you cut? Ive always wondered if we could cut carbon on our CNC (any advice on bit size and speed would be awesome, and where you got the carbon sheets) :rock-n-roll:

I'll second this question, we use a Vision 1624 for all our ADA and engraving, but I'm always looking to expand our boundaries.
 

GypsyGraphics

New Member
great sign (including intentional visible hardware)

what a great thread too, so cool to see photos of all the steps your taking to create the dimension!

been wanting a Visons for quite some time, hope to see the video you mentioned.
 

cnc602

New Member
Hello the sign is done! We took it too a trade show.
I'll be posting the final pics next week.

To answer the questions
I used a multipurpose hard plastic cutting end mill from Onsrud model 65-000.
I ran the spindle at 12,000 and at the RPM the manufacturer recommends a feed rate of .4-.8 ips.
The carbon fiber sheets came from a past project but you can find them on Amazon.

If your going to work with Carbon Fiber, don't forget to use a mask and gloves. :)
 

cnc602

New Member
Here are photos of the finished Zombie Sign.

All the parts of the Zombie Sign ready to assemble.
You'll notice the Dibond letters are covered in red sticker vinyl.
We had pre assembled the sign and felt it was very lack luster.
It did not POP like we wanted.
I'll post a photo of the sign with black letters, you'll see what I mean.
attachment.php


Here is the finished Zombie Sign
attachment.php

attachment.php

attachment.php


Here it is with black Dibond letters
attachment.php


What do you folks think? Was the color change a good idea or should we have stayed with black.
We also went back and forth on the the letter "O" being red or black.
With kept it black to give it more contrast to the rest of the letters being the focal point.

Were also thinking of adding led lights behind the letters to accentuate the stand-offs and give it more pop.

Thoughts?
 

Attachments

  • IMG_2132-B.jpg
    IMG_2132-B.jpg
    94 KB · Views: 290
  • IMG_2444-B.jpg
    IMG_2444-B.jpg
    87 KB · Views: 291
  • IMG_2500-B.jpg
    IMG_2500-B.jpg
    81.9 KB · Views: 277
  • IMG_2499-B.jpg
    IMG_2499-B.jpg
    75.6 KB · Views: 271
  • IMG_2478-B.jpg
    IMG_2478-B.jpg
    81.6 KB · Views: 286

ExecuPrintGS

New Member
Turned out great, though my OCD doesn't like that the M mounts different from all the other letters (screws in the center not top and bottom).
 

Marlene

New Member
love it! love how you used the "O" as a target with a zomibe. love seeing the hardware. the only thing that bothers me is the natural wood. I would have loved to see it a faux rusted metal or something else more industrial as the rest of it has that feel
 
Top