• I want to thank all the members that have upgraded your accounts. I truly appreciate your support of the site monetarily. Supporting the site keeps this site up and running as a lot of work daily goes on behind the scenes. Click to Support Signs101 ...

Need Help Mimaki cjv 150-130 cut problem

docea marius

Liondor1969
Hallo

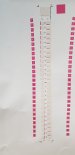
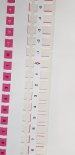
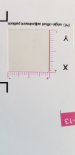
I buy a mimaki cjv 150-130,the printer works perfect..i made test all is perfect,but not cut ok on the contur.A service firma made all istalation.I made cut calibration..al but resultat is not ok..cut it to one side.I talked to someone who installs mimaki, but he does not know what to do,I asked the mimaki but I did not get a 2-month response.I also changed the cutting knife..same problem persist
Please help
TX
 

Attachments

  • 20180801_144316.jpg
    20180801_144316.jpg
    598.6 KB · Views: 755
  • 20180801_144321.jpg
    20180801_144321.jpg
    636.2 KB · Views: 710
  • 20180801_144328.jpg
    20180801_144328.jpg
    648.7 KB · Views: 721
  • 20180801_144336.jpg
    20180801_144336.jpg
    704.4 KB · Views: 774
  • 20180801_144356.jpg
    20180801_144356.jpg
    638.2 KB · Views: 705
There are a lot of variables that can effect how precise your cuts are. Things that I do to ensure a proper cut are as follows...

1) Never align the media off of the leading edge of the media. The media cutter seldom cuts these edges perfectly straight. It's typically always slightly off, maybe as much as 1/32"-1/16". Always align off of the registration marks themselves. You can do this several ways, but once the media is in place double check your media alignment off of the registration marks with the laser to ensure proper media alignment.
2) Always move the media holders on the back of the machine to the far left and right out of the media's way. If the edges of the media come in contact with the holders, it can cause unneccessary friction that can gradually work the media further and further out of alignment. I would also do the same with the take up reel.
3) A little bit of masking tape on the media hold-downs can go a long way. I've seen the hold-downs pop right off the edge of the media many times (most times, actually), which can gradually cause problems to occur as well.
4) Try your best to avoid letting the lead edge or back edge of the media slam into the floor as the machine is cutting. This can also gradually throw your media alignment off while the machine is cutting.
5) Use the bare minimum cutting pressure necessary to perform the task at hand.

Using the cutter was a bit of a learning curve for us. The training my technician gave me was crap, so I picked up on a few of these helpful things through trial and error, which was costly. I hope this helps.
 

docea marius

Liondor1969
There are a lot of variables that can effect how precise your cuts are. Things that I do to ensure a proper cut are as follows...

1) Never align the media off of the leading edge of the media. The media cutter seldom cuts these edges perfectly straight. It's typically always slightly off, maybe as much as 1/32"-1/16". Always align off of the registration marks themselves. You can do this several ways, but once the media is in place double check your media alignment off of the registration marks with the laser to ensure proper media alignment.
2) Always move the media holders on the back of the machine to the far left and right out of the media's way. If the edges of the media come in contact with the holders, it can cause unneccessary friction that can gradually work the media further and further out of alignment. I would also do the same with the take up reel.
3) A little bit of masking tape on the media hold-downs can go a long way. I've seen the hold-downs pop right off the edge of the media many times (most times, actually), which can gradually cause problems to occur as well.
4) Try your best to avoid letting the lead edge or back edge of the media slam into the floor as the machine is cutting. This can also gradually throw your media alignment off while the machine is cutting.
5) Use the bare minimum cutting pressure necessary to perform the task at hand.

Using the cutter was a bit of a learning curve for us. The training my technician gave me was crap, so I picked up on a few of these helpful things through trial and error, which was costly. I hope this helps.

Thanks jsmoritz2000.i must test naw,is it possible to be because of the material? we used 80 microns ?
with what type of laser to measure the choice of material?please advise me what to buy
I always pull the material in front of about 50 cm, then let the handle down and rewrap the material
I just printed 5-6 pieces, I'm trying. When I start cutting the first piece on the right, it's relatively good, but when it comes to the last piece on the left, the cut is far off
 
Last edited:

Marac

New Member
Was just wondering , did you cut trough rasterlink or finecut. I am using cjv150-160 , i rather use finecut plugin for corel or illustrator and it works better .
It's normal that you will have movement of cutting path ( it depends on resolutions and that is why we have bleed)
 
The software is shitty with Mimaki, you need ignore what it tells you to input, you need to use your numbers:

Never mind what numbers your printer tells you to set, just set one of the axis at -2 and do a real test cut with your own design. See how it looks. Now try with -4 and check if its closer to a good cut, if not try the other way like 0 or +2 etc. When the first axis is good do the same with the other axis. After wasting 10m of material I can finally cut with under 1mm error on 4 m length. You need to do the same for the bidir settings as that's just as f*cked up. Good luck.
 

docea marius

Liondor1969
Was just wondering , did you cut trough rasterlink or finecut. I am using cjv150-160 , i rather use finecut plugin for corel or illustrator and it works better .
It's normal that you will have movement of cutting path ( it depends on resolutions and that is why we have bleed)
I use only plugin for ilustrator..
TX
 

docea marius

Liondor1969
The software is shitty with Mimaki, you need ignore what it tells you to input, you need to use your numbers:

Never mind what numbers your printer tells you to set, just set one of the axis at -2 and do a real test cut with your own design. See how it looks. Now try with -4 and check if its closer to a good cut, if not try the other way like 0 or +2 etc. When the first axis is good do the same with the other axis. After wasting 10m of material I can finally cut with under 1mm error on 4 m length. You need to do the same for the bidir settings as that's just as f*cked up. Good luck.
thank you for the advice,I do not really know how to adjust the axes but I will try how you say.someone recommends using a laser to align the material..do you use it ... and if yes .. please recommend a model to use
I changed the material to be 100 microns..nothing..same problem.I also changed the cutting knife on the recommendation of the service..nothing..same problem cut.
I think I've been cutting the cutting knife too deep, cut the paper holder,CJV-150-130..I do not know how much to let off the top,cutting is set on CUT 1 with a pressure of 70 for a 100 micron material.
should I manually adjust knife setting from the screws behind it?

thanks
 

docea marius

Liondor1969
The software is shitty with Mimaki, you need ignore what it tells you to input, you need to use your numbers:

Never mind what numbers your printer tells you to set, just set one of the axis at -2 and do a real test cut with your own design. See how it looks. Now try with -4 and check if its closer to a good cut, if not try the other way like 0 or +2 etc. When the first axis is good do the same with the other axis. After wasting 10m of material I can finally cut with under 1mm error on 4 m length. You need to do the same for the bidir settings as that's just as f*cked up. Good luck.
thanks..i must test this setings..is not a problem for material...tx
 

TA04

New Member
The software is shitty with Mimaki, you need ignore what it tells you to input, you need to use your numbers:

Never mind what numbers your printer tells you to set, just set one of the axis at -2 and do a real test cut with your own design. See how it looks. Now try with -4 and check if its closer to a good cut, if not try the other way like 0 or +2 etc. When the first axis is good do the same with the other axis. After wasting 10m of material I can finally cut with under 1mm error on 4 m length. You need to do the same for the bidir settings as that's just as f*cked up. Good luck.

Hello! In which menu can go for adjust P&C? Print fiel and cut after adjust, bot where? Thanks!
 
Top