WB
New Member
I thought I'd post a quick and dirty version of how I use our Laminator to mount vinyl to different boards.
In my opinion if you have a Laminator then you should be using it to mount your vinyl. Alot of people do it by hand or with a Big Squeegee which is perfectly fine if that all you have, but a laminator can to the job faster and better.
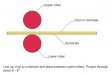
This sign is Arlon Cast vinyl with a cast overlam being mounted to 3mm Dibond.
I've found that if you leave abit of extra material on the bottom you won't get small air bubbles from you crease line.

With laminated vinyl I don't normally apply pre-mask but for the sake of demonstration I did. It's just a 3" strip across the bottom, Once you get comfortable mounting you can do away with it. When I'm training someone I usual get them to apply the pre-mask to everything until they get hang of it..

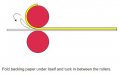
After the Pre-mask is on and trimmed you flip the vinyl over and fold a small flap up about 1-1.5"

Then flip it over and line it up on your material, then press down you hinge. You can see in the picture that I didn't use all the vinyl I had left for my hinge, I only did this because I only had about a 1/2" of Dibond to play with..

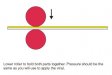
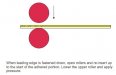
It's important whenever possible to mount your hinge to a straight edge thats nice and square, this will ensure that when you start feeding into the laminator it'll run straight and apply the vinyl evenly. If you end up shoving 1 corner in 1st it'll end up apply the vinyl at an angle and you'll end up with the chance of getting a wrinkle it shifting your print as it lays it down..

So normally I'll push th eboard up to the rollers and make sure it's straight then feed it in a 1/2" or so. This will hold the vinyl down so you can then hold up the print over the roller.. like so

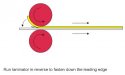
Once you have it up over the roller you want to make sure that the vinyl is tight but not streched. You want to the vinyl to be nice and smooth across the roller. If the vinylis nice and smooth as it goes through then you'll have a nice flat print, if you start seeign wrinkles at the bottom of the roller stop..

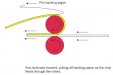
So once your in place with the vinyl up over the roller you simple press the pedal and make sure your removing the release liner as it feeds through.

A couple of things, if you start to see some small wrinkles you can sometimes avoid wrinkles by apply some tension on the print as it goes through. If you drop the release liner or vinyl and it goes through, back it up and keep going most of the time you'll be fine depending on the material.. I'd also recommend NOT have the heat on the rollers if you have a hot laminator, the heat will stretch the vinyl..
That's about it I guess. Once you get the hang of it you'll never look back.. I can run non laminated 4'x8' by myself with no worries. On material like Corex it'll apply the vinyl no problem with no bubbles in the grooves. I also normally go 1 setting smaller then my material, Ex. that piece of 3mm Dibond was mounted on the 2mm setting.
Anyway I hope that helps someone.
If anyone has any questions let me know
Bill
Last edited by a moderator: