• I want to thank all the members that have upgraded your accounts. I truly appreciate your support of the site monetarily. Supporting the site keeps this site up and running as a lot of work daily goes on behind the scenes. Click to Support Signs101 ...

Neep Help With Repaint Of Old Metal Sign

Jonny & Grace

New Member
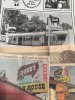
Hi all! I'm working on a repaint of a metal sign. I've been lurking for a bit trying to hunt down answers, but I need some advice with the specifics for this particular project.

The sign was made in the 60's and is constructed with a product called paint-grip. I uncovered the printed label on the second side of the sign after doing a bit of work on the first side, so now I have some concerns my initial approach is incorrect. I have read that lightly scuffing metal prior to paint is recommended (followed by a tack cloth and a high quality wax and grease remover. I've purchased something called Maxx-solv). The sign is big and after stripping the paint with a heat gun (for over a week now), I used the sander to remove some of the remaining stubborn bits of paint and vinyl adhesive. There are at least three layers of vinyl letters with corresponding paint on this thing. I have used sharpie to trace most details and have patterns of the rest.

Have I now (by sanding the thing) removed the coating/bath that both provides adhesion for paint and additionally resists rust? I left the job and don't plan on being able to return for around a week. The climate is humid. Will I be returning to a rusted sign (likely to the owner's terror)?

Additionally, I have not found any consensus on the matter, but can/should lettering enamel be applied directly to metal? I am using 1shot (I do understand there are contradicting preferences, especially on this forum).

What is the best way to approach the project at this point? Sand more? DTM Primer? Can Zinsser Bullseye be used?

I'm starting to ramble here, but I want to do the job right. I am sure you will have additional questions for information I have omitted. I am happy to provide any details necessary. Let me know what you think and thank you for your help!
 

Marlene

New Member
Do you have a photo of what you are redoing? Is it a shaped sign so there's a good reason to redo rather than replace? If you are worried about the background paint, why not have it sprayed painted by an auto body shop.
 

Gino

Premium Subscriber
Sounds like you've wasted a lotta time, trying to resurrect something not worth keeping. Whether it's free form or not, a new piece is what you want to do.
 

Johnny Best

Active Member
I agree with Zsigns on just getting new panels, but since you have already gotten everything off and sounds like a restoration job, just use those primers you have and you should be good. I prefer epoxy primers, they are more expensive and two part mixing, strong smell, two coats, but it will bond better. A good top coat polyurethane paint and you should be ready to go.
Note:The new OneShot lettering enamels do not last as long as they once did, but that's another discussion.
 

equippaint

Active Member
I would have started with fresh metal if there wasn't a bunch of fab work in it. As it is now, put some epoxy primer on it and get all your painting done within the recoat window of the epoxy.
I have never received any clear cut answer as far as paint grip needing to be primed or not. We have done it both ways depending on time and have never had problems.
 

Jonny & Grace

New Member
Great! Thank you all for your replies.

After the last week of paint removal, I can definitely see the attraction of a brand new panel. The sign is shaped like a large cow on pill box and is around 9'x15'. It is historic, and well loved by the family who owns it. The signs are mounted to the parapet wall and hang over an awning on the front of the building. I don't have funds for a crane, which is why they're staying put. The original arrangement was to restore the sign. I did not suggest the option of using new panels, but that is simply due to inexperience and a lack of awareness of the products available. There is another sign I'm repainting for them that is smaller which has a new panel riveted to cover the original in a section that would be manageable to easily cover. I only identified new paneling after I removed a couple layers of vinyl and at that point I was knee deep (in scraped paint).

Because the owner would question my sanity if I suggested covering the sign with new paneling at this point, I am considering moving ahead with sanding, cleaning thoroughly (wax/grease remover and denatured alcohol), and priming. Does this make sense? We have a good auto paint shop in town that should have an epoxy primer. I contacted the owner today and he mentioned an acid bath? I'm concerned about something called "acid bath" getting on the flat roofing and awning when its washed off. Is this a valid concern, or is an acid bath necessary at all? There was no mention of it in the responses above.

I have a bunch of 1shot ready to go. Is there a way to help it last longer? I plan on using hardener and maybe a UV clear coat. Is Ronan the way to go in the future? Should I paint multiple coats or just cut around the letters? It was recommended by a knowledgable source that I paint everything the color of the letters, which are lighter, and cut in the dark background. Sounds like even more work, but that hasn't deterred me yet. Will the 1shot fall off like the last paint did or will it just fade over time?

The only fortunate result of all the scraping is that I have uncovered the original design and colors of the sign, which I didn't know before. The restoration will be closer to the original than I could have managed with any other option.

I knew I was going to get a little roasting on here for this one. I hate hearing I wasted my time, but I have certainly learned where to come for info and next time I'll ask beforehand. Please forgive my long response here, but it is awesome to have a conversation with knowledgable people about what I'm doing here, as I am not knowledgable myself.
 

Attachments

  • IMG_2830.jpg
    IMG_2830.jpg
    1.1 MB · Views: 288

signbrad

New Member
Paint Grip is a galvanized steel product. It also has an enamel receptive finish that is supposed to accept paint without the need for any etching. I have painted tons of it—literally tons—it makes heavy sign cabinets. On your piece, the Paint Grip finish has surely been compromised by sanding. There are good etching (acid wash) primers as well as rust-inhibitive epoxies at auto body paint supply stores, but they are probably all intended to be sprayed. You are no doubt rolling/brushing the signs in the field. I know that there are brushable epoxies. 3M makes a two-part epoxy called Scotchkote that can be brushed or rolled, but I have never used it. Sherwin Williams makes a primer called Procryl that I have used. It is water based but seems to have excellent adhesion and gets hard.

Nothing is going to last forever, of course. What you put on may not last as long as the original finishes.

It is true that One Shot paints do not have the durability they once did.
Cutting in dark-colored backgrounds is a traditional practice, but I would still double coat any bright colors (meaning all of them except black). The Walldogs mural painters have abandoned One Shot entirely in favor of Nova colors, which are water-based acrylic mural paints. They resist fading better.

If you use One Shot, I would put epoxy under it. If I were to use Nova colors, I would not hesitate to put SW Procryl on the bare metal. I am sure there are other good primers as well. Zinsser 1-2-3 Latex Primer is a good product. It is certainly cheap enough. I believe Procryl is much better. And it costs quite a bit more.
 

SignEST

New Member
I suppose sand blasting is out of the question? You can do that outside nowadays without much hassle and it will remove whatever crap is on the surface without damaging the metal and it's actually the perfect surface prep for whatever paint you put on it after. Especially for galvanized(that's what Google says don't quote me on it). After you sandblast just wipe it down with some solvent like paint thinner prior to painting to remove any particles , use a lint free cloth.

Another option would be lacquer thinner. You can buy that from Home Depot or your hardware store of choice. Just soak a rag with it and leave it on the surface of the paint for a few seconds and see if it rubs away. If it does, repeat the process across the whole surface and it should only take about an hour to clean it all off if you apply the apprentice. Use a plastic spatula that doesn't melt. Make sure you use chemical resistant gloves with the lacquer as it likes to destroy all the other kinds. Doesn't necessarily give you stage 6 tumors on contact though.
 
Last edited:

visual800

Active Member
if this were my job, I would strip sign with stripper, clean it off, wash it. Prime with 2 part epoxy and spray latex on top and then letter it....it is a very cool sign and a satin latex would be awesome as a background.

I would also lay that sucker down so that stripper could stay on longer
 

Marlene

New Member
Nice to see an old sign get refreshed instead of replaced as some here suggested. These old ones become landmarks and it is always sad to see them go. I still would look into having a base coat of paint put down by an auto body shop, then add on the details after the base is down. When you finish this project, please post a photo as I'd love to see it.
 

Johnny Best

Active Member
I use an epoxy primer, AwlGrip 545 epoxy primer, two part mix and get the brushable thinner. Foam roller and prime entire sign after you strip it.
But as Brad mentioned about the SW primer probably is cheaper and easier to get in Colorado.
On the advice, you got about cutting in around the letters. Unless you have never done this method with a large flat, I would paint the background smooth and double coat the letters. Cutting in will give you brush strokes all over from the paint drying while you are painting a large background and are not experienced enough to move at a good clip using a larger brush for bigger areas and a smaller brush for cutting in.
Looks like a fun job.
 

Gino

Premium Subscriber
I suppose sand blasting is out of the question? You can do that outside nowadays without much hassle and it will remove whatever crap is on the surface without damaging the metal and it's actually the perfect surface prep for whatever paint you put on it after. Especially for galvanized(that's what Google says don't quote me on it). After you sandblast just wipe it down with some solvent like paint thinner prior to painting to remove any particles , use a lint free cloth.

Another option would be lacquer thinner. You can buy that from Home Depot or your hardware store of choice. Just soak a rag with it and leave it on the surface of the paint for a few seconds and see if it rubs away. If it does, repeat the process across the whole surface and it should only take about an hour to clean it all off if you apply the apprentice. Use a plastic spatula that doesn't melt. Make sure you use chemical resistant gloves with the lacquer as it likes to destroy all the other kinds. Doesn't necessarily give you stage 6 tumors on contact though
.

Not around here. You can't blast anything outside, unless you completely enclose it. Not allowed to let all that stuff become airborne.

You can see where you could've taken a rubbing of that cow and had it cut out and riveted overtop of the original. I don't don't know what those little plates are for, unless there's something you need to get inside for, but I don't see any electrical connectors.

Otherwise, maybe a DA Sander would've been easier. Nice to see someone cares about the end results. I highly doubt, regardless of clearcoating or any other additives, you're gonna get much more than 7 to 10 years, if you're lucky.


Good Luck....................​
 

signbrad

New Member
I use an epoxy primer, AwlGrip 545 epoxy primer, two-part mix and get the brushable thinner.
But as Brad mentioned about the SW primer probably is cheaper and easier to get in Colorado.

I was hoping someone would suggest a brushable epoxy they have used. I have never used a brushable epoxy and this is something I would like to try to see how it covers and lays down. Being old school, I lean heavily toward solvent based primers for metal, as opposed to water base. But the waterborne finishes of today are far more advanced than the latex paints of years ago.
The Sherwin Williams Procryl was very impressive when I used it on a painted warehouse about three years ago. I used it as a block out for a 15'x50' lettered area on the warehouse. I asked for their best adhering primer and it seemed to be very aggressive. The warehouse was textured steel with what I assumed was a factory applied PVDF coating that had aged considerably. High-performance PVDF coatings are common for prepainted wall panels and roofing. I pressure washed first. Cost for the Procryl was around 65 a gallon, compared to Zinsser 1-2-3 from Home Depot at 15 or 16 a gallon.


On the advice, you got about cutting in around the letters. Unless you have never done this method with a large flat, I would paint the background smooth and double coat the letters. Cutting in will give you brush strokes all over from the paint drying while you are painting a large background and are not experienced enough to move at a good clip using a larger brush for bigger areas and a smaller brush for cutting in.
Looks like a fun job.

True. Cutting in a background should be done rapidly to minimize brush marks. Two people working together helps considerably. And I knew old walldogs that used cutters entirely on work like this, rather than lettering brushes. Rolling the background first, and then double-coating, or even triple-coating, the graphics, may be the best way. The sign will not be viewed up close, so that is an advantage either way.

This is a job I would enjoy doing, though it could easily be a loser.
I would probably patch the holes where the PK housings penetrated the face. 3-inch squares of .040" sanded aluminum with Lord adhesive and a little bit of double-sided tape to keep the patch from sliding down while the glue sets up would work. The patches would be less noticeable than the existing holes. Also, the holes could be starting places for new rust, especially if the glass housings were removed with a hammer.

This was a spectacular sign in its day, even with those ugly guy wires.

Brad
 
Last edited:

Jonny & Grace

New Member
Okay. I am getting lots of answers here, but it keeps making more work for me. I had better stop asking so many questions. ;)

I think I'm sold on the Procryl and I called Nova Colors today and they were willing to spend a few moments on the phone to go over their products. I can appreciate willing customer service and I'm sure their paint is as good as they say. I'll have to check it out. Their website mentions washing metal in vinegar. Is this similar to an acid bath and is this also necessary at this point?

I can absolutely see those holes as a rust magnet. I'll stop by the metal shop and see what I can find. Is it the Lord Fusor 110B you're referring to?

This one's going to be near bulletproof by the time I get paint on it. It sounds like I still have several steps before that occurs.

Here's a photo with a couple iterations of the sign over the years. I'm putting the script "Dude's" back on (which was outlined with green on one side and red on the other. Sweet! ), and going with the larger western style letter with the split serif for the "steak house". If it had neon I'd be willing to keep the straight letters, but the western letters are a little fancier to compensate for the lack of neon.

Thank you all so much for the guidance. I will definitely post some photos of the completed job.
 

Attachments

  • IMG_2840 (1).JPG
    IMG_2840 (1).JPG
    1.4 MB · Views: 237

signbrad

New Member
Is it the Lord Fusor 110B you're referring to?

No. I think it is called 403 or 406. I'll check tomorrow. I honestly have not paid attention to the label when using it myself and our fabricator does the ordering. He uses it in building aluminum cabinets. And it does require an application gun. And I am sure there are other adhesives that would work fine as well.

Vinegar is an acid. I worked at a shop in the 70s that used it for washing aluminum prior to painting. I would expect a commercial etching preparation to do a more consistent job, though. There are probably several brands of etching solutions sold at paint stores. I saw one at Home Depot under the Kleen Strip brand. The trick is to make sure it's rinsed off before applying paint.

If you are used to the leveling and flow of One Shot colors, you will need to get used to Nova colors. They are heavily pigmented, but they don't flow through a lettering brush the way an oil-based lettering color does. And some colors are more opaque than others. I double coat for opacity, and sometimes triple coat certain colors. I do not use regular squirrel hair lettering brushes, or bristle cutters and fitches in this paint. I use synthetics. There are some synthetic quills on the market that work well for small lettering (Mack has a line of them). On bricks or rough surfaces, I have found some angled synthetics at Michaels craft stores that do pretty good (Royal Langnickel Z43. Handles are silver). Red sables work but they are pretty stiff. And for large brushes, any high-quality brush for latex will work, the softer the better being my preference.

Brad
 
Top