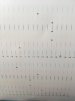
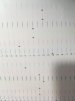
I will be completely honest with you if you haven't done this before you need to call a tech and have them come out asap. First off you need a service code if I remember correctly to get into the service menu to run the actual test you need done at the start to see where the heads are at currently, someone correct me if I am wrong. I don't have my notes on me for the whole process for the soljets right now. I do have a pic of the correct aligned test pattern attached. You need to print this test after the new head is installed and before any manual alignment is done and keep adjusting and printing this pattern until they are lined up. Once the head is in you are not physically moving it out of the machine again like you are stating you are about to do in this response.... instead you are making small physical MANUAL non menu adjustments then test print over and over and over to line everything up to the black head which is the black bar test pattern in the photo between each head nozzle print. Once you get the heads physically in their place and obtain a test print similar to this attached then you can get into all the test listed by others here that are inside the actual printer menu.
If the head is placed in the machine and prints but is not correctly aligned you could also not get a proper seal at the capping station leaving your head/s exposed, if someone for example goes gets dinner and doesn't work on the machine again for an extended period of time maybe next day it can cause problems. Not trying to scare you but you should consider getting a tech.
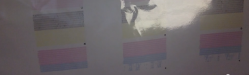
That is CYAN and MAGENTA not blue and pink
")