• I want to thank all the members that have upgraded your accounts. I truly appreciate your support of the site monetarily. Supporting the site keeps this site up and running as a lot of work daily goes on behind the scenes. Click to Support Signs101 ...

Need Help Roland Sp540v Smearing Cyan Everywhere

SignShopGal

SignShopGal
Hello, I recently received a used Roland 540v. The company owner is doing small upgrades but hasn't provided me with a computer that can run versa works yet so, when the printer came to me, it had been being used in the other location, and only had been turned off to travel to relocate. I have been turning it on everyday even though it's not connected to anything, and running the test print twice a day just to keep everything running. Test prints have been perfect, heads not miss-firing, nada. But then it did something weird, left a huge cyan streak though everything, and even off the edge of the media on the metal surface. I ran a head cleaning, medium, nothing changed. I did a manual cleaning, nothing. I did a heavy cleaning, still nothing. I read somewhere it might be a circuit board problem? How does this even happen? It's not plugged into a computer and I can't run it that way yet anyway, so I have no way of telling the printer what to do except run a test print. I ran a test print from the main menu in system report, still didn't change.
Attached are images from the bad tests.
 

Attachments

  • Bad Test 1.JPG
    Bad Test 1.JPG
    80.4 KB · Views: 677
  • Bad Test 2.JPG
    Bad Test 2.JPG
    53.3 KB · Views: 713
  • Bad Test 3.JPG
    Bad Test 3.JPG
    68.6 KB · Views: 942
  • Normal Test Print.JPG
    Normal Test Print.JPG
    66.3 KB · Views: 589

SignShopGal

SignShopGal
I meant to add:

Does anyone have any ideas where I can start to fix this, any an all help information welcome, thank you!
 

printhog

New Member
The cyan spill looks like you had some ink leach out in addition to the print problem. Temperature changes can cause that.

First thing.. get some head cleaning solvent and some wipes and get all that ink cleaned up. Pay attention to the vacuum holes and get it off the pinch rollers. Then run some of the solvent thru the cap station to flush the drain.

These machines are made to be left on so the ink circuit can stay warm, and the heads can keep warm. The machine will remind you to do a cleaning when it needs one. You don't need to run test prints daily if it's in good condition. Turning it off and on can cause the cartridges to heat and cool and that creates a flow of ink that can make a mess. I suspect that happened.

So turn it on. Leave it on. Let it get to 32 or 35 c standby temperature and leave it there. Turning it off will let it cool off and could cause ink to see siphon.

It's possible the head may have gotten damaged electronically. Until you get it to proper operating temperatures there's a lot of possibilities.


Sent from my SM-G900T using Tapatalk
 

SignShopGal

SignShopGal
Thank you Printhog, much appreciation for the news.

The cyan spill looks like you had some ink leach out in addition to the print problem. Temperature changes can cause that.

First thing.. get some head cleaning solvent and some wipes and get all that ink cleaned up. Pay attention to the vacuum holes and get it off the pinch rollers. Then run some of the solvent thru the cap station to flush the drain

I have a box of solvent cleaning cartridges, I have no idea how to use those. I do have the solvent cleaner and the wipes, I was able to remove most of the ink from the machine after I took the photos. I don't know how to run solvent through the cap station..
 

WalkerP

New Member
Check your ribbon cables and connections for ink and/or scorching or poor seating. They could have been slightly dislodged in transportation and joggled loose with the printing/nozzle checks. Both going into head and control board. That's an easy troubleshoot to rule that out.
Make sure printer is unplugged from the power when doing this!
 

printhog

New Member
Signshopgal I'd hesitate to tell you to do any cables or other work as your knowledge base seems fairly beginner. Dont want you to fry some EXPENSIVE electronics.. Roland has service support contracts and it may be right to go that way.

If you can't do that path.. Running a flush requires simple steps. Google the service manual for your printer, buy one. Follow the steps in that.

I'm thinking your issue is a bit of improper care from just not knowing that machines issues, and maybe some device issues to boot.

If your cyan head has leaked from a physical defect, and I think it has, it would make a spill that. I can you post a photo of your dampers? Is the cyan damper empty?


Sent from my SM-G900T using Tapatalk
 

SignShopGal

SignShopGal
Signshopgal I'd hesitate to tell you to do any cables or other work as your knowledge base seems fairly beginner. Dont want you to fry some EXPENSIVE electronics.. Roland has service support contracts and it may be right to go that way.

If you can't do that path.. Running a flush requires simple steps. Google the service manual for your printer, buy one. Follow the steps in that.

I'm thinking your issue is a bit of improper care from just not knowing that machines issues, and maybe some device issues to boot.

If your cyan head has leaked from a physical defect, and I think it has, it would make a spill that. I can you post a photo of your dampers? Is the cyan damper empty?


Sent from my SM-G900T using Tapatalk

The test print wasn't as messy today-the dampers aren't empty, wipers looked good too. I'm trying to upload a photo but my network is running like molasses. They are otherwise clean on the outside though. I have a manual, I haven't gotten to the flush part yet. That's todays reading on my lunch break.
 

SignShopGal

SignShopGal
Signshopgal I'd hesitate to tell you to do any cables or other work as your knowledge base seems fairly beginner. Dont want you to fry some EXPENSIVE electronics.. Roland has service support contracts and it may be right to go that way.

If you can't do that path.. Running a flush requires simple steps. Google the service manual for your printer, buy one. Follow the steps in that.

I'm thinking your issue is a bit of improper care from just not knowing that machines issues, and maybe some device issues to boot.

If your cyan head has leaked from a physical defect, and I think it has, it would make a spill that. I can you post a photo of your dampers? Is the cyan damper empty?


Sent from my SM-G900T using Tapatalk

*test print wasn't as messy, meaning, no change, just not as much spillage, same outcome though. I changed my ink cartridges.
 

Attachments

  • printcaps.jpg
    printcaps.jpg
    183.4 KB · Views: 526

SignShopGal

SignShopGal
Signshopgal I'd hesitate to tell you to do any cables or other work as your knowledge base seems fairly beginner. Dont want you to fry some EXPENSIVE electronics.. Roland has service support contracts and it may be right to go that way.

If you can't do that path.. Running a flush requires simple steps. Google the service manual for your printer, buy one. Follow the steps in that.

I'm thinking your issue is a bit of improper care from just not knowing that machines issues, and maybe some device issues to boot.

If your cyan head has leaked from a physical defect, and I think it has, it would make a spill that. I can you post a photo of your dampers? Is the cyan damper empty?


Sent from my SM-G900T using Tapatalk

So,

I got the smearing to stop. But now, it's not printing black. I thought a clog in the line, since the cyan was printing it's old and was uncared for properly, then upon second test print after a cleaning and black line flush, cyan has stopped. It is sporadic. Can a head be bad but still print one color? It appears there are 2 parts to the head, I don't want to take it apart, I don't want to touch any boards, and I mean this utmost respect, I am not an idiot, however new to the machine, I have worked around electronics and circuitry my whole life and just plain out have no desire to royally screw the pooch. I just have no experience with this area. Print heads are foreign to me.

So this is what I've done so far to try to solve this issue before we resort to replacing head, with help from a good technical machine mechanical mind and careful hands:
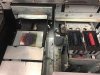
We flushed black and cyan out completely, from the solvent cleaning cartridge, which mind you has NO information on HOW to use it in the manual whatsoever. We took apart the back of the machine to inspect lines for cracks, leaks, bad o-rings etc. All checks out. We then hand pulled the ink back through the lines with syringes, separate ones for each color. We then did a few series of auto cleaning cycles until we were certain the cleaning solution was no longer in the lines. Head caps are still moistened with ink, and appear to making full connection with head. The suction is working, we can see it pulling ink through the hoses, black, cyan, magenta, yellow, as it should be.

And absolutely yes, the machine had not been serviced prior to coming into my hands by previous sign shop. Slightly absurd considering how long they had it.

Any help or ideas/suggestions you can provide to help me continue on this journey is ever so greatly appreciated, I mean that with all my heart! I am going to do everything in my power to make this work. I am not a quitter!

Thank you
Danae


Oh and I finally figured out the difference between a damper and a cap.

Dampers are those little white plastic paddle looking things where the hoses connect to that are in turn attached to the print head top part.

Dampers do indeed have ink running in them.
 
Last edited:

SignShopGal

SignShopGal
Black printed today, no cyan. Black did the cyan smear. This is after a weekend. I'm starting to feel this is hopeless.
 

printhog

New Member
Old machine tells me you need to replace the dampers, wipers, cap stations and sponges. The dampers act to balance pressure differences in weather and temperature changes, and as filters. They are disposable. Pull straight up on them, do not rock them or wiggle, that will break the port right off .. SNAP! Then pull the ink line off. Reverse the process to install.. hint I've broken more ports installing than removing. They need very little force.

Replace the capping stations, the edges get hard over time and don't create a proper seal. While in there, flush the drain lines with solvent till it runs clear. That gets the pumps back to life.

To get to cleaning cycle...
When powered off Hold down the cleaning button while powering on. Machine should go into cleaning mode. The wiper moves forward cap stations move up, and the head travels to the maintenance side of the carriage. From here you can dab the heads with swabs soaked in head cleaning solvent. You can also clean the wiper, it will come forward for that.

As for colors not printing. Usually we see that when the cap station doesn't park properly to seal like it's designed to do. But plugged dampers can do.

Google service manual for your model. Get one. You'll get real good at the machine with that book in hand. The flushing process is called pump down and is all automatic.

If you buy Bordeaux or triangle inks they can get you a copy of the service manual. Otherwise$10 online.

its only a freaking sign!
 

SignShopGal

SignShopGal
Ahhh! Service manual! There's a difference between the machine manual, now I understand. I've cleaned the wipers, they look good otherwise, as far as rubber whole, not cracked, in tact. Capping station are cheaper than a print head. Lol, yes, they are just signs but this machine was brought on to lesson the load off my hands and shoulders, I make the signs by hand, electrocut film & sheeting..all rolled with a brayer, etc. I was so excited to be able to print multicolor decals. I'm not through yet, I will keep tinkering away with this machine until the sun stops shining. My company keeps hiring people only have them go off into the traffic control side of the company, I'm left with occasional people to help me in here, I'm running solo the workload that normal shops would have at least 3 people doing. I'm not getting paid enough for this.

Thank you for your help, I will post some results after I have a break-though.
 

SignShopGal

SignShopGal
Old machine tells me you need to replace the dampers, wipers, cap stations and sponges. The dampers act to balance pressure differences in weather and temperature changes, and as filters. They are disposable. Pull straight up on them, do not rock them or wiggle, that will break the port right off .. SNAP! Then pull the ink line off. Reverse the process to install.. hint I've broken more ports installing than removing. They need very little force.

Replace the capping stations, the edges get hard over time and don't create a proper seal. While in there, flush the drain lines with solvent till it runs clear. That gets the pumps back to life.

To get to cleaning cycle...
When powered off Hold down the cleaning button while powering on. Machine should go into cleaning mode. The wiper moves forward cap stations move up, and the head travels to the maintenance side of the carriage. From here you can dab the heads with swabs soaked in head cleaning solvent. You can also clean the wiper, it will come forward for that.

As for colors not printing. Usually we see that when the cap station doesn't park properly to seal like it's designed to do. But plugged dampers can do.

Google service manual for your model. Get one. You'll get real good at the machine with that book in hand. The flushing process is called pump down and is all automatic.

If you buy Bordeaux or triangle inks they can get you a copy of the service manual. Otherwise$10 online.

its only a freaking sign!

Just purchased the service manual. It was cheap.
 

printhog

New Member
Vanderj. Roland doesn't sell them. I've tried to get them from Roland multiple times. One reason I'd never buy one of their machines new in box.

its only a freaking sign!
 

Solventinkjet

DIY Printer Fixing Guide
Vanderj. Roland doesn't sell them. I've tried to get them from Roland multiple times. One reason I'd never buy one of their machines new in box.

its only a freaking sign!

That's my point. Anyone who is selling the manual just found the PDF online and is basically selling you something you could find for free anyway. And it's illegal.
 

printhog

New Member
Agreed. But the free PDF I found online was riddled with virus. Really wish the idiots at Roland would just publish the thing online instead of trying to sell machine owners service contracts.

its only a freaking sign!
 

Vinyldog

New Member
Hopefully you're doing this as a hobby or side job because you are going to spend a lot of time working on an old printer like that. Sometimes you need a witch-doctor more than a tech. It's hard to make money in a competitive market like ours even if everything works.
BTW if you blow the fuses on that mother-board from static discharge the replacements will have to be soldered in. And if you get it a little too hot you can toast the board. Make sure it's unplugged and you're grounded when you're working on it.
 
Last edited:

Solventinkjet

DIY Printer Fixing Guide
Agreed. But the free PDF I found online was riddled with virus. Really wish the idiots at Roland would just publish the thing online instead of trying to sell machine owners service contracts.

its only a freaking sign!

I agree. Especially on legacy printers. I think if you pay for the machine you should get to know how to fix it yourself. There is a big fight going down with John Deere about this same issue. Farmers want to fix their tractors but John Deere won't let them!
 

SignShopGal

SignShopGal
Hopefully you're doing this as a hobby or side job because you are going to spend a lot of time working on an old printer like that. Sometimes you need a witch-doctor more than a tech. It's hard to make money in a competitive market like ours even if everything works.
BTW if you blow the fuses on that mother-board from static discharge the replacements will have to be soldered in. And if you get it a little too hot you can toast the board. Make sure it's unplugged and you're grounded when you're working on it.

Thank you for the reminder. My co-worker used to be a mechanic and fixed treadmills too. I'm lucky to get him for the evening, we begin tear-down in t-1 hour
 
Top