Nismoasfuh
New Member
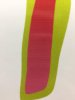
Hello all, so to cut to the chase my sp540v has some very visible lines in it's prints. I have attached a couple pics, one of which is lamented (didn't catch it before it was laminated) but its a good example.
On test prints the magenta is mixing into the yellow, but all the heads seem to be firing just fine. I have done my research and found that the wipers, cap tops, and dampers are probably due for replacing and that should make a big difference. My question is how basic is this job? I mean I know the wipers are easy to do but Im particularly worried about attempting the cap top/ dampers due to the hose and springs. Im just really torn between going about it myself and chucking over the money for a tech to come out and do the job. I have found a couple videos on youtube that seem easy enough but would like any more info on tips and suggestions you guys may have. Also, would like to hear any other suggestions as far as what else may cause the lines, even though I'm sure this is the most practical and efficient place to start tackling this problem. One last thing, is that during the last manual head cleaning I noticed a "icicle" of ink hanging from one of the heads but I was extremely reluctant to try to clean it off as it was exactly where everyone says not to rub your swab (directly on the head) and I knew it would take some serious scrubbing to get it off. So would like to know how to go about that as well. Thanks everyone and look forward to hearing from you all!

 (didn't catch it before it was laminated) but its a good example.
On test prints the magenta is mixing into the yellow, but all the heads seem to be firing just fine. I have done my research and found that the wipers, cap tops, and dampers are probably due for replacing and that should make a big difference. My question is how basic is this job? I mean I know the wipers are easy to do but Im particularly worried about attempting the cap top/ dampers due to the hose and springs. Im just really torn between going about it myself and chucking over the money for a tech to come out and do the job. I have found a couple videos on youtube that seem easy enough but would like any more info on tips and suggestions you guys may have. Also, would like to hear any other suggestions as far as what else may cause the lines, even though I'm sure this is the most practical and efficient place to start tackling this problem. One last thing, is that during the last manual head cleaning I noticed a "icicle" of ink hanging from one of the heads but I was extremely reluctant to try to clean it off as it was exactly where everyone says not to rub your swab (directly on the head) and I knew it would take some serious scrubbing to get it off. So would like to know how to go about that as well. Thanks everyone and look forward to hearing from you all!
On test prints the magenta is mixing into the yellow, but all the heads seem to be firing just fine. I have done my research and found that the wipers, cap tops, and dampers are probably due for replacing and that should make a big difference. My question is how basic is this job? I mean I know the wipers are easy to do but Im particularly worried about attempting the cap top/ dampers due to the hose and springs. Im just really torn between going about it myself and chucking over the money for a tech to come out and do the job. I have found a couple videos on youtube that seem easy enough but would like any more info on tips and suggestions you guys may have. Also, would like to hear any other suggestions as far as what else may cause the lines, even though I'm sure this is the most practical and efficient place to start tackling this problem. One last thing, is that during the last manual head cleaning I noticed a "icicle" of ink hanging from one of the heads but I was extremely reluctant to try to clean it off as it was exactly where everyone says not to rub your swab (directly on the head) and I knew it would take some serious scrubbing to get it off. So would like to know how to go about that as well. Thanks everyone and look forward to hearing from you all!
On test prints the magenta is mixing into the yellow, but all the heads seem to be firing just fine. I have done my research and found that the wipers, cap tops, and dampers are probably due for replacing and that should make a big difference. My question is how basic is this job? I mean I know the wipers are easy to do but Im particularly worried about attempting the cap top/ dampers due to the hose and springs. Im just really torn between going about it myself and chucking over the money for a tech to come out and do the job. I have found a couple videos on youtube that seem easy enough but would like any more info on tips and suggestions you guys may have. Also, would like to hear any other suggestions as far as what else may cause the lines, even though I'm sure this is the most practical and efficient place to start tackling this problem. One last thing, is that during the last manual head cleaning I noticed a "icicle" of ink hanging from one of the heads but I was extremely reluctant to try to clean it off as it was exactly where everyone says not to rub your swab (directly on the head) and I knew it would take some serious scrubbing to get it off. So would like to know how to go about that as well. Thanks everyone and look forward to hearing from you all!