• I want to thank all the members that have upgraded your accounts. I truly appreciate your support of the site monetarily. Supporting the site keeps this site up and running as a lot of work daily goes on behind the scenes. Click to Support Signs101 ...

Webbing Laminator....What's your method?

splizaat

New Member
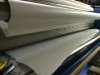
What a learning curve! Coming off our 38" Daige, to our new 63" USTECH has been one heck of an experience. So much more room for error when laminating 54" prints. We finally got it laminating 20ft runs without wrinkles after a bit of fussing with it, but I figured I'd ask about your tips and tricks for laminating large stuff.

How do you start it?
Do you always leave it webbed or do you raise the rollers once you're done?
Do you use a sled?

Let's hear it..most of our runs are about 3 to 25 feet so I don't want to waste 5 feet every time to get it running right :)
 

jtinker

Owner
When we got our Seal the dealer came down and showed us how to do it just like in the videos on their site. To reduce waste they said, all you have to do is take the backing up off of the laminate and bring the laminate through the back of the machine.

I dont know if any of you have ever tried pulling melted cheese off of a sidewalk but thats prettymuch how it was. Especially sicne all of our stuff was 3m cast.

Now we pull the lam and backing through the rollers until its tight, drop the rollers and wind the gear for about an inch or so until there arnt any wrinkes or puckers in the material then take a straight edge razor and score the back of the lam to release the backing. Pull it up to the takeup and there you go. This method worked 1000 times better than the way the dealer showed us. Saved us tons of time and money
 

splizaat

New Member
That's exactly how we laminated everything on our 30" printer (backing off, pull lam through and drop roller). Tried that with the 54" and it was not having it. The only way I was able to get the 54" to feed properly was to pull lam+liner through rollers, drop them and slit the lining like you said. But do you do this everytime? Seems like quite a bit of work to do it every time
 

AF

New Member
Roll to roll eliminates defects on long runs if you get it webbed correctly. Pay attention to your mistakes to learn what a properly webbed laminator looks like. Our laminator takes 30 seconds to web, because of it's design and our commitment early on to figure it out.

I use a sled on short runs of wide material, no sled on small stuff if using kraft. Big squeegee is useful for small jobs too, depending on the laminate being used.

The only advice I can give for avoiding wrinkles is to make sure there are no distortions in the medial or laminate when webbing the machine. Even the most inconsequential wave in the laminate will snowball into a catastrophic failure after a few feet. Once you learn this critical step, you will be able to laminate full rolls in minutes with no issues.
 

Dennis422

New Member
I do something similar to this:
[video=youtube;fF_8OQQQV0I]https://www.youtube.com/watch?v=fF_8OQQQV0I[/video]
I just adjusted the steps slightly for my USTech laminator. Works realy well for me
 

AF

New Member
I do something similar to this:
[video=youtube;fF_8OQQQV0I]https://www.youtube.com/watch?v=fF_8OQQQV0I[/video]
I just adjusted the steps slightly for my USTech laminator. Works realy well for me

That technique does not work with plastic liners, unfortunately.
 

Dennis422

New Member
That technique does not work with plastic liners, unfortunately.


Why not?
If you are careful enough, it will work.
I use Avery 1360 and it worked for me. I cut through in a few places, but it held until it went through.
 

LeLuni

New Member
That video is a good illustration of why flatbed applicators/laminators are gaining in popularity these days.
 

trakers

New Member
Web our USTECH 65" using Scott's method on the video above. Works perfect.

Interestingly, a small Phillips screwdriver is what we use to slit the paper backing on the 3M 8508 laminate we use without cutting through.

Once webbed and used we tape down the back edge of the laminate and raise the rollers a fraction of an inch. When ready to use again lower roller, remove tape and go. Works great.
 

splizaat

New Member
I definitely got the webbing part down.......but I'm looking for some tips to keep it going on long runs. Totally new to 50+" Laminate and there's a hell of a learning curve :) I can get about six to eight feet laminated perfect, then all hell breaks loose and seems the area between the roll of laminate and the top roller all wrinkle the same direction. I end up with little fingering all going one way or the other...if I slide the laminate roll to straighten out the fingers, I can get another foot out of it before they come back. EDIT:: After watching more videos on youtube I think my issue may be that we're pulling the liner off the laminate from about halfway between the laminate roll and the top roller - in mid air, whereas all these videos are showing the liner coming off halfway up the frontside of the actual roller.

This is on our USTECH.

Haven't messed any prints up yet, but I'm fighting it overtime we laminate something. Any tips?
 

AF

New Member
I definitely got the webbing part down.......but I'm looking for some tips to keep it going on long runs. Totally new to 50+" Laminate and there's a hell of a learning curve :) I can get about six to eight feet laminated perfect, then all hell breaks loose and seems the area between the roll of laminate and the top roller all wrinkle the same direction. I end up with little fingering all going one way or the other...if I slide the laminate roll to straighten out the fingers, I can get another foot out of it before they come back. EDIT:: After watching more videos on youtube I think my issue may be that we're pulling the liner off the laminate from about halfway between the laminate roll and the top roller - in mid air, whereas all these videos are showing the liner coming off halfway up the frontside of the actual roller.

This is on our USTECH.

Haven't messed any prints up yet, but I'm fighting it overtime we laminate something. Any tips?

Having the liner release about an inch from the nip stabilizes the laminate better and may help. But if you get wrinkles after a few feet you need to improve your webbing technique or adjust you roller pressure.
 

rjssigns

Active Member
When I web up I used the tail of whatever I previously used to stick the new laminate to. I do however run sacrificial paper. Once the new laminate gets into the nip point I use a sled made from 3mm Sintra and nip on float pressure to straighten out any wrinkles. Works like a champ. No fingers, wrinkles, or buckling. Nothing but smooth.

I adjust the tension as I'm webbing up, but it is a system that works for me and may be unique to our laminator. Laminating I was told is an art, not science. Every laminator and every laminate runs different. You have to learn what your rig likes and be diligent on repeating those techniques.
 
That's exactly how we laminated everything on our 30" printer (backing off, pull lam through and drop roller). Tried that with the 54" and it was not having it. The only way I was able to get the 54" to feed properly was to pull lam+liner through rollers, drop them and slit the lining like you said. But do you do this everytime? Seems like quite a bit of work to do it every time


At the end of each run throw a 6" piece of aluminum in there to hold the lam in place till the next job.
 

splizaat

New Member
So i think i've narrowed my issue down to just tension on the knobs of my USTECH laminator, but I'm hoping you guys can help me diagnose :) We're webbing using the fellers route in the video and every time we laminate, the first 4-6 feet are flawless, then it walks. The wrinkles are in the same direction every time....I have not messed a print up yet since I'm able to manually pull the roll of laminate to the right to get rid of the wrinkles, but they come back about a foot later again so I fight it the whole time.

I know it's a technique thing, I'm having fun with it so far and I feel like we're 90% of the way there - just hoping you can help me get the other 10% :)

I've attached a photo at the end of this 6ft print. You can see the wrinkles. Based on the photo, what do you think?
 

Attachments

  • IMG_9832.jpg
    IMG_9832.jpg
    41.9 KB · Views: 167

trakers

New Member
Are you talking about the roller up/down knobs or the lam supply roll/take up reel clutch tension knobs?

On the first, the up/down knobs should go slack allowing for the full weight of the top roller to rest on the bottom.

On ours the lam supply/take up reel clutches are adjusted so the release point of the backing paper stays constant as it runs (which we adjust so there's only about 3/4 of an inch away from the nip where it could wrinkle)

Truth be known even at minimum tension, left on its own the release point on ours will tend to creep up, but the spring on the clutch won't allow me to back it off anymore. Need to cut a loop off the spring, just haven't done it.

It may also just need a little more fine tuning, just too cheap/lazy to do it since it is easier to just grab the takeup reel to move the release point back down every so often since I have no need to laminate unattended.
 

splizaat

New Member
Sorry I meant I think it has something to do with the tension knobs at the end of the lam roller and the takeup roller, but I'm new to this laminator/larger laminating so I was hoping you guys could help diagnose what I've got going. What would you suggest based on my photo there?
 

AF

New Member
The picture of the wrinkles looks like the machine was webbed incorrectly or possibly the rollers are not aligned / machine is not level. Either will cause the films to skew and distort. Adding more tension is not a good solution in most cases, better to fix the root cause of the problem.
 

gabagoo

New Member
Cut lam to length, hinge it to print, run it through laminator. Zero waste and perfect every time.
I do it this way as most prints are smaller than 8 feet. No waste andI am very fast at getting the sheets cut and taped. 98% success rate!!!

I find it strange in the video that you have to cut a fine line between the lam and the liner...for heavens sake, someone invent a tool to do it easilly please.
 

CES020

New Member
I find it strange in the video that you have to cut a fine line between the lam and the liner...for heavens sake, someone invent a tool to do it easilly please.

There are a number of tools on the market that do that. Our's are from Olfa, but I know others are out there.
 
Top