• I want to thank all the members that have upgraded your accounts. I truly appreciate your support of the site monetarily. Supporting the site keeps this site up and running as a lot of work daily goes on behind the scenes. Click to Support Signs101 ...

JV33-160 - black creeping into the yellow

force-ultimate

New Member
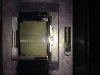
Hello all, I've got a very frustrating problem with both our Mimaki JV33-160 printers. Have a look a the test print result below, there are very fine traces of black ink at the top and bottom of the yellow blocks:

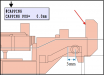
Which unfortunately cause massive problems when printing - big thick horizontal lines:

We've recently changed the capping stations on both machines, which is the only major intervention we've made recently. And as both machines have the same problem we've obviously missed something important. What's been checked so far:

- ink lot: no problems according to Mimaki for the particular batch of yellow SB53 solvent ink
- direct printing from the machines, nothing is being sent badly by RIP software
- the pump lines appear to be draining properly, although the pump and lines haven't been changed for a year
- the capping station has all lines and plugs in the right place and tightly fixed
- the dampers seem to be ok, no contamination from siphoning
- the print heads seem clean
- and we've adjusted the capping station as well as possible, following the Mimaki guide and using the #ADJUST 'secret' menu and have even in desperation replaced the old capping station and reset all values to the originals

What do you think? Is this all coming from a badly positioned capping station? How tightly does it need to be placed against the print head, the AIRPULL and FLUSHING positions? What about the wiper X/Y position? What are the ideal settings?

I've been in contact with our tech. support but they can't make it out to see us for two weeks which is fatal for our production queue of course.

Any help will be much appreciated! All the best, Ben
 
Last edited by a moderator:

BigfishDM

Merchant Member
Ouch, it could possibly be a bad/broken wall in your printhead. I have seen issues like that before and almost everytime it ended up being a bad wall inside the head.
 

BigfishDM

Merchant Member
Yeah it sounds bizarre and I really hope that isnt the case but just wanted to let you know it might be possible. I will keep my fingers crossed for you though!
 

Solventinkjet

DIY Printer Fixing Guide
It sounds like your maintenance station is working as it should. The next thing to do is change the dampers. Even if they look alright, they could be malfunctioning and pulling ink up through the head. If that doesn't fix it, it could be the heads. Make sure your ink cartridges actually have ink in them. The sensors that read if there is ink in them are easily broken. I had a customer the other day who had broken 6 of the 8 sensors which caused the cartridge to pull back on the ink system. This caused drop out in each of the colors and if left alone would have caused the same issue you are having.
 

force-ultimate

New Member
I've checked the ink to make sure all the bags are full or at least have some ink in them, both printers have a bulk ink system which seems to be working ok. And the cartridge inserts seem to be intact.

Changing the dampers is an option though I guess.
 

Solventinkjet

DIY Printer Fixing Guide
Ahh a bulk system. That just made the issue much more complicated. Bulk systems are notorious for causing issues that look like bad dampers and maintenance stations. Does your bulk system hook directly into the ink lines or does it have a mid cartridge? Sometimes just raising the bags up a little bit will help some issues.
 

force-ultimate

New Member
A mid cartridge: the bags are on a stand with lines running into the cartridges inserted in the machine and are positioned slightly higher. On the Mimaki supplied stand as far as I know.
 

force-ultimate

New Member
I've come across some threads about similar problems - one guy was talking about the humidity and temperature during the winter months. It's worth a try! It's cold in our print room and so I've boosted the heating, set up a machine to dehumidify the room, have left the head soaking for 24hours and I'll see what the prints look like on Monday morning...

What is odd is that if I print a large block of 100% yellow, I have these traces at the beginning of the print job and then they disappear gradually. Print jobs in the queue afterwards are more or less ok too. But if the head spends any length of time at the capping station... it gets re-contaminated with black :omg:
 

gixxer2004

New Member
Same problem

Force-ultimate-

i have been having the same problem for the last few months and cannot figure it out!!!! Please let me know what you figure out. I changed out dampers, maintenance station and pump and have not seen any change. I am running 440ml triangle cartridges so you can rule out your bulk fill system. Mine also clears up in the 1st 2inches of the print but comes back when it sits for a few minutes.
 
Vander is on the right track by suggesting the ink system. I believe that your problem lies in the Cartridge Valves. As JV33s age the valves don't always allow full flow of ink when opened. I bet this is what's happening with the yellows and when you do a cleaning the restriction is causing negative pressure to build in the head. As soon as the pump stops running, waste ink is syphoned up into the yellow channels. This is probably what Vander was thinking when he asked about ink levels in the cartridges.

Try either replacing the valves or, somethibg that has worked well for me is to add a small o-ring or e-clip between the end of the valve plunger where the linkage from the solenoid attaches. This will make the plunger pull open a little further and you should get good flow again.

Can send a picture if this doesn't make sense.
 

Vital Designs

Vital Designs
You had mentioned being cold. If you have the exact same problem I would explore the environment further.

Is the media cold and or damp. If the issue dissipates once you start moving then it could be the media has static, moisture or not up to temp yet.

Check humidity, our JV 33's happy zone is around 40%.
 

force-ultimate

New Member
attachment.php

Can you have a look at the picture above? The state of the print head after a small production run, hard clean and a test draw. The capping station looks set too far to one side, do you know how I can set this in the #ADJUST -> Capping menu? I'm having trouble finding the right configuration:

- CAPPING POS
- AIRPULLPOS
- FLUSINGPOS
- WIPERPOSX
- WIPERPOSY
 

Attachments

  • IMG_1237.jpg
    IMG_1237.jpg
    57 KB · Views: 648
Yes please - I'd be grateful for a photo. It sounds like a good analysis of the situation.

attachment.php


Not the best picture but the arrow indicates the area where I suggest adding a small o-ring or e-clip. This needs to sit between the arrowed area and the Link. The idea here is that when the Solenoid actuates the link it will pull the plunger a little further open than before.

That said, your Capping Station photo seems to indicate that you're capping off center and may have the Cap riding up onto the protective bezel around the head, and thus not getting a good seal - This is why one of the most useful troubleshooting tools is a large syringe (I'm meaning to add them to our web store as a tool). There is no actual adjustment for the left/right alignment of the Capping Station that I know of, rather capping off-center like this usually indicates that the post of the Capping Station which the carriage pushes against has worn down.

attachment.php


On JV3s I've had temporary success gluing a thin piece of styrene to the area to build it up, but really you need to replace the whole Capping Station.

Hope these suggestions help!
 

Attachments

  • Screen Shot 2015-02-18 at 7.37.32 AM.png
    Screen Shot 2015-02-18 at 7.37.32 AM.png
    84.1 KB · Views: 635
  • Screen Shot 2015-02-18 at 7.53.20 AM.png
    Screen Shot 2015-02-18 at 7.53.20 AM.png
    41.9 KB · Views: 726

force-ultimate

New Member
Hi there, just a quick message to close this thread down.

- on one of our machines a capping station replacement (the whole thing - head + carriage) and a careful capping head adjustment solved the banding problem
- on the second machine, the same maintenance didn't help and after testing the print head by pumping a small amount of liquid through it we found that the head itself was broken - ink was leaking all over the different channels and so a print head replacement had to be ordered and installed :frustrated:

The head probably broke after a pretty severe paper blocage we had a few weeks ago.

Thanks for all your help/suggestions. I've learned a lot and hopefully this new print head will last a lot longer than it's predecessor...

All the best, Benjamin.
 
Top