• I want to thank all the members that have upgraded your accounts. I truly appreciate your support of the site monetarily. Supporting the site keeps this site up and running as a lot of work daily goes on behind the scenes. Click to Support Signs101 ...

Advice Needed

divers2deep

New Member
I am extremely new to all of this. I am doing my first wrap and i am struggling. I am using mpi 1005ezrs / 1360 DOL. vertical panels 52" wide with .5" overlap. I am lining my panels up and using masking tape about 24" below the top of the trailer. I squeegee to the top and then work my way down. I don't believe as though i stretch the vinyl much. I'm having bunching issues and my print are not lining up very easily, when i do line them up, I am having to raise the print which creates more bunching. I completely understand practice makes perfect. I think my prints are stretching too much, not sure though.

Please don't beat me up to bad, trust me ive completed 25% of the trailer in 6 and half hours. I'm kicking my own butt at this time.

Any elementary tips for me would be awesome!!!!

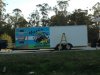
Here are pics of my issues...

Thanks a bunch, Signs101 members are truly awesome to converse with!
 

Attachments

  • Photo Feb 21, 5 44 12 PM.jpg
    Photo Feb 21, 5 44 12 PM.jpg
    95.3 KB · Views: 86
  • Photo Feb 21, 5 47 15 PM.jpg
    Photo Feb 21, 5 47 15 PM.jpg
    67.4 KB · Views: 64
  • Photo Feb 21, 5 05 55 PM.jpg
    Photo Feb 21, 5 05 55 PM.jpg
    62.2 KB · Views: 73
  • Photo Feb 21, 5 06 02 PM.jpg
    Photo Feb 21, 5 06 02 PM.jpg
    65.8 KB · Views: 86
  • Photo Feb 21, 5 47 24 PM.jpg
    Photo Feb 21, 5 47 24 PM.jpg
    63.4 KB · Views: 68

Snydo

New Member
In the future I would recommend starting from the back, so your overlaps are not a catch-all(air, dirt, etc.). If the outside temp is warm enough or overuse of a heat gun could cause this. I have been using your media/lam combo for years with few issues but It is sensitive to too much heat, as most vinyls are.

What was this printed on?
 

divers2deep

New Member
In the future I would recommend starting from the back, so your overlaps are not a catch-all(air, dirt, etc.). If the outside temp is warm enough or overuse of a heat gun could cause this. I have been using your media/lam combo for years with few issues but It is sensitive to too much heat, as most vinyls are.

What was this printed on?

I'm printing on Roland VS540.

Good call on starting from the back. I never thought of that. I will do the other side that way.
 

Snydo

New Member
also if you didn't...always use 'automatic tile flip' or your equivalent in your RIP when you send to the printer. This greatly improves panel to panel registration for some printers.
 

divers2deep

New Member
also if you didn't...always use 'automatic tile flip' or your equivalent in your RIP when you send to the printer. This greatly improves panel to panel registration for some printers.

I just did an automatic tile flip google search, nothing relevant came up, can you quickly explain what that is ?

Thanks!
 

GAC05

Quit buggin' me
From the photos it looks like some of those panels are beyond the point of fixing by someone with your skill level. You need to find outside help.
The wrinkled panel has to be pulled back up past the point of the folded areas.
From there you need pull the creases apart and then use a heater gun to warm the film section by section just until it pulls back into the smooth flat unwrinkled shape.Then let it cool all the way down to minimize the stretching when it goes down the second time.
If you are working out in the hot Florida sun its gonna be a problem no matter what you do. You need shade to keep the vinyl and vehicle from getting too warm.

If the film is too aggressive on the initial tack (that is what it looks like in the photos) you should do what you did with the top and then fold the remaining liner back on its self and just expose a foot or so of the film at a time - working your way down the side using the fold in the liner to keep the film from contacting the side of the trailer.
It's easier to control and you can drive the film to get it to line up with the joining edge(s). Do a web search for Justin Pate's "micro triangle technique" to see how to deal with mismatched details along the panel edges.
Might be too late to salvage what you have done so far (I have not used the 1005ez film) but a skilled installer might pull it off. I had to remove and re-install a 52"x8' panel of printed 180c that was placed out of order on the side of a box truck & it did work.

good luck with it

wayne k
guam usa
 

CanuckSigns

Active Member
what I find helps is to use a empty roll core. here is my procedure:

1. do what you are already doing with tacking the top 24" or so on.
2. with the backer paper still on the bottom of the print, roll the print onto the core.
3. pull a few feet of backer off at a time and work your way down, making sure to squeegee side to side with a decent overlap.

The core helps to keep the tension even across the panel, and keeping the backer paper on helps to keep the vinyl from stretching as much, an extra set of hands is helpful if you can get it.

As for what you have done already, depending on your skill, you may be able to repair the problems, it's amazing how a little heat will shrink the vinyl back to it's original size, but it may be easier to reprint the panels and start again as what you have posted is not something that should go out your door.

Good luck, it takes practice, but it does get easier as you go.
 

divers2deep

New Member
I found this from roland, is this similar to what you are talking about.

"If you are looking for a tool in Roland’s VersaWorks™ RIP software that speeds up the process of creating graphics larger than the width of the device, then be sure to check out tiling. VersaWorks allows you to set the tiles any way you see fit, depending upon the task at hand. However, be sure to alternate your tiles. This will help eliminate any possible print differences from one side of the printer to the other. Simply click on the “Clip & Tile” tab in VersaWorks and check the box marked “place alternated” under the tiling section, and then let the software do the rest!"
 

divers2deep

New Member
Thanks for the feedback! and absolutely outside help would be nice, but I've got to learn somehow, I'm gonna reprint and give it another shot.

From the photos it looks like some of those panels are beyond the point of fixing by someone with your skill level. You need to find outside help.
The wrinkled panel has to be pulled back up past the point of the folded areas.
From there you need pull the creases apart and then use a heater gun to warm the film section by section just until it pulls back into the smooth flat unwrinkled shape.Then let it cool all the way down to minimize the stretching when it goes down the second time.
If you are working out in the hot Florida sun its gonna be a problem no matter what you do. You need shade to keep the vinyl and vehicle from getting too warm.

If the film is too aggressive on the initial tack (that is what it looks like in the photos) you should do what you did with the top and then fold the remaining liner back on its self and just expose a foot or so of the film at a time - working your way down the side using the fold in the liner to keep the film from contacting the side of the trailer.
It's easier to control and you can drive the film to get it to line up with the joining edge(s). Do a web search for Justin Pate's "micro triangle technique" to see how to deal with mismatched details along the panel edges.
Might be too late to salvage what you have done so far (I have not used the 1005ez film) but a skilled installer might pull it off. I had to remove and re-install a 52"x8' panel of printed 180c that was placed out of order on the side of a box truck & it did work.

good luck with it

wayne k
guam usa
 

Snydo

New Member
tile flip is essentially every other panel prints upside down...so if you print panel 1 feet first, panel 2 would print head first,....panel 3 feet first etc...
If you are in the deep south I would highly recommend that you find a pavilion or something you can park under with full shade, it can make a world of difference.
 

divers2deep

New Member
I agree with you, this should not go out the door! Good thing the trailer belongs to a friend. Im using it as a learning experience... He paid for the materials and Ive got to learn!

I will try the empty core, sounds like the added tension may be helpful.

what I find helps is to use a empty roll core. here is my procedure:

1. do what you are already doing with tacking the top 24" or so on.
2. with the backer paper still on the bottom of the print, roll the print onto the core.
3. pull a few feet of backer off at a time and work your way down, making sure to squeegee side to side with a decent overlap.

The core helps to keep the tension even across the panel, and keeping the backer paper on helps to keep the vinyl from stretching as much, an extra set of hands is helpful if you can get it.

As for what you have done already, depending on your skill, you may be able to repair the problems, it's amazing how a little heat will shrink the vinyl back to it's original size, but it may be easier to reprint the panels and start again as what you have posted is not something that should go out your door.

Good luck, it takes practice, but it does get easier as you go.
 

divers2deep

New Member
Got it, its the alternate tile feature in versaworks... I will work in the shade tomorrow, I am in southwest FLA, definitely may be an issue!

Again thanks for your help.

tile flip is essentially every other panel prints upside down...so if you print panel 1 feet first, panel 2 would print head first,....panel 3 feet first etc...
If you are in the deep south I would highly recommend that you find a pavilion or something you can park under with full shade, it can make a world of difference.
 

MR. Graphics

New Member
I do alot of outside installs on location in Florida. Florida sun will heat your avery supercast to (avery super gooey). been there almost had some bottom writting fall off the bottom of the door on the back of a van. Keep the graphics out of the sun. start on the shaded side, work quickly or find a friend who has a warehouse/garage that will provide a little temp break. As for install, only pull 18" of backing paper off at a time.
 

msenjur

New Member
why not using wet installation? Water would dry up easly, you can set matcing, surface is flat...

i also hope, that you have laminate the prints, becouse then installation is much easier.
 

xxaxx

New Member
why not using wet installation? Water would dry up easly, you can set matcing, surface is flat...

i also hope, that you have laminate the prints, becouse then installation is much easier.

You don't wet install vehicle wraps ... doesn't play nice with the adhesion.
 
Top