• I want to thank all the members that have upgraded your accounts. I truly appreciate your support of the site monetarily. Supporting the site keeps this site up and running as a lot of work daily goes on behind the scenes. Click to Support Signs101 ...

Arrrgggg...

Bradster941

New Member
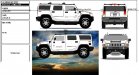
Well, I bring in a template from Signshop Helper into Flexi.
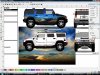
I then ungroup the image and select one of them.
Next I bring in a picture to use as a fill.
<?xml:namespace prefix = o ns = "urn:schemas-microsoft-com:eek:ffice:eek:ffice" /><o:p></o:p>
I can Arrange it to the back, but that doesn’t work.
I’m missing something here.

How do I make it show through on the template only?
Picture attached.

The Blue Sky is what I want as a fill.

<o:p></o:p>
TIA
<o:p></o:p>
Bradster.
 

Attachments

  • wondering 1.jpg
    wondering 1.jpg
    59.2 KB · Views: 243

signguy95

New Member
you can select the hummer and do an ungroup. Next while still selected use the compound tool. this will create just outlines of the hummer or...

Go to edit>select>select by attributes. Under color check mark the white and select OK. This will select just the white panels. Group them together. select the white panel and the picture. Go to Arrange>Mask>mask. this should accomplish a better looking proof!

Hard to explain but very simple to do!


Jay
 
S

Stan B

Guest
if your vehicle is a vector ungroup it and make a copy of only outter edge outline of the vehicle, move it over the background, select both (including the background) and do MASK. Then position the mask over the original vehicle.
 

Mike Paul

Super Active Member
Mask is the correct way. What version of Flexi do you have? The Mask feature may not be available.
 

Bradster941

New Member
Thanks Guys, I appreciate your help.

In Jays method, I like how the detail is maintained, (windows, molding, badges) and the such.

The question is, how do you move the picture around behind the outline so it shows through for the purpose of positioning?

I can select the outline and select either “No Fill” or “Wireframe”, but then when I move the picture around I am no longer able to select the outline.!.

Mike, I'm using Flexi Pro 7.6

Thanks again, pic. Attached

Brad.

:Cool 2: :Cool 2: :Cool 2: :wink:
 

Attachments

  • hummer filled 4s1.jpg
    hummer filled 4s1.jpg
    140.1 KB · Views: 190

Bradster941

New Member
Select in design editor


Well, Ummm, thanks for your reply, but your 4 word post really doesn’t tell me much.
I spent 45 minutes trying to get it to work in design editor, but still have no idea what you are talking about.
<?xml:namespace prefix = o ns = "urn:schemas-microsoft-com:eek:ffice:eek:ffice" /><o:p></o:p>
Could you be a little more specific?

TIA

Brad.
 

asignstop

New Member
Try right clicking inside the masked area, choose "select within", you should be able to reposition the image on the template.
 
Is it masked , grouped or compounded. In design editor & it's drop-down menu you have access & control over everything. You may need to change the layer of selection. Is the outline itself masked over a white background Rather than filled.
 
Everyone builds files differently. IE - white background with black circle & white circle centered on the black. I would have a white filled circle on top of the black filled circle - 2 objects. Some compound or cut through the black to reveal white background (like a donut) - 1 object. If you where to select the white circle within the black , you would be selecting the white background along with everything else attached to that layer. I don't know how your file is built so I can't give you a specific. You may have to release, unmask or uncompound objects or find selected paths.
 

Bradster941

New Member
you can select the hummer and do an ungroup. Next while still selected use the compound tool. this will create just outlines of the hummer or...

Go to edit>select>select by attributes. Under color check mark the white and select OK. This will select just the white panels. Group them together. select the white panel and the picture. Go to Arrange>Mask>mask. this should accomplish a better looking proof!

Hard to explain but very simple to do!


Jay


cinemasign.grafix, this is what I'm following as it makes a nice proof.
The only problem is, I can't seem to move the picture around and see it through the (white) panels unless I select wireframe or no fill.
Once I select either of those options, though I can see the background picture at that point and reposition it, I am no longer able to select my outline to Mask it with the picture.

Hope this makes since,
and thanks for trying to help.

Brad.
 
Top