Smoke_Jaguar
Man who touches printers inappropriately.
After acquiring a JFX200-2513 for a stellar $2500, I got a taste for the big flatbeds. Minor strike damage on the heads, but a quick and easy restoration that was printing within a day. Such glorious times. Sheets of plywood, drywall, framed canvas, coroplast, all sorts of big things to print. Running the CMYKClClWW set on LUS-120 was pretty good and the results were nice. It was like the big dumb brother to my UCJV300. Unfortunately, it wasn't big enough. The Gen5 heads are great, but only two of them? Bah.
A bit of snooping around and I found a JFX500-2131 located a nice 12+ hour drive away. Not bad, only $4500 with a CIO board error. Should be an easy fix. The owner had it set up by PDS and after it went down, he hadn't heard back from their techs in months (yup, PDS all right). Basically a boat anchor to the guy, and cheap and quick were the name of the game. After looking at diagrams and videos of them being setup, was going to be a feat. At $4,500, freight was out of the question. So, 1 28" box truck and mini forklift later we hit the road. The print gantry was removed and we made a pallet cradle to carry the head/y axis and disconnected it. A few 2x4's later and lots of screws sunk in, we got things bolted in and rested the wooden 'crate' on the bed atop a thick sheet of insulation foam to protect the bed. One long-ass road trip later and we get the thing safely to the shop without a ton of hassle. Skipped the hotel, so just me and 2 worn out coworkers to unload without too much fuss. Finally get the hookup on JFX500 manuals, damn those would've been nice before the move.
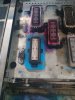
After bolting the carriage back on and getting the thing powered up, the CIO error was tracked to the board not getting power. 2/3 of the 36V power supplies were toasted. Plasma cutter in the next room and no climate control, so tons of nasty conductive dust was built up inside the PSUs. Power supplies are easily $1200+ each, so lucked out when coworker found some surplus TDK Lambda SWS1000L-36 units for only $250 on eBay and we snagged all three for less than the cost of half of one from Mimaki. With power restored, we had to see why the CIO board wasn't getting power. After tracking power back to the JFX Slider board in the main electronics bay, we found a fuse just underneath the ribbon cable leading to it on the backside of the slider board. Blown fuse replaced, power back on the CIO board. More errors, but new ones. Turns out the CIO board controls all the motors in the head station, none are moving. Coworker probes out the board, finds a couple of bad chips and gets replacements for around $20 on Digikey. New parts get the CIO back into working order. A good day of swapped cables (2x Pump III boards, got them switched around, oops) and replacing the air/vacuum pump to get it the pressure system working again. Glass bowl vacuum filter is rust-colored, so pulled that to get air flowing again. Vacuum testing the 8 port manifold showed 3 bad solenoids, swapped them out individually from a pile of donors.
After vacuum/pressure errors are cleared, I get to flush the subtank and white lines. Messy and awful as usual. Capsule filters seem to be shot, no shocker there. Seems they're a yearly maintenance item anyways. But, after some work, ink is flowing and subtanks are filling. Finally doing test prints! Now I get to flush all the heads, recovering them pretty well (I love the Gen5) and have gotten some decent but banded test prints so far. Kept getting linear encoder errors on the bed, so had to clean and realign the sensor. The dang thing uses a nice set of Renishaw scales, I am impressed.
Poking around for latest firmware. Printer isn't terribly old with a 2016 build date, hope to have 99% of the nozzles firing as well. Stocked with LUS-150 with CMYKWW and moving one of the white tanks over to clear ink for doing glossy stuff that clients love. Been a helluva fun and crazy rebuild, but I think I got a smoking deal. The printer is based on the ancient EPL2 board, but it handles itself pretty well.
A bit of snooping around and I found a JFX500-2131 located a nice 12+ hour drive away. Not bad, only $4500 with a CIO board error. Should be an easy fix. The owner had it set up by PDS and after it went down, he hadn't heard back from their techs in months (yup, PDS all right). Basically a boat anchor to the guy, and cheap and quick were the name of the game. After looking at diagrams and videos of them being setup, was going to be a feat. At $4,500, freight was out of the question. So, 1 28" box truck and mini forklift later we hit the road. The print gantry was removed and we made a pallet cradle to carry the head/y axis and disconnected it. A few 2x4's later and lots of screws sunk in, we got things bolted in and rested the wooden 'crate' on the bed atop a thick sheet of insulation foam to protect the bed. One long-ass road trip later and we get the thing safely to the shop without a ton of hassle. Skipped the hotel, so just me and 2 worn out coworkers to unload without too much fuss. Finally get the hookup on JFX500 manuals, damn those would've been nice before the move.
After bolting the carriage back on and getting the thing powered up, the CIO error was tracked to the board not getting power. 2/3 of the 36V power supplies were toasted. Plasma cutter in the next room and no climate control, so tons of nasty conductive dust was built up inside the PSUs. Power supplies are easily $1200+ each, so lucked out when coworker found some surplus TDK Lambda SWS1000L-36 units for only $250 on eBay and we snagged all three for less than the cost of half of one from Mimaki. With power restored, we had to see why the CIO board wasn't getting power. After tracking power back to the JFX Slider board in the main electronics bay, we found a fuse just underneath the ribbon cable leading to it on the backside of the slider board. Blown fuse replaced, power back on the CIO board. More errors, but new ones. Turns out the CIO board controls all the motors in the head station, none are moving. Coworker probes out the board, finds a couple of bad chips and gets replacements for around $20 on Digikey. New parts get the CIO back into working order. A good day of swapped cables (2x Pump III boards, got them switched around, oops) and replacing the air/vacuum pump to get it the pressure system working again. Glass bowl vacuum filter is rust-colored, so pulled that to get air flowing again. Vacuum testing the 8 port manifold showed 3 bad solenoids, swapped them out individually from a pile of donors.
After vacuum/pressure errors are cleared, I get to flush the subtank and white lines. Messy and awful as usual. Capsule filters seem to be shot, no shocker there. Seems they're a yearly maintenance item anyways. But, after some work, ink is flowing and subtanks are filling. Finally doing test prints! Now I get to flush all the heads, recovering them pretty well (I love the Gen5) and have gotten some decent but banded test prints so far. Kept getting linear encoder errors on the bed, so had to clean and realign the sensor. The dang thing uses a nice set of Renishaw scales, I am impressed.
Poking around for latest firmware. Printer isn't terribly old with a 2016 build date, hope to have 99% of the nozzles firing as well. Stocked with LUS-150 with CMYKWW and moving one of the white tanks over to clear ink for doing glossy stuff that clients love. Been a helluva fun and crazy rebuild, but I think I got a smoking deal. The printer is based on the ancient EPL2 board, but it handles itself pretty well.
")

