-
I want to thank all the members that have upgraded your accounts. I truly appreciate your support of the site monetarily. Supporting the site keeps this site up and running as a lot of work daily goes on behind the scenes. Click to Support Signs101 ...
You are using an out of date browser. It may not display this or other websites correctly.
You should upgrade or use an alternative browser.
You should upgrade or use an alternative browser.
XR-640 main board change
- Thread starter Mr.Bundy
- Start date
IN THE MEANTIME keep the captop wet with cleaning solution from a roland cartridge or AT A MINIMUM isopropyl.
can’t help you with your board swap, but thiscwill hopefully buy you enough time to sort it out.
if you are able, do a cleaning cycle and/or a test print
failing that manually unlock the carriage & wet down with a speay bottle
can’t help you with your board swap, but thiscwill hopefully buy you enough time to sort it out.
if you are able, do a cleaning cycle and/or a test print
failing that manually unlock the carriage & wet down with a speay bottle
Is this a new board you have just fitted? I'm not 100% on the XC/XR but it should be a dip switch setting on the main board tells the board which printer model it is fitted to.
If you check the switch settings from your old board, and make sure the new ones are set the same and see if that fixes it
If you check the switch settings from your old board, and make sure the new ones are set the same and see if that fixes it
DL Signs
Never go against the family
Yes, dip switches must be set in a specific order. Some of the same boards are used in different printers, and those need to be set right order for each model. That's probably your issue.
Do you have the original board yet to compare the settings to?
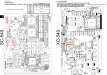
If you have a service manual it should have the switch setting on the main board page like the samples shown here (note these are NOT for the XR640). I have a lot of older Roland manuals, unfortunately that's a model I don't have a manual for. Maybe someone will help you out and send it to you, or the switch settings, or just buy a service manual on line. Where did you get the board from? I've replaced boards in Roland's, and the documentation that came with the board also usually included the switch settings for each model it was used in.
Do you have the original board yet to compare the settings to?
If you have a service manual it should have the switch setting on the main board page like the samples shown here (note these are NOT for the XR640). I have a lot of older Roland manuals, unfortunately that's a model I don't have a manual for. Maybe someone will help you out and send it to you, or the switch settings, or just buy a service manual on line. Where did you get the board from? I've replaced boards in Roland's, and the documentation that came with the board also usually included the switch settings for each model it was used in.
Attachments
Mr.Bundy
New Member
Thanks for all the help . Dip switch was wrong . But got other problems
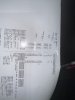
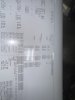
Got that part Fixed but having a hard time getting settings moved over. Since I can't put a file from the old board. Network port went out. So have to do it all by hand . I'm having this problem now. Here are 2 screen shots. Can't get the ink cal to show . Not sure where I can enter it in.
Got that part Fixed but having a hard time getting settings moved over. Since I can't put a file from the old board. Network port went out. So have to do it all by hand . I'm having this problem now. Here are 2 screen shots. Can't get the ink cal to show . Not sure where I can enter it in.
Attachments
DL Signs
Never go against the family
If you don't have/ didn't use the Peck tool for all your settings and paramiters, you'll have to do it all manually. Again, if you have the service manual for it, under parts replacement/ main board it'll have a list of what you need to do. This is for an XC, but it'll be similar... Since it's a new board, it will have no parameters set for anything, all is needed for it to operate.
Perform the following operations if it is not possible to transfer the parameters by Peck4.exe.
1. DIP SW SETTING
2. BATTERY INSTALLATION
3. FIRMWARE INSTALLATION
4. SYSTEM PARAMETER INITIALIZE
5. TIME AND DATE SETTING
Set the date and time in the [SERVICE MENU] > [SUB MENU] > [CLOCK].
6. IP ADDRESS SETTING
Start the machine with the Service Mode and set in the User Menu.
7. FIRMWARE VERSION CONFIRMATION OF NETWORK CONTROLLER
8. HEAD RANK SETTING
9. SERIAL NUMBER INPUT
10. INK TYPE SETTING
11. CAP & WIPER CHECK
It can be performed in the [SERVICE MENU] > [I/S MENU] > [I/S CHECK].
12. CAP HEIGHT CHECK
It can be performed in the [SERVICE MENU] > [I/S MENU] > [CAP ADJUST] > [CHECK GAP].
13. SENSOR CHECK
It can be performed in the Sensor Check.
14. LIMIT & CUT DOWN POSITION INITIALIZE
15. LINEAR ENCODER SETUP
16. TOOL PRESSURE ADJUSTMENT
17. HEAD ALIGNMENT
Only Horizontal and Bidirectional Adjustment are required.
18. CALIBRATION
19. CROP MARK SENSOR ADJUSTMENT
20. CROP-CUT ADJUSTMENT
21. PRINT / CUT POSITION ADJUSTMENT