SignosaurusRex
Active Member
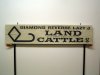
Last evening I decided to throw together a hand lettered piece for a buddy of mine in Montana. Just something to hang in his cave. I wanted to make it appear rather old and aged.
I started with a 5/quarter" x 10" x 8' rough cedar, smooth 1 side that had been sitting outside for some time and had developed a slight curl and cracks. Cut to 42" long with a hand saw so as to leave a rough end cut. I painted the wood with fast dry white spray primer gradually while rubbing the paint in with an old rag. I then misted the piece with beige fast dry spray paint, again rubbing with the same rag while spraying. Enough paint was applied to coat the wood yet still barely see the grain.
I made a quick pounce pattern so as to not have any layout pencil marks left on the finished product. I then lettered it with black Japan Color mixed with window spar varnish to cut the coverage of the black. After the lettering was completed I used some Scotch-Brite and 320 sand paper to knock down the finish and expose some more wood grain and brush strokes.The Japan Color with spar varnish dries extremely fast so very little time was needed once lettered before sanding. Once the desired look was achieved I clear-coated the sign with fast dry clear satin spray. Once that was dry I buffed the finish with Scotch-Brite to achieve a semi flat finish.
This turned out to be a pretty fun project especially since it goes so fast. From start to finish the whole thing only took about 3 hours.


 If the sign were that proportion you have in the pic, I would not have taped that top line but since they are only 1-1/8" tall......wellllllllllll, what can I say, besides, since when is the use of tape considered cheating? :ROFLMAO: