-
I want to thank all the members that have upgraded your accounts. I truly appreciate your support of the site monetarily. Supporting the site keeps this site up and running as a lot of work daily goes on behind the scenes. Click to Support Signs101 ...
You are using an out of date browser. It may not display this or other websites correctly.
You should upgrade or use an alternative browser.
You should upgrade or use an alternative browser.
Cutting weighted outline in Illustrator.
- Thread starter wildhock
- Start date
Dan Ripper
New Member
Go to Object>Path>Outline Stroke. You might them have to un-group them.
iSign
New Member
first of all, you should consider making a copy of the text, pasting it in the back, and adding your stroke weight only to the back copy.
The front copy, without any stroke represents the proper letter forms designed into the font. These should not be messed with as they will suffer somewhat in all cases, and suffer far beyond an unacceptable degree in many cases.
The copy in the back will now be able to have a stroke applied, and only the outer half of it will show behind your properly formed copy in front, so you might need to assign a much larger stroke weight to get a similar thickness of "outline", but you will be doing it in what I consider the "right" way by not bastardizing professionally designed fonts with quick-fix outlining procedures.
Lunatic Taskbar
New Member
I agree with Isign, thats exactly how I do it.
Sign_Boy
New Member
first of all, you should consider making a copy of the text, pasting it in the back, and adding your stroke weight only to the back copy.
The front copy, without any stroke represents the proper letter forms designed into the font. These should not be messed with as they will suffer somewhat in all cases, and suffer far beyond an unacceptable degree in many cases.
The copy in the back will now be able to have a stroke applied, and only the outer half of it will show behind your properly formed copy in front, so you might need to assign a much larger stroke weight to get a similar thickness of "outline", but you will be doing it in what I consider the "right" way by not bastardizing professionally designed fonts with quick-fix outlining procedures.
Sounds about right to me.
boostdemon
New Member
the catch to that is then you have 3 paths for each letter outline. The original letter, the outter ouline, and the inner outline. If you dont delete the original and the inner, wont the plotter slice up your lower layer as it shows in the group layer?
not a big deal, select and remove the rest thats in the way. then you get where i am trying to find a faster/easier way to merge the ouline cuts together when they overlap
not a big deal, select and remove the rest thats in the way. then you get where i am trying to find a faster/easier way to merge the ouline cuts together when they overlap
iSign
New Member
apply stroke same color as fill (on a copy in the back, as mentioned earlier), then choose the "outline stroke" command mentioned earlier, then while still selected, choose "unite" from the pathfinder tools. Done.
Ken, Corel is inferior, save your pontification for n00bs who can't afford industry standard programs,
...don't waste an Illustrator owners time with your own software shortcomings.
Ken, Corel is inferior, save your pontification for n00bs who can't afford industry standard programs,
...don't waste an Illustrator owners time with your own software shortcomings.
boostdemon
New Member
apply stroke same color as fill (on a copy in the back, as mentioned earlier), then choose the "outline stroke" command mentioned earlier, then while still selected, choose "unite" from the pathfinder tools. Done.
Ken, Corel is inferior, save your pontification for n00bs who can't afford industry standard programs,
...don't waste an Illustrator owners time with your own software shortcomings.
I have a "merge" option in the pathfinder effect menu, but it doesnt do anything. I tried the "trap..." options for merge and selected remove redundant anchors but that didnt change anything either. Im probably doing it wrong

iSign
New Member
what version of illustrator? I have them all, but I still use version 9 because that was the one I was on when life got too busy to screw with chasing after where Adobe moved menus on upgrades I only had to buy to open client artwork.
As far as what I've looked at, "Unite" has always been there... but as one example of why I quit bothering to learn the upgrades, in version 10, what worked in 9 by simply clicking "unite", now had to be followed by clicking "expand"... can't see why that was worth doing? ...
hmmm... just goofed around in CS3 for the first time since I bought it, besides using it to open files... and now they call it "add shapes to area" ...AND it doesn't work in this case, and "expand' stays greyed out
bummer... just checked CS2 also... don't work there either... screw upgrades!!.. I do it every day in version 9
KR3signguy
New Member

Uhhhhhh, he said stroke.
GK
New Member
Hello All,
Within Illustrator, If I create a line of text and create a different color outline around it by increasing the "weight" of the stroke, is there anyway for me to seperate the two in order to cut them on my Roland?
Thanks for any help.
Merry Christmas!
Jon
Yes there is. What you need to do first is is convert the type to outlines, then Object > Expand and it will expand the stroke into its own layer.
As far as what I've looked at, "Unite" has always been there... but as one example of why I quit bothering to learn the upgrades, in version 10, what worked in 9 by simply clicking "unite", now had to be followed by clicking "expand"... can't see why that was worth doing? ...
Version 10 brought in "smart" compound shapes that allowed you to "unite" two items, but you could still go back and move those two items indepently under a "sub object". That's why the expand button is there. Ones you've done expand you can no longer adjust the individual components.
Alternatively you could hold down alt while clicking on the "unite" function and it bypasses the "sub object".
If you've used flexi-sign it's similar to how it keeps the memory of compounded objects.
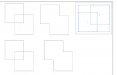
If you look at the attached picture you see two rows. The bottom row is how you would do the addition. The top row is doing the addition through "smart groups". The third group on the top row shows I can still move the individual squares around, but it's still considered one "object".
(the grey box you see there comes up when you enter one of these "smart groups".)
Attachments
boostdemon
New Member
Ok, here’s exactly how I am doing it in Illustrator CS2. I'll do this step by step so I am hoping someone can tell me a better way. I really don’t mean to thread-jack wildhock's original post, but I think it’s along the same lines...
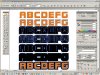
Here is an actual file I just finished for cutting on vinyl. It took me about 5 hours to "fix" the original file so it was correct for plotting.

... as you can see the stroke path has been combined and duplicate sections removed and paths 'joined' so the plotter only cuts around the border.

So starting fresh, here’s just two letters that combine the majorit of my issue when they are on an outline multi-layer assembly.

then I am selected the layer and right clicking the selection and choosing "create outlines" to get the paths.

Then I duplicate the layer and add the thick stroke.

Select the stroke group and go to "Object | Path | Outline Stroke". Then I delete the original text letters...

Then in order to remove the center sections of the compound path, you have to select each layer and right click the image and choose "release compound path" (this is also in the ‘object | compound path’ menu)

Delete all the extra layers of path parts you don’t need. There always seems to be stray single anchor path layers left over too. At this point for ease of viewing I change the two inner cut outs of the "e" to white fill

The "k" is easier since it doesn’t need an inside cut out. For the next problem I have to move all the intersecting layers into one group.
HERES MY BIGGEST ISSUE: As you can see, the paths overlap. The plotter will cut these lines so they all have to be joined into just 1 path of the outer most line.
I changed the color of the e just so you can see the difference between the two layers.

First thing I did was select the pen tool, add new anchors on both the e and the k paths at their intersecting points.

Then pick up the 'path select' tool and select the path line that is overlapping on each and delete it till you just have the two open endpoints. I found it helps to lock the other layer so you can click and drag a box touching the line. Did the same for the k.

Then I join the end points. both layers unlocked, dragging a box into both end anchors... or if you have to get fancy, holding select - click end box, release select, click end box again to select only the end, then hold select and grab the end of the other path.

Right click, 'join path'. if you don’t have only those two end points, and they're both in the same group it just errors out and you want to throw your mouse. None the less, eventually you get one solid outline (which you have to keep adding letters to) and the inside cut outs.

Now i have two layers to send to the plotter... one for the grey background layer and only for the orange top layer.

This is a ridiculous process. doing "aplhenke" this way was stupid, what if i had to do a whole set of lettering for something... I’d just turn down requests for anything over 5 letters lol.
Help?
Here is an actual file I just finished for cutting on vinyl. It took me about 5 hours to "fix" the original file so it was correct for plotting.
... as you can see the stroke path has been combined and duplicate sections removed and paths 'joined' so the plotter only cuts around the border.
So starting fresh, here’s just two letters that combine the majorit of my issue when they are on an outline multi-layer assembly.
then I am selected the layer and right clicking the selection and choosing "create outlines" to get the paths.
Then I duplicate the layer and add the thick stroke.
Select the stroke group and go to "Object | Path | Outline Stroke". Then I delete the original text letters...
Then in order to remove the center sections of the compound path, you have to select each layer and right click the image and choose "release compound path" (this is also in the ‘object | compound path’ menu)
Delete all the extra layers of path parts you don’t need. There always seems to be stray single anchor path layers left over too. At this point for ease of viewing I change the two inner cut outs of the "e" to white fill
The "k" is easier since it doesn’t need an inside cut out. For the next problem I have to move all the intersecting layers into one group.
HERES MY BIGGEST ISSUE: As you can see, the paths overlap. The plotter will cut these lines so they all have to be joined into just 1 path of the outer most line.
I changed the color of the e just so you can see the difference between the two layers.
First thing I did was select the pen tool, add new anchors on both the e and the k paths at their intersecting points.
Then pick up the 'path select' tool and select the path line that is overlapping on each and delete it till you just have the two open endpoints. I found it helps to lock the other layer so you can click and drag a box touching the line. Did the same for the k.
Then I join the end points. both layers unlocked, dragging a box into both end anchors... or if you have to get fancy, holding select - click end box, release select, click end box again to select only the end, then hold select and grab the end of the other path.
Right click, 'join path'. if you don’t have only those two end points, and they're both in the same group it just errors out and you want to throw your mouse. None the less, eventually you get one solid outline (which you have to keep adding letters to) and the inside cut outs.
Now i have two layers to send to the plotter... one for the grey background layer and only for the orange top layer.
This is a ridiculous process. doing "aplhenke" this way was stupid, what if i had to do a whole set of lettering for something... I’d just turn down requests for anything over 5 letters lol.
Help?
Rick
Certified Enneadecagon Designer
I would say that took about 4 hours and 55 minutes too long.
On the area that needed to be outlined, all you have to do is make a copy of the top layer (with no stroke) and set it aside... then
Object>Path>outline
Object>Ungroup
Window>Pathfinder>unite>expand
Place the top layer that you set aside on top then align vertically on horizontally...and that is it.
I always check to make sure I don't have wild lines that occasionally pop up from thick strokes.
This complex drawing was mostly done with strokes and took only a half an hour to prepare for layers and single color....
Attachments

iSign
New Member
I was wondering how that took 5 hours... after following your screnshots, I can see that it would.
I messed around a little in CS2 to see what I could learn.
I didn't have as good a result as Rick on the "unite" & "expand" because while it took care of the overlapping letters, the inside edges of my thick strokes didn't go away.
(Ungroup was greyed out, so I didn't follow that step)
Even with that one flaw (which I don't get in version 9) it was still easier to finish off then your usual routine... While everything was still selected, I went to "object > compound path > release compound" and then, since my fat strokes all overlapped, holding down the shift key, I deselected the outer-most contour, and then deselected the 3 inside contours that were needed for "holes' in my final cut file. This left all the unwanted contours selected (including stray points, if any) for deleting all at once, followed by making the resulting contours into a compound path again & placing my copy of the original text back on top.