• I want to thank all the members that have upgraded your accounts. I truly appreciate your support of the site monetarily. Supporting the site keeps this site up and running as a lot of work daily goes on behind the scenes. Click to Support Signs101 ...

HP Latex 800 take-up reel telescoping

Kemble

New Member
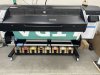
HP Latex 800, 3 weeks old.
We are printing a 58" wide panel on 60" IJ180CV3. Panels are 120" tall (for a box truck).
1st 2 panels printed fine, 3rd panel started to skew.
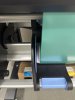
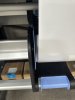
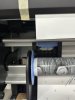
We are seeing some telescoping on the take-up reel which caused the print to skew and now we toasted this panel.

Has anyone else experienced this? Is this a simple fix that we can fix/adjust or something we need an HP tech for?

tyia
 

Attachments

  • IMG_2931.jpg
    IMG_2931.jpg
    2.8 MB · Views: 520
  • IMG_2932.jpg
    IMG_2932.jpg
    1.5 MB · Views: 171
  • IMG_2930.jpg
    IMG_2930.jpg
    1.4 MB · Views: 221

Manevitch

HP Latex Application Product Specialist
See how the blue endcaps aren't completely parallel to the black ends? There's too much pressure on the side and it's causing skew. Pull the blue lever a little until the black piece pops left and you should see not only a larger gap but also the blue endcap will straighten out.

You'll likely need to do that with the supply roll as well.
 
Multi-tile jobs should also be set to Center Justification in the RIP, and not Left or Right. This appears to be Right Justified.
 

Kemble

New Member
We unloaded and reloaded the material. It was a brand new 100 yard roll so it was quite heavy. We've got a few 100 yard rolls that our production girls have been avoiding for that very reason but I've instructed them to burn them up and from now on we stick to 50yard rolls. The material was not properly installed which is what was causing the skewing. /doh

However... Once we fixed the skewing issue we had a new problem. Our print was still pushed to the left side of the material. Even after checking the justification. We have the printer set to 0" on the margins and centered and we still lost our crop marks on the left side. We managed to get our crop marks back by setting the right side lead edge on the media settings on the printer to -0.6 (Range -.06" to +3.0") but I'm not comfortable with this as a long term solution. I'm hoping this is still related to how heavy the roll is. I guess time will tell as we use up more material and it gets lighter.
 
Check the media width being reported when the media is loaded - under the Substrate Menu. Do not engage he media edge holders during the media loading, as they can cause the printer to mid-report media width. They can be slid into place if desired after loading the media if desired, although they are really not needed for most white SAV medias.
 

Kemble

New Member
Were still experiencing telescoping issues. The 1st 1 panel looks great but then it starts to skew to the point if I leave it alone, the print will eventually start to bleed off the side of the paper and the media gets damaged on the sides of the take up reel. I have loaded/unloaded the media MANY times doing my best to ensure its going into the printer strait. The tension of the media on one side is MUCH tighter than the other. We have tension set to constant.

As you can see in the pic. I placed a piece of tape along the edge of the media when the job started. It traveled about 1.5" over the course of (3) 100" panels.
 

Attachments

  • IMG-2961.jpg
    IMG-2961.jpg
    1.6 MB · Views: 194

balstestrat

Problem Solver
It's so new just get tech there to print with you. There's so many variables that experienced guy might spot if something is wrong or the material is just that way.

There is also a new tiling firmware and profile that is not public. You have to request it from HP.
 

balstestrat

Problem Solver
Does this machine not come with an idler/dancer bar?
It does have it, just where the leading edge of vinyl is on picture above.
But I'm not so sure it's going to make any difference. If something I would increase the tension slightly. Too much and you mess up something else.
 

JBurton

Signtologist
I am going to say this has something to do with the 100yd rolls being handled before loading. If you scope a full roll and just try to beat it back to square, it often binds one wrap that will stretch and leaves slack in another, you should always take the tape loose of the roll and kindly shimmy it back and forth around the tube to take the stress out. I imagine if it happened with 100yds, that was a ton of tension that caused it to stretch pretty fast. Does this happen on 50yd rolls?
How are you taping the material to the takeup reel? Before starting a print, mid print? Are you taping just center of the media, or a piece on each end?
 

Kemble

New Member
I am going to say this has something to do with the 100yd rolls being handled before loading. If you scope a full roll and just try to beat it back to square, it often binds one wrap that will stretch and leaves slack in another, you should always take the tape loose of the roll and kindly shimmy it back and forth around the tube to take the stress out. I imagine if it happened with 100yds, that was a ton of tension that caused it to stretch pretty fast. Does this happen on 50yd rolls?
How are you taping the material to the takeup reel? Before starting a print, mid print? Are you taping just center of the media, or a piece on each end?
The 100 yard roll is a concern of mine. The rolls are quite heavy and we do our best to make sure they don't telescope while loading. I'd like to think they are pretty straight on the feed roll.

They are taping the media onto the take up reel with 1 piece in the center. They have done it at multiple stages. Sometimes they tape it to the take up reel once it gets long enough to attach to the roll, sometimes they feed extra material and tape it up before print and use the self adjusting feature on the printer.
 

JBurton

Signtologist
the self adjusting feature on the printer.
Haven't heard of this before, is it meant to self adjust on the take up reel?

Next time you have this issue, before you unload the roll, check it. See if one side is 'squishy' and the other is tight. If it is, I'd chalk it up to the rolls, and spool half of them off onto another core with a laminator. As wasteful as it will be it is better than an unusable print...
 

greysquirrel

New Member
Although Signs101 is a great forum, I absolutely agree you need to get your reseller's tech or an HP tech onsite for this problem. Before you do any of that, what is the weight of your 100' rolls? The max weight according to the printer's spreadsheet is 121lbs. If you.are over, follow JBurton's advice. If not, Id flag to HP.
 

Kemble

New Member
yes, the take up reel has some sort of auto adjusting feature but I'm not confident it works the way it's supposed to.

I'll check on the roll's "squishiness" :p
 

Shred_signs

Lost Member
I promise the dancer bar will help.

Physics will help pull the material back into place as it telescopes. You'll end up with a roll that might zig and zag a bit but it won't run off the edge of the machine.
The pulley system that the dancer bar helps creates will help work out the stress that may be encountered in JBurton's post.
 
Top