• I want to thank all the members that have upgraded your accounts. I truly appreciate your support of the site monetarily. Supporting the site keeps this site up and running as a lot of work daily goes on behind the scenes. Click to Support Signs101 ...

L26500 C/LC issue?

Davis25r

New Member
Good evening all,

I have an issue here and I am stumped.

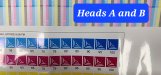
Im getting this strange banding like deal in my L/LC on my L26500. Ive put (2) seperate sets of heads in, and still the same problem.

Ive cleaned the OMAS sensor, both manual, and automatic head alignments, cleaned the line sensor, changed to a different roll of material, inspected and cleaned the encoder strip, tried different profiles, but still no luck.

Print aligment plots look fine, granted I am using non oem heads, but that hasnt seemed to be an issue so far. To me, this almost seems like a data issue. So maybe a encoder strip?

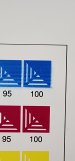
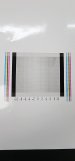
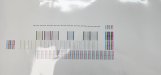
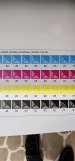
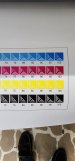
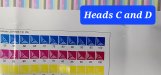
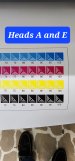
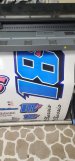
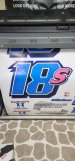
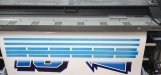
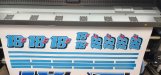
Attached some test plots, as well as the ink limit test print when trying to build a new profile.

You can see the banding, as well as what looks like overspray in the Cyan, but all the other colors printed fine.

Originally I noticed it when printing some logos, I was getting random varying thicknesses of bands in a logo, but all the logos were identically incorrect, so I thought it was a file issue.

This is all being done in Flexi 10.5.
 

Attachments

  • 20230302_194407.jpg
    20230302_194407.jpg
    518.8 KB · Views: 213
  • 20230302_193501.jpg
    20230302_193501.jpg
    453 KB · Views: 90
  • 20230302_193438.jpg
    20230302_193438.jpg
    804.3 KB · Views: 84
  • 20230302_193337.jpg
    20230302_193337.jpg
    656.7 KB · Views: 77
  • 20230302_193333.jpg
    20230302_193333.jpg
    634.9 KB · Views: 88

Peter Martins

New Member
It's the heads. There miss fireing and causing a blur.

We have hp new c cl heads available if you get in touch.

We also have cleaning cassette rebuild kits and a bunch of other stuff

Regards

Peter
Bristol Inkjet ltd

T
 

balstestrat

Problem Solver
Yeah I will just repeat it, issue is the printheads and/or combination of those and whatever ink you are using.
No encoder issue, no omas issue nothing. Don't waste time chasing problems that don't exist.

It could help if you enable the spit bars on the side but I doubt it will completely cure it for you. However you can see it helping on the diagnostic tests etc.
 

Davis25r

New Member
So I tried a combination of 5 different heads so far, I have labeled as such. All 5 sets show nearly identical results. I labeled them as A,B,C,D,E

Now if its any indication, I ran about a 40 inch piece after I posted this last night.

After the run, I got an error "Reseat C/LC Printhead 2". I have never seen this error before, nor had I ran that much material since doing all the head swaps.

Could this be an indication of issues with the contacts at position 2, causing the misfiring?
 

Attachments

  • 20230303_064204.jpg
    20230303_064204.jpg
    1.2 MB · Views: 67
  • 20230303_063938.jpg
    20230303_063938.jpg
    1.1 MB · Views: 79
  • 20230302_193333.jpg
    20230302_193333.jpg
    1.1 MB · Views: 76

Davis25r

New Member
So after spending yesterday and this morning doing some more playing around, here is what I came up with.

I changed some more printheads, I also changed out my ink, and redid some profiles. I also cleaned all the PH contacts. The issue is only prevelant in the lighter shades of blue. Going to more passes, and higher ink helps.

My nozzle tests look pretty good, they arent perfect, but I have printed with worse and not had this issue.

This morning I printed out some numbers, now when I printed them to correct orientation I would get IDENTICAL bands in every number, regardless of size. BUT if I take that same number and rotate it 90 deg, all the banding goes away and it looks good. What is up with that!?

See the photos here, 2 large numbers with identical bands in them. Then the rotated image printed at the same time is fine. This issue is so identically repeatable with different heads, profiles, etc, but orientation fixes it.
 

Attachments

  • 20230304_102927.jpg
    20230304_102927.jpg
    972.9 KB · Views: 68
  • 20230304_103449.jpg
    20230304_103449.jpg
    769.4 KB · Views: 78
  • 20230304_102911.jpg
    20230304_102911.jpg
    1 MB · Views: 76

JBurton

Signtologist
Is that 100% cyan on the 18?
I figure it's due to that white area where no ink is being fired, followed by high density single color, causing the cyan to sort of whiplash the amount of ink. I've had something similar using 100% black. I'll bet 100 bucks if you rotate the any other straight sections of white in line with the printheads, it will do it again. If you can modify the shade of blue to use more of the different color inks, it should alleviate the issue. Higher passes will minimize the effect, and unidirectional printing will reduce it to only one side of the graphic. In fact, easiest test is to set up the print file with banding in a unidirectional print mode and see if it doesn't reduce the banding to one side only.
 

Davis25r

New Member
Is that 100% cyan on the 18?
I figure it's due to that white area where no ink is being fired, followed by high density single color, causing the cyan to sort of whiplash the amount of ink. I've had something similar using 100% black. I'll bet 100 bucks if you rotate the any other straight sections of white in line with the printheads, it will do it again. If you can modify the shade of blue to use more of the different color inks, it should alleviate the issue. Higher passes will minimize the effect, and unidirectional printing will reduce it to only one side of the graphic. In fact, easiest test is to set up the print file with banding in a unidirectional print mode and see if it doesn't reduce the banding to one side only.
Now thats an interesting take, and I agree with it. It is not 100% cyan on that number, but I am going to test that on here a few and see if what you said is correct.

Now assuming thats the case, why would this be so consistent even with different heads? My nozzle tests come out okay, but this issue still persists.
 

Davis25r

New Member
So I went ahead and changed the 18 to 100% Cyan, as well as did a print of just Cyan bars, with and without empty spaces of white between them.

Both prints were done with 12P UniDir High Ink.

The test with just the cyan bars doesnt seem to show any banding. However, I do notice that the Cyan is more vivid and dark towards the right side for about 2-3" and then fades off.

I also did a print here with the 18s, both orientations and at different sizes. Again it seems lile theres a darker color differences at the right edge, but its hars to see in my photo.

Also I still see the same banding, it is most noticeable at the top and bottom of the numbers just where the cyan meets the black. Once it gets to the black you can see a color shift in the Cyan.
 

Attachments

  • 20230304_115735.jpg
    20230304_115735.jpg
    2 MB · Views: 62
  • 20230304_115759.jpg
    20230304_115759.jpg
    718.9 KB · Views: 60
  • 20230304_121136.jpg
    20230304_121136.jpg
    2 MB · Views: 65
  • 20230304_121202.jpg
    20230304_121202.jpg
    640.1 KB · Views: 64
  • 20230304_121223.jpg
    20230304_121223.jpg
    958.9 KB · Views: 73

JBurton

Signtologist
The test with just the cyan bars doesnt seem to show any banding. However, I do notice that the Cyan is more vivid and dark towards the right side for about 2-3" and then fades off.
Wild, the darker area aside, I'd expect to see similar banding in these bars. I'd say spitbars (gutters, what have yas) would help, but seeing how it's only showing up for 3-6" and not the width of the print, I really don't think so. But evidently my theory of solid cyan was only partially right, so what do I know?
So another thought, cyan and black are on the same printheads, right? Is it plausible this is a printhead/voltage issue? Trying to fire both in such high density is causing... something, idk what?
I'm also finding it wild that the earlier test prints had the banding in the white area, these are clearly past the white area, almost exactly where the black starts.
Furthermore I'd expect the last set that are rotated out of alignment to look better than they do. Leading me to believe I know nothing about these printers. This is frustrating I'm sure...
 

Davis25r

New Member
So I had been printing the side bars just not in these photos (for whatever reason Flexi kept putting the right side right over top my registration marks, so I didnt print them in hopes that I would get good results and acrually be able to cut). When I did use the side bars, they looked fine with no obvious marks.

This is an L26500 with 792 heads, so the head contains C/LC and not C/K.

This is definitely frustrating for sure. Like I said, the issue remains with different sets of PHs, so I feel like it would be more an issue of what the printhead is being instructed to do, whether that be an issue with the carriage board, or an issue with one of the contacts on the end of the ribbon cable.
 

balstestrat

Problem Solver
It's simply an issue with used printheads (and possibly 3rd party ink). New heads will work fine. You can see the same on 300-series latex.
 
Top