• I want to thank all the members that have upgraded your accounts. I truly appreciate your support of the site monetarily. Supporting the site keeps this site up and running as a lot of work daily goes on behind the scenes. Click to Support Signs101 ...

Not accurate cut with Gerber Edge and Gsx Plus Plotter

Hielorojo

New Member
Hello there, I have a accurate cut problem with my gsx plus and Gerber Edge, look the pics please:
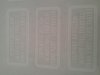
- Pic 1, show a "border" around of the design.
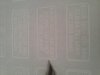
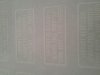
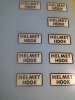
- Pic 2&3,show the design cut, you can notice as the cut border is not accurate, "left side border" is thicker than "right side border"
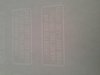
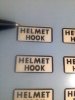
- Pic 4, show some "acceptable" cuts from the same job....

I have notice the same problem in others jobs, is there any solution? Is a inherent problem of Gerber accurate?

Thank you in advance.

P.S: sorry from my English.

attachment.php
attachment.php
attachment.php
attachment.php
 

Attachments

  • image.jpg
    image.jpg
    27.4 KB · Views: 650
  • image.jpg
    image.jpg
    26.9 KB · Views: 626
  • image.jpg
    image.jpg
    27.2 KB · Views: 592
  • image.jpg
    image.jpg
    23.4 KB · Views: 563

James Burke

Being a grandpa is more fun than working
You don't specify which direction these were run through the plotter and that would give us a better clue.

Check the two socket head cap screws on the split collar clamp that secures the drum shaft. Sometimes those loosen and allow a bit of play.


JB
 

Hielorojo

New Member
You don't specify which direction these were run through the plotter and that would give us a better clue.

Check the two socket head cap screws on the split collar clamp that secures the drum shaft. Sometimes those loosen and allow a bit of play.


JB
Thank you for your help, "rotate the pic 90 grades to the right" and that is the directon.
 

Fred Weiss

Merchant Member
I would also recommend that you clean all the stainless steel shafts with alcohol and recoat them with sewing machine oil. Then put one drop of oil in the hole in the bottom of the bronze bearing inside of the tool head assembly. Gerber plotters are built like tanks but they will sometimes cut strangely if they are allowed to get dirty or lack lubrication.
 

Kathi Hauser

Sign Girl
Sprocket plotters

There are other things to try I am sure that have been addressed..Pre unroll the media, try other rolls, flip the file to see if the problem is the same.blah blah blah....

Check the play in the collar is good advice though....it happens.


This is a common problem also....
When you start with a file then copy paste mirror it, It changes the start and stop of the cut path.
and
make sure you shut off the optimize cut order.
Use detail edit to make sure the cut beginning and end are starting all in the same corner.

this is usually noticable on thick materials...
 

Hielorojo

New Member
Thank you for your help,
I do not understand what you mean with this:
".....When you start with a file then copy paste mirror it, It changes the start and stop of the cut path.
and
make sure you shut off the optimize cut order......"
 

Fred Weiss

Merchant Member
There are other things to try I am sure that have been addressed..Pre unroll the media, try other rolls, flip the file to see if the problem is the same.blah blah blah....

Check the play in the collar is good advice though....it happens.


This is a common problem also....
When you start with a file then copy paste mirror it, It changes the start and stop of the cut path.
and
make sure you shut off the optimize cut order.
Use detail edit to make sure the cut beginning and end are starting all in the same corner.

this is usually noticable on thick materials...

Thank you for your help,
I do not understand what you mean with this:
".....When you start with a file then copy paste mirror it, It changes the start and stop of the cut path.
and
make sure you shut off the optimize cut order......"

I think Kathy is just throwing out random possibilities, most of which are not present in your layout.
 

Fred Weiss

Merchant Member
Thank you Fred, I will send the File when return to home.

I have gone over your file and cannot make sense of it when compared to what you showed in your pictures. I will write you back privately by email.

What does stand out is, what is to me, a basic best practice that should help if you will implement it. That is to do your rotations and Y axis repeats in Composer before you send the job to GSPPlot. Then do your X axis repeats there. You will find that there are much less cut to print registration problems when you do these actions in Composer.

attachment.php
 

Attachments

  • repeats.jpg
    repeats.jpg
    233.4 KB · Views: 572

Hielorojo

New Member
I have gone over your file and cannot make sense of it when compared to what you showed in your pictures. I will write you back privately by email.

What does stand out is, what is to me, a basic best practice that should help if you will implement it. That is to do your rotations and Y axis repeats in Composer before you send the job to GSPPlot. Then do your X axis repeats there. You will find that there are much less cut to print registration problems when you do these actions in Composer.

attachment.php

Thank you Fred, I understand you, I do the rotations in GSPplot because is more "fast and easy", I have never thought about do the repeats on Composer and send it to GSPplot, but make sense! I will try it!.
Best Regards.
 

Bcrawf

New Member
I think what's happening is you have some "movement" in the tractor pins. I line up my target and then gently "rock" the vinyl back and forth and the recheck the target, if it's off I re-position the cutting head with the arrow keys. That usually gets the cut right where it should be. I always check the crosshair cuts before starting the cut.
 

Hielorojo

New Member
Hello there, the endless story...the cuts problems remains and are very noticiable with small decals....

The first Pic show the bottom of the vinyl, whre the "cut" is correct, but in the "top"(lic 2) the cut is not correct and is very noticiable.
I followed all the recomendations but there is not solution .....Really I do not know if it is a cut problem o print problem.....
Any idea?
Thank you in advance.

attachment.php
attachment.php
attachment.php
 

Attachments

  • IMG_1383.jpg
    IMG_1383.jpg
    70.8 KB · Views: 571
  • IMG_1384.jpg
    IMG_1384.jpg
    71.2 KB · Views: 525
  • IMG_1382.jpg
    IMG_1382.jpg
    53.1 KB · Views: 617

Jburns

New Member
I would try and create more of a bleed for the black border- so the contour cut is thru the middle of it- rather on the razors edge next to the blank white material?

These small samples were Black printed on Yellow Vinyl - done in Flexi. You may be able to see my contour line in the screenshot below. Edge 2 and Envision 375. NOTE: the first time i cut them, they were off. I slowed the speed to slowest possible setting and really centered the bomb sight- then it cut accurately


attachment.php


attachment.php
 

Attachments

  • IMG_1202.jpg
    IMG_1202.jpg
    48.2 KB · Views: 607
  • Screenshot KC.jpg
    Screenshot KC.jpg
    44.6 KB · Views: 612

Hielorojo

New Member
I would try and create more of a bleed for the black border- so the contour cut is thru the middle of it- rather on the razors edge next to the blank white material?

These small samples were Black printed on Yellow Vinyl - done in Flexi. You may be able to see my contour line in the screenshot below. Edge 2 and Envision 375. NOTE: the first time i cut them, they were off. I slowed the speed to slowest possible setting and really centered the bomb sight- then it cut accurately


attachment.php


attachment.php
Hello Jburns, I have try with a bleed and I get the same problem, the only difference is that I do not get a "regular black square"(not symetrycal)........i do not know if the problem is for the plotter or perhaps the problem is the printer that not print the art in the correct position and then the cut is not accurate.....
Thank you for your help.
 

Fred Weiss

Merchant Member
Being that much off, I would be looking at cleaning and lubrication of the plotter bearings and shafts. All of the Gerber 15" plotters, going back to the old Signmakers, are built like tanks but need regular cleaning and lubrication anywhere metal moves against metal.
 

Hielorojo

New Member
Have you calibrated your EDGE to your plotter?
Yes, it was first that I did....
tonigh I will do a "total clean up/tune up" but I think that problem is "print off", printer does not print in the correct position, "bottom art" cut well but the "upper arts" are "cut off".....I suppose....
 
Top