-
I want to thank all the members that have upgraded your accounts. I truly appreciate your support of the site monetarily. Supporting the site keeps this site up and running as a lot of work daily goes on behind the scenes. Click to Support Signs101 ...
You are using an out of date browser. It may not display this or other websites correctly.
You should upgrade or use an alternative browser.
You should upgrade or use an alternative browser.
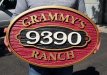
A sweet little HDU sign we just finished
- Thread starter TimToad
- Start date
Kottwitz-Graphics
New Member
Very nice. 
g&eprinting
New Member
Nice.
Love it! Okay, newb question, but how do you get that wood grain effect? My router can etch out pvc signs, but I've never got it to do anything textured like that.
I would like to know as well, was it routed or sandblasted, sorry but I have zero experiences with those type of signs.
J Hill Designs
New Member
most non-basic CAM software for routers can take a raster grayscale and apply depth based on white-to-black gradation
most non-basic CAM software for routers can take a raster grayscale and apply depth based on white-to-black gradation
The sign is routed to about six different depths. The photo doesn't do it full justice on all the different planes its working on.
We rarely do sandblasted wood anymore now that the resource is so diminished and the HDU foam is so easy to work with. It takes paint so much better and has far less expansion and contraction.
Redwood trees aren't exactly a plantation kind of crop given how long it takes them to achieve millable size.
The texturing can be adapted to nearly any raster/bitmap image you can feed into the software connected to the router. Our operator has a whole library of wood grains, patterns, etc. that we can plug into a job.
We keep talking about getting Dan Sawatzky's texture DVD, but most customers aren't adventurous enough to bite on anything but woodgrain.
We used Modern Masters acrylic paint for all the gold and even after an acrylic based clearcoat, it still has a really nice metallic sheen.
Beautiful sign, type i would like to learn how to paint. Could you give a quick tutorial on how you painted the sign
thanks
don
Thanks, once the sign is routed and depending on its size, it must be sanded a bit and air blown to get all the grit off of it. We then either brush and/or spray two good coats of a water based primer filler made by Coastal Enterprises which manufactures SignFoam brand HDU. The material is super porous, so the smoother the desired surface, the more sanding and coats of primer needed. I've cut a sample piece after painting to see how far the primer and paint soaks in and its between 1/16" and 1/8" saturated. That creates a really good bond with the foam, IMO superior to wood. The foam and paint will expand and contract in unison unlike wood and the wrong types of paint. I've seen thousands of sandblasted wood signs painted with hard enamel paints like 1Shot and all eventually swell and fail. Wood needs to breathe, so solid color stains are my first choice when using wood as a substrate.
Once it was fully primed, we did three coats of the burgundy background using a high quality, 100% acrylic exterior enamel. After that we started applying the gold paint. We use Modern Masters brand for any metallics we use when using acrylic paints. The center address panel and numbers were made separately for added depth, so we painted the individual white numbers and the panel itself then glued them together. The area where that panel was adhered to was routed flat 1/8" into the surface, so the whole address "module" was glued into place after painting.
It all depends on the desired look and setting its going in. You also aren't limited to routing or sandblasting this stuff either. you can hand carve it, distress it, machine it with grinders, Dremel tools, etc. Whatever your imagination can come up with. We are hardly experts with it either. There are some really fantastic craftspeople and colleagues in our area and we're just trying to do them and ourselves proud on every job we get.
You can use automotive paints, lacquers, stains, glazes, etc. on this stuff. The May/June issue of Signcraft magazine has a whole article chocked full of resources on finishing routed and blasted signs.
The HDU comes in different densities, so if you want a real tight, slick surface aesthetic, you use the highest density material and harder coatings like automotive paints, etc.
The technique for painting this type of sign comes mostly from practice. Its not like "lettering" something in the slightest. We typically lay the sign flat and brush most of the details with the flat brushes laid on their edge in a dabbing motion being careful not to slip over the front plane. If there are separate elements, we'll break out the spray gun and shoot them so the depths or "returns" are the same color as the faces like the white numbers on this sign. We then assemble it all after painting with low foam polyurethane glue.
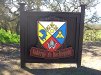
After 35 years of being a signmaker, starting as a strictly hand painted billboard and commercial signpainter, I'm a great painter in general and an accomplished artist away from the shop, but my wife is the one who paints nearly all of our routed signs now. She works full time at the shop. She has a knack for it and I get interrupted too many times a day to fully concentrate on what I'm doing. I'll help her by blasting on the background colors or primer, but she handles most of the finish and detail work. She and I collaborate on a lot of the design ideas, but I do most of the design work to present to the clients and work from. Here is a real detail pig she did a few months ago. That sign is only 36"x36".
Attachments
Tim, much thanks for the details. i saw a video where they used a small foam brush to do the edges so as to minimize runs down the sides. so simple routing/v carving could be straight forward. the more detailed engraving on your second sign is where the artistic talent comes in - and 35 years of practice. once you get the sign to where you want it, do you then top coat the entire sign with clear acrylic? i guess i just need to start doing some samples, but the hdu can be expensive to practice on. do you have a suggestion for good practice material? again thanks for the details and info. don
Tim, much thanks for the details. i saw a video where they used a small foam brush to do the edges so as to minimize runs down the sides. so simple routing/v carving could be straight forward. the more detailed engraving on your second sign is where the artistic talent comes in - and 35 years of practice. once you get the sign to where you want it, do you then top coat the entire sign with clear acrylic? i guess i just need to start doing some samples, but the hdu can be expensive to practice on. do you have a suggestion for good practice material? again thanks for the details and info. don
Hey Don,
Yes, stiffer, flat brushes seem to work the best for simple jobs where you are just painting the top plane of the letters, borders or graphic elements. We use an old set of red sable showcard brushes I have. I think the jobs where you also paint the returns or edges of the letters, etc. look best and that is a lot harder to do with much precision though. That's why when want that effect, we'll rout those letters separately and paint the entire letter before gluing them into the 1/8" deep pocket we've routed into the background.
The beauty of this stuff is that it can be easily laminated together to create thicker pieces. You could buy a single sheet of the thinnest, lowest density stuff and glue up several thicker pieces and get several samples out of it. As soon as you get a few jobs out there and a few sample pieces to show clients, the textural beauty and added depth sells itself.
Mikesbales
New Member
Looks great!
Tim,
i am getting excited about trying this out. visited the Sherman Williams dealer today - they stock the sher-clear 1000 - $45 gallon - dealer said all their paint is 100 percent acrylic - unless you advice otherwise, this may be my source for sign paint.
i have a couple of samples of hunter xci class A insulating foam which i plan to try out. talked to their rep and he suggested Insufoam which is stocked at 2.1" no price yet. he is sending me samples. also found signfoam4 - 1.5" is $348, 1" is $269. i just may get a sheet of the 1" to try things out.
appreciate the help.
don
Tim,
i am getting excited about trying this out. visited the Sherman Williams dealer today - they stock the sher-clear 1000 - $45 gallon - dealer said all their paint is 100 percent acrylic - unless you advice otherwise, this may be my source for sign paint.
i have a couple of samples of hunter xci class A insulating foam which i plan to try out. talked to their rep and he suggested Insufoam which is stocked at 2.1" no price yet. he is sending me samples. also found signfoam4 - 1.5" is $348, 1" is $269. i just may get a sheet of the 1" to try things out.
appreciate the help.
don
There is a SW store here, so we use Sherwin Williams paints quite a bit.
I don't know the technical differences or science behind the two, but insulating foams might not react when machined or carved as predictably as HDU does. The cellular makeups seem different. Most insulating foam is more like beads of the material fused together, while HDU is more granular and more dense.
Its worth playing around with anything though.
We use Titebond polyurethane glue. We work with the woodworking shop next door a lot who has a vacuum clamping table which is just the slickest thing. Its this huge vacuum table that has a thick plastic cover and a super strong suction.
You put your glued up pieces in it and hit go and its like a giant vacuum sealer for food. It pulls the pieces together more evenly than clamps and works awesome.
Beware on any poly glues, they expand like crazy and will get everywhere if you apply too much.
You put your glued up pieces in it and hit go and its like a giant vacuum sealer for food. It pulls the pieces together more evenly than clamps and works awesome.
Beware on any poly glues, they expand like crazy and will get everywhere if you apply too much.
J Hill Designs
New Member
insulating foam is mostly just EPU (expanded polyurethane) whereas HDU (signfoam) is a closed cell high density urethane. very different. do your tests with the cheaper, low density, HDU, rather than the insul crap.
exp foam is great for adding buildouts to stucco monuments, but other than that has no real professional use in the sign game.
exp foam is great for adding buildouts to stucco monuments, but other than that has no real professional use in the sign game.