• I want to thank all the members that have upgraded your accounts. I truly appreciate your support of the site monetarily. Supporting the site keeps this site up and running as a lot of work daily goes on behind the scenes. Click to Support Signs101 ...

Adobe Illustrator and Vinyl Cutting... I just don't get it!

MariaMartini

New Member
I've been using Adobe Illustrator awhile, but I usually only use text, simple and pre-made, mostly ready-to-cut, graphics.

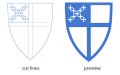
I am trying to cut this Episcopal shield for my car, and for practice, but if I cut it like it is, there will be no outline and a BUNCH of unnecessary cuts. How do I make the outlines look like the picture and make everything in blue one piece?

I hate to ask for help, but I want/need to know how to do this in the future.

Thank in advance!
 

Attachments

  • help.jpg
    help.jpg
    47.8 KB · Views: 97

Sign_Boy

New Member
You need to make compound paths.
For example see where your center lines cross?
There should not be a box in the middle.

Use the pathfinder pallet.
 

Rick

Certified Enneadecagon Designer
you need to do some "expanding", uniting (pathfinder tools) and probably compounding,,
 

Robert H. Bigart

New Member
They make it sound hard, all you have to do is cut the Blue background and the cut the White Designs, Then past the White on the Blue and you have your Decal.

Bob Bigart
 

Attachments

  • DewTrain.jpg
    DewTrain.jpg
    67.9 KB · Views: 111

Sign_Boy

New Member
They make it sound hard, all you have to do is cut the Blue background and the cut the White Designs, Then past the White on the Blue and you have your Decal.

Bob Bigart


HUH???? If I understand you right, you have this as a 2 color job?
I guess you could do it that way but why?

IMO britelitesignsllc "who from now on will be called B-Lite" should learn how to use the tools that illy has.
In this case the pathfinder tools.
 

MariaMartini

New Member
Thanks for all of the help.. I am slowly but surely trying to figure it out.

Was able to hand trace with the pen tool, but wasn't quite as clean as I would like (that takes practice, too :p).

Was able to compound the cross in the middle, but had trouble joining that to the outer shield...

I'll def check out those tutorials!

THANKS FOR ALL YOUR HELP!
 

Service Sign Co

New Member
You can stay within a few pixels of a line with the pen tool and redraw it till you're happy.it re creates or overwrites a single line. If you have a current version
 

Robert H. Bigart

New Member
Quick Trace in InkScape converted to .png

Bob Bigart
 

Attachments

  • ChurchCross.png
    ChurchCross.png
    966 bytes · Views: 111
  • Billboard.jpg
    Billboard.jpg
    38.2 KB · Views: 100

Fred Weiss

Merchant Member
Redraw it like a draftsman.

1. Place image in workspace and lock it.

1.jpg

2. Draw a box to enclose the outer edges. Add a center point at the bottom of the shield. Delete the two bottom corner points. Convert each side to a curve and adjust each side's node handles to match the image.

1a.jpg 1b.jpg 1c.jpg 2.jpg

3. Inline the outer shield to match the inner shield. Select both vectors, compound and preview.

3.jpg 4.jpg

4. Draw a rectangle to match an inner cross part. Duplicate it and rotate it 90 degrees. Position each part over the image, stretching it to fit within the border.

5.jpg

5. Merge or weld the two rectangles to form a cross. Select both the cross and the shield border and merge or weld the two objects. Delete the one vector that encloses the blue field of small crosses.

6.jpg 7.jpg 8.jpg

6. Turn off preview. Draw a rectangle to fit one stroke of a small cross. Duplicate the rectangle, rotate it 90 degrees, and center-center justify the two rectangles. merge or weld the two to form one small cross.

9.jpg 10.jpg

7. Duplicate the small cross for a total of five and position them to form half the X design. If step and repeat is available in your application use it for best accuracy.

11.jpg

8. Duplicate, mirror and position the five crosses to form the other half of the X design. Delete the extra small cross in the center.

12.jpg

9. Select all vectors and recompound. Preview the result to insure accuracy. Delete the original image. Set color and save.

13.jpg 14.jpg 15.jpg

Done. Start to finish less than ten minutes and the result is as high a quality as is possible.
 
Last edited:

MariaMartini

New Member
6. Turn off preview. Draw a rectangle to fit one stroke of a small cross. Duplicate the rectangle, rotate it 90 degrees, and center-center justify the two rectangles. merge or weld the two to form one small cross.

View attachment 27406 View attachment 27407

7. Duplicate the small cross for a total of five and position them to form half the X design. If step and repeat is available in your application use it for best accuracy.

View attachment 27408

8. Duplicate, mirror and position the five crosses to form the other half of the X design. Delete the extra small cross in the center.

View attachment 27409

9. Select all vectors and recompound. Preview the result to insure accuracy. Delete the original image. Set color and save.

View attachment 27410 View attachment 27411 View attachment 27412

Done. Start to finish less than ten minutes and the result is as high a quality as is possible.

Thanks Fred, so much, and everyone else for your help. This thread has taught me a lot.

Fred, I didn't expect you do spend that much time on it (though, you say it only took you 10 minutes :p), but I do thank you for that.. the step by step instructions were very helpful!
 

zgraphics

New Member
This is another way of cheating, if you can change the color blue to black with ease, then save the image as a jpeg. Then reopen the image and do an autotrace. maybe this would help make it easier. this only work with a one to two colors.. good luck..
 

MariaMartini

New Member
2. Draw a box to enclose the outer edges. Add a center point at the bottom of the shield. Delete the two bottom corner points. Convert each side to a curve and adjust each side's node handles to match the image.

View attachment 27398 View attachment 27399 View attachment 27400 View attachment 27391

I'm working on something different now, but wanted to BUMP Fred's great tutorial...

AND..

I forgot how to convert a line to a curve.. I tried putting an anchor in the center and then adjusting the anchor, but then I get a line that squiggles (or curves in both directions).
 

MariaMartini

New Member
I'm working on something different now, but wanted to BUMP Fred's great tutorial...

AND..

I forgot how to convert a line to a curve.. I tried putting an anchor in the center and then adjusting the anchor, but then I get a line that squiggles (or curves in both directions).

Again, I figured it out AFTER I gave up and asked the forum. Thanks for help anyway and once again, I hope I'm not wasting anyone's time because I was able to bump Fred's great tutorial.
 

osmasterflex

New Member
Hold Shift and click on the parts that you dont want cut, and fill them in with whatever color, just completely remove the "CutContour" stroke from them. and the printer wont cut it, it will only cut wherever you have the CutContour Stroke.
 
Top