• I want to thank all the members that have upgraded your accounts. I truly appreciate your support of the site monetarily. Supporting the site keeps this site up and running as a lot of work daily goes on behind the scenes. Click to Support Signs101 ...

BannerSpring Mounting and Tensioning

JNW83

New Member
As the cold weather approaches, have you thought about whether or not your banner's hardware could weather the season?

Our stainless steel BannerSpring tensioning system has proven to weather all types of conditions.
Learn more at www.lindsignspring.com
 

SightLine

║▌║█║▌│║▌║▌█
I post a little review on these. I was quite skeptical but gave these a go for one job about a month ago. 4 5'x16' banners and 1 10'x16' banner. All were mounted to a building, 2 on a brick wall the rest on stucco. This dealership had in the past always had us make them banners for these spots which they always installed themselves and there were literally hundreds of ragged out holes everywhere. My installer complained a little at first but moved forward installing with these and came up to me later saying he was super impressed. I have to admit, for flat mounted banners these give them a truly professional appearance and they stay incredibly smooth and flat with almost zero ripples.

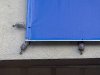
Installing the ones on the brick wall was the slowest since we had to drill many dozens of holes into brick with a hammer drill. On the stucco, that was backed by 3/4" plywood internally so those just zipped right in with deck screws. I also increased the spacing suggested by Lind (sorry Lind but I personally felt the suggested spacing was overkill for this application). They have been up for over a month now and still look as perfect as the day we put them up. Time will tell how they fare a year down the road. Seemed odd just punching the springs hooks right through the banner this way but they seem to be incredibly secure.

On the numbers of banners this was quite an upcharge to pass on to the customer as well but I also assured him that these would make a very big difference in the appearance of the banners as well as eliminating making more new holes everytime they change the banners out. Also made sure he understoood that while the install cost this first time was high (charged them about $1500 for the springs and install) that the install cost on swapping the banners later would actually be drastically reduced since the springs just stay in the wall.

I need to get some better photos but here are a couple for now.

The folks at Lind who I dealt with (John and Jillian) were both very helpful, corteous and easy to work with on purchasing our first real test of these. I can say without hesitation at this point if you have an opportunity to pitch these to a client, give them a try. My customer loves how the banners look now and while you can see the springs they actually look much more professional and secure than a bunch of random screws with big fender washers around the edges. I will be reccomending these to other clients on future projects. Oh and on the design..... this place has their own in house guy, not my design. lol
 

Attachments

  • BS1.jpg
    BS1.jpg
    78.7 KB · Views: 113
  • BS2.jpg
    BS2.jpg
    93.6 KB · Views: 113

SightLine

║▌║█║▌│║▌║▌█
Well as expected the initial install takes a bit longer but not much. The extra time is for pretty detailed measuring out where you want to install the springs. Actually installing them to the wall and attaching the banner takes no longer than if you were installing screws into grommets with fender washers. Plus you save a little time back at the shop since you need not bother with grommets. Changing the banner out with a different one of the same size will be quite fast.

I don't see any reason why you could not give them a quick spray with a rattle can. Even if you hit them thick it would not prevent the springs from spreading. They are quite strong. It would take quite a huge effort with a couple of pairs of vice grips to actually bend or stretch one.
 

GAC05

Quit buggin' me
I'll be honest, I am not a fan of the exposed springs & screws.
While the banner is tight and smooth the install looks unfinished.
Too Steampunk for me.

wayne k
guam usa
 

2B

Active Member
@SightLine

what did you sew into the banner hem to keep the wire from pulling through the material?
What weight banner was used?
assuming you attached the top row first and let gravity help for the rest, how much tension did you apply?
 

SightLine

║▌║█║▌│║▌║▌█
Nothing special done with the edges. Just standard double hemmed. The hooks on the springs just poke through, it actually stronger than a grommet in my opinion since you are not cutting/damaging the 2 layers of scrim with a grommet. These are long term banners, will be up at least a year. Ran them on 16oz stock. It is pretty tight tension to pull it and hook the springs on opposite edge...
 

JNW83

New Member
@ Sightline...Thank you for your point of view of using the BannerSpring's. Your install looks great.

@2B - At Lind, we use a lightweight PE Material to hang our billboards and we stitch for finishing. We have over 300 boards using BannerSpring's and the heaviest material we have ever use was a 7oz vinyl. Here is a link to a show we did in Indiana using an unfinished 7 oz vinyl.

http://www.youtube.com/watch?v=vNbbb12MUoo
 
Top