• I want to thank all the members that have upgraded your accounts. I truly appreciate your support of the site monetarily. Supporting the site keeps this site up and running as a lot of work daily goes on behind the scenes. Click to Support Signs101 ...

Blurred print and cut marks - SP-540V

Goatshaver

New Member
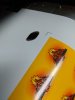
Not quite sure what going on. The start of the sheet and all the print is fine until it prints the last couple sets of marks and they had get skewed/blurred. It's done it on two different jobs. Really not sure what is causing this. I don't think it's encoder because the entire print would be blurred and this has repeated 3 times the exact same thing has happened.
 

Attachments

  • IMG_20190907_203007.jpg
    IMG_20190907_203007.jpg
    2.3 MB · Views: 530
  • IMG_20190907_203020.jpg
    IMG_20190907_203020.jpg
    2.3 MB · Views: 361

Gino

Premium Subscriber
Were all three jobs basically the same file size ??
 
Last edited:

Lindsey

Not A New Member
If you haven't already, try cleaning the encoder strip, and doing the scan & feed calibrations.
 

Gino

Premium Subscriber
I'd be checking your signal transfering sequence. Sounds like somethng is interupting your file at the end.
 

Goatshaver

New Member
Ink starvation. Replace dampers.
Please explain how this makes sense? The entire sheet prints fine until the last two "registration marks"

If you haven't already, try cleaning the encoder strip, and doing the scan & feed calibrations.
Done. First thing I check.

I'd be checking your signal transfering sequence. Sounds like somethng is interupting your file at the end.
Is there someplace specific I should check? Did it on two different files and exactly the same spot right when it switches back to printing the crop/registration marks.
 

Lindsey

Not A New Member
Is it doing this for every print job?
Try printing a totally different file with crop marks. Do a print that is just a few inches in length. Do the crops blur just the same?
 

Goatshaver

New Member
Is it doing this for every print job?
Try printing a totally different file with crop marks. Do a print that is just a few inches in length. Do the crops blur just the same?

I had tried 2 different files in two separate jobs but it was multiple up so the print area was like 45" x 22.5". I tried a different file just a 4" square with the print and cut marks and it was fine. I'm kind of stumped on this one.
 

Solventinkjet

DIY Printer Fixing Guide
Try doing an Environmental Match. It's weird because the crop marks look like the encoder is bad but then the print itself doesn't show any signs of encoder issues. My thought is that the encoder in the scan motor is messing up somehow and an environmental match might bring it back into spec. Environmental match syncs the encoder in the motor with the strip.
 

Goatshaver

New Member
Try doing an Environmental Match. It's weird because the crop marks look like the encoder is bad but then the print itself doesn't show any signs of encoder issues. My thought is that the encoder in the scan motor is messing up somehow and an environmental match might bring it back into spec. Environmental match syncs the encoder in the motor with the strip.

I thought that might be it but can't remember if I did that or not, I usually do it first thing.

Now I can't even make it through a print before it gets blurred out. The encoder strip is only a few months old so I don't know any reason why it would just suddenly stop.

Could this be the sensor possibly? I had to replace my network card a couple weeks ago because of a electrical issue with bad weather.

IMG_20190912_115744.jpg
 

Solventinkjet

DIY Printer Fixing Guide
I thought that might be it but can't remember if I did that or not, I usually do it first thing.

Now I can't even make it through a print before it gets blurred out. The encoder strip is only a few months old so I don't know any reason why it would just suddenly stop.

Could this be the sensor possibly? I had to replace my network card a couple weeks ago because of a electrical issue with bad weather.

View attachment 142768

Ok that is a clear cut sign that the encoder strip is damaged or the sensor is failing. I would at least replace the sensor but to be safe probably the strip as well.
 

Goatshaver

New Member
Ok that is a clear cut sign that the encoder strip is damaged or the sensor is failing. I would at least replace the sensor but to be safe probably the strip as well.

I think it's definitely one of the two. I'm leaning towards the sensor only because I can calibrate my strip and when I did bi-directional test the uni-direction was fine but when I actually started a print in uni-direction it was crap.
 

Goatshaver

New Member
So I had remembered that I got a encoder strip not long ago and when I installed it found that it was slightly longer (approx .25") than the stock one that was in before. I think t was just not positioned quite right due to the fact I had to try and make it fit.

Not sure why it's slightly bigger. I ordered the correct part when I looked at my invoice.

Made some adjustments to the strip and cleaned it while I had it out and seems to be working normally again.
 

phototec

New Member
So I had remembered that I got a encoder strip not long ago and when I installed it found that it was slightly longer (approx .25") than the stock one that was in before. I think t was just not positioned quite right due to the fact I had to try and make it fit.

Not sure why it's slightly bigger. I ordered the correct part when I looked at my invoice.

Made some adjustments to the strip and cleaned it while I had it out and seems to be working normally again.


How hard is it to align a new encoder strip? After install, do you have to do any adjustments to the printer? Thanks for any help, this will be my first time to replace the encoder strip.
 

Goatshaver

New Member
How hard is it to align a new encoder strip? After install, do you have to do any adjustments to the printer? Thanks for any help, this will be my first time to replace the encoder strip.
Shouldn't have to align anything really, you just need to do the calibration function in the service menu after installing it.

It's pretty easy to do, just make sure you don't get any kinks or scrapes in the strip when installing it. Just take your time and do rush it. I've replaced mine a few times without any incidents.


phototec

New Member
Shouldn't have to align anything really, you just need to do the calibration function in the service menu after installing it.

It's pretty easy to do, just make sure you don't get any kinks or scrapes in the strip when installing it. Just take your time and do rush it. I've replaced mine a few times without any incidents.


Thanks, for the video, looks easy enough, however, I noticed in the start of the video when the power is disconnected the print head is over the capping station, and they at the end of the video when disconnecting the right side of the encoder strip the printhead is moved over to the left to allow room to work on the right side connection point. How do you unlock the printhead to manually move it to the left?

My print head feels like it's locked over the capping unit?
 

Solventinkjet

DIY Printer Fixing Guide
Thanks, for the video, looks easy enough, however, I noticed in the start of the video when the power is disconnected the print head is over the capping station, and they at the end of the video when disconnecting the right side of the encoder strip the printhead is moved over to the left to allow room to work on the right side connection point. How do you unlock the printhead to manually move it to the left?

My print head feels like it's locked over the capping unit?

The official way - Look under the machine right below the capping station. There is a hole that has a metal bar inside it and if you spin it, the capping station will move down. There is a special tool that makes it easy but you can use pliers or something like that. Then you just push the head to the right and then the left and it will unlock.

The lazy tech way (i.e me) Turn the machine on in cleaning mode and power off once the head unlocks.
 
Top