Hey my 2012 CJV30-130 has recently started having cutting issues. But it is consistently inconsistent. We are using Flexi Cloud. If I send a big shape and have it cut it out it will cut 99% perfect. If I send small text it will be off. If I send a big file maybe 4'x4' with a logo shape and text it will start out fine and then get off, by .25" or more. But it starts a little off then gets more and more so I cant set the offset in the printer because it isn't off by the same amount.
-
I want to thank all the members that have upgraded your accounts. I truly appreciate your support of the site monetarily. Supporting the site keeps this site up and running as a lot of work daily goes on behind the scenes. Click to Support Signs101 ...
You are using an out of date browser. It may not display this or other websites correctly.
You should upgrade or use an alternative browser.
You should upgrade or use an alternative browser.
CJV30-130 Cutting issues. Consistently inconsistent
- Thread starter signlords
- Start date


Solventinkjet
DIY Printer Fixing Guide
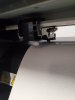
Check the little lever on the left of the machine if you are facing the back of it. It's hard to describe but the lever sometimes pops over the little metal lip so when you lower the lever to lower the pinch wheels, it's not going down all the way. The issue is it goes down just far enough to trip the sensor that tells the machine the pinch wheels are down but in reality the left rollers aren't down all the way so the media skews when it goes to cut. I have seen that happen as these machines age.
Check the little lever on the left of the machine if you are facing the back of it. It's hard to describe but the lever sometimes pops over the little metal lip so when you lower the lever to lower the pinch wheels, it's not going down all the way. The issue is it goes down just far enough to trip the sensor that tells the machine the pinch wheels are down but in reality the left rollers aren't down all the way so the media skews when it goes to cut. I have seen that happen as these machines age.
Ok, I definitely think and have thought this is along the right lines. It's like the pinch rollers have uneven pressure, but I am not sure exactly how to test this. I put small pieces of vinyl under the far edge rollers and tug on it a little and they are both tight. I did just go look at the lever area and don't specifically see anything I could say is wrong. A couple weeks ago we did try cleaning the little metal rollers on the bottom side as they looked like they had some build up but I am not sure the best way to do that. I know the pinch rollers are replace-able as well but I have gone down the rabbit hole of just throwing parts at a machine before and want to avoid it.
Not an answer to your question, just a tip in case you didn't know;
It's easier and better to just create boxes around what you will be cutting, because
it will always be off some. If I wanted the logo on the left, the image to the right is what I would
print and cut:
View attachment 145589
Yes for some stuff we just throw a heavy stroke around the outermost color very similar to this box method. Lately though the cutter is off enough that sometimes it actually affects leveling and layout. :-(
Attachments
Solventinkjet
DIY Printer Fixing Guide
Ok, I definitely think and have thought this is along the right lines. It's like the pinch rollers have uneven pressure, but I am not sure exactly how to test this. I put small pieces of vinyl under the far edge rollers and tug on it a little and they are both tight. I did just go look at the lever area and don't specifically see anything I could say is wrong. A couple weeks ago we did try cleaning the little metal rollers on the bottom side as they looked like they had some build up but I am not sure the best way to do that. I know the pinch rollers are replace-able as well but I have gone down the rabbit hole of just throwing parts at a machine before and want to avoid it.
Yes for some stuff we just throw a heavy stroke around the outermost color very similar to this box method. Lately though the cutter is off enough that sometimes it actually affects leveling and layout. :-(
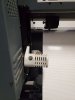
I pointed out the part that is in the wrong position in your image. The part that is in front should be in back.
Attachments

I pointed out the part that is in the wrong position in your image. The part that is in front should be in back.
You guys rock! This is why I have been and will continue to be a long time customer for you! I bent that metal piece a little bit so it doesnt click past and the very next job cut perfectly!