• I want to thank all the members that have upgraded your accounts. I truly appreciate your support of the site monetarily. Supporting the site keeps this site up and running as a lot of work daily goes on behind the scenes. Click to Support Signs101 ...

design help

signprinter

New Member
Hello Everyone
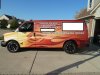
I thought I would check here to see if anyone may be able to help me. I design graphics for a custom go kart business that makes karts that look like real vehicles. A customer of theirs has purchased a van go kart and wants the graphics to match his fleet of real vans. I have most all the Aurora Graphics so the "wood" I can get close to but it is the front flame fill that I am having a time with. I have a vector flame but cannot figure out how to get the same look. Normally we can contact the companies that made the fleet wrap and they are more than willing to send us graphics so it matches but this customer does not know who did it. Can anyone help me out with this...thank you in advance I have attached the only picture i have so hopefully it shows up ok.
 

Attachments

  • van.jpg
    van.jpg
    66.8 KB · Views: 81
Looks like flame with almost a transparent stainless steel lens.

Don't forget the little motorcycle guy by the front wheel.
 
Last edited:

peavey123

New Member
Alrighty, This lil' ditty is all photoshop.

I've attached the source images I used so you'll have to find something similar on your stock photo site.

First step is to import you vector flame into photoshop. This will be used as a selection only. ( CTRL click layer to select)

Place the "fire" image into photoshop and rasterize the image. CRTL click the flame layer, then press CRTL + SHIFT + I to invert selection. Then press delete. Now your left with the flame filled with the fire image.

To get the red chrome outline on the flames, duplicate the flame layer and then double-click on the top layer to bring up the layer style properties. select 'stroke', and adjust the width, then select 'bevel'. There's a drop-down menu to select the type of bevel. Select stroke bevel. Change the 'highlight mode' to screen and make it a light orange colour. Change the 'shadow mode' to colour burn. You will have to play with the opacity on each to get the result your after. You'll also have to adjust the bevel size and depth. Next, select 'contour' under bevel. Change the contour curve to the wave. You should now have something close to a red chrome stroke. Before closing the blending mode dialog box, click at the top onto 'blending options'. Make sure the box "layer mask hide effects" is checked.

Next select use the layer mask on the flame stroke layer to blend out the stokes if you wish to do so...

Select the bottom flame layer and add a drop shadow using a dark red.

Place the fire image as your background, guassain blur the image and place it until it looks right. Then place the wood texture overtop and desaturate the wood texture so that it's only black and white values. Change the blending mode to overlay and reduce the opacity until you get the desired effect.

Viola, you should have something like this my attached images.
 

Attachments

  • Untitled-1.jpg
    Untitled-1.jpg
    53.5 KB · Views: 54
  • Untitled-2.jpg
    Untitled-2.jpg
    43.1 KB · Views: 66

signprinter

New Member
Alrighty, This lil' ditty is all photoshop.

I've attached the source images I used so you'll have to find something similar on your stock photo site.

First step is to import you vector flame into photoshop. This will be used as a selection only. ( CTRL click layer to select)

Place the "fire" image into photoshop and rasterize the image. CRTL click the flame layer, then press CRTL + SHIFT + I to invert selection. Then press delete. Now your left with the flame filled with the fire image.

To get the red chrome outline on the flames, duplicate the flame layer and then double-click on the top layer to bring up the layer style properties. select 'stroke', and adjust the width, then select 'bevel'. There's a drop-down menu to select the type of bevel. Select stroke bevel. Change the 'highlight mode' to screen and make it a light orange colour. Change the 'shadow mode' to colour burn. You will have to play with the opacity on each to get the result your after. You'll also have to adjust the bevel size and depth. Next, select 'contour' under bevel. Change the contour curve to the wave. You should now have something close to a red chrome stroke. Before closing the blending mode dialog box, click at the top onto 'blending options'. Make sure the box "layer mask hide effects" is checked.

Next select use the layer mask on the flame stroke layer to blend out the stokes if you wish to do so...

Select the bottom flame layer and add a drop shadow using a dark red.

Place the fire image as your background, guassain blur the image and place it until it looks right. Then place the wood texture overtop and desaturate the wood texture so that it's only black and white values. Change the blending mode to overlay and reduce the opacity until you get the desired effect.

Viola, you should have something like this my attached images.[/QUOTE


WOW!!! YOU ARE AWESOME....more help than I ever expected, I really really appreciate this I was pulling my hair out!
PM me and Let me know if you are available for free lance work and what types of work you do...I would most definitely use you.
Thank you
 
Top