Well that is NOT sounding good. Sorry to hear that.
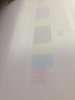
As soon as you get a chance post up a photo to the original thread showing what your CURRENT test print looks like.
I have not experienced what you are currently dealing with.
several things do come to my mind. These may, OR may Not be of help, but you might check these out.
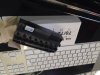
1: have you pulled out /or changed the two connector cables that connect the print head to the main board, or the "slider" board? If you have, I would CAREFULLY verify that they are properly attached and seated into the slots on either end of the cable.
2: I would also make several test patterns that are several inches deep, by the Max. width your printer is capability of printing. Create them to print JUST MAGENTA, [or which ever color is clogged] then set up the printer to print at the MAXIMUM print quality [example] pick a ICC file that would allow you to print 16- 24 PASS. It doesn't matter which material you are printing on for this test. The idea is to get the printer to push as much ink as possible through the head as possible. SOMETIMES, this will cause the print head to clear the stick nozzles.
As a last thought, you mentioned last week that you pushed cleaning solution through the top of the print head with a syringe. There is a possibility you damaged the print head. Look closely to see if there is any ink leaking from the print head in areas that are not suppose to.
 ~$0.02
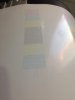

