• I want to thank all the members that have upgraded your accounts. I truly appreciate your support of the site monetarily. Supporting the site keeps this site up and running as a lot of work daily goes on behind the scenes. Click to Support Signs101 ...

Falcon print head alignment

400 lb Gorilla

New Member
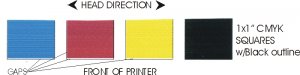
Could sure use a little help. I just replaced the black print head on my Falcon Outdoor JR. I prints perfectly except it is not aligned with the color print head any longer. I ran a "Head Alignment" procedure but apparently that only aligns the Left/Right print head movement, not the media feed direction. The test strip below shows a gap between where the black ends and the color begins. Anybody know how to get them back in sync?
Thanks!!
 

Attachments

  • Graphic1.jpg
    Graphic1.jpg
    91.5 KB · Views: 105

RG

New Member
Welcome, 400. Looks like those who know everything are busy, so I'll tell you what I have done with my FOJ printer. It might help if you would post a picture of a nozzle check test. When my black printhead is not aligned with the color head, I loosen the one screw that holds the black printhead in place and move the head slightly, either forward or backward. In your case looks like you would move it toward the rear of the printer (backward).
 

randya

New Member
The picture is a bit confusing.
As there are gaps between all colors.
If there is only a gap (left to right) between the colors and black, then this is a timing alignment, sorry but it has been too long since I have done one to remember.
Perhaps someone else will chip in and give the procedure.
 

400 lb Gorilla

New Member
Thanks for the info RJ. After a little trial and error, I was able to re-align the black head to the color head. It was just a matter of loosening the single head screw and moving forward & back, left & right until it printed correctly.
Now I have to work on the color head. Looks like I have a mis-directed or clogged nozzle. (noticed some small cyan streaks on my test pattern)
You wouldn't happen to know where I can get some info on the Heaters would you? The operators manual doesn't say anything about the proper heat settings for different media ie; vinyl, photogloss, banners etc.
Thanks!
And if anybody ever has to replace a printhead, it's easier to replace than it looks. The same goes for the Head Fuses on the circiut board. I'm thinking about doing a short instructional video on how to do both. Maybe it would save the do-it-yourselfer a lot of time AND money!
 

400 lb Gorilla

New Member
Thanks for the input. I still can't find any info on actually setting the heater temp. Here's a pic. What does it all mean???
 

Attachments

  • HEATER.jpg
    HEATER.jpg
    27.1 KB · Views: 95
The fixer heater is right under the print path and the front heater is in front of the print path. The s on each setting is the temperature setting the r is the actuall temp. We run both of ours at 50. You just want to make sure you don't get to hot or it will make the media buckle and cause a head strike. If you want start at 40 and go from there. It makes a huge difference in the prints.
 

Jackpine

New Member
40 is a good place to start with your heaters. I always run mine as hot as the material will take without buckling. Oracal 3621 will take 50+ other material lower. 13 oz banners at 45. Roy from Gregory told me "hotter the better" and I believe it from my experience.
 

400 lb Gorilla

New Member
Thanks for all your help. I'm assuming that it's 50 Celsius and not Fahrenheit? And if you look at the pic, doe's this mean I've been running this printer with the heater set at 13 Front, and 12 Fixer? I've never adjusted them in 5 years or so.
 
That's what they are set at in the picture. Don't know if they may have reset themselves some how because I don't know how you good have ever gotten decent prints with the heaters being set at least close to where they need to be. In the picture the room temperture is higher than the heater is set at.
 

400 lb Gorilla

New Member
Actually, the prints have been coming out great. I don't know if they reset themselves, but I know for sure I've never adjusted them and I'm the only one with access. If they were great before, I can only imagine what they'll look like now, with the proper temp settings.
 

400 lb Gorilla

New Member
So I got the print heads re-aligned. I confirmed that the cyan test pattern was banding. The yellow is perfect. The magenta is starting to show signs of banding. I have this stainless steel ultrasonic cleaner that I used with denatured alcohol to try to salvage the head. After 30 min. of cleaning, I put the heads back in and still have banding on the cyan. (repeated "Powerful Head Cleanings" don't help). Question is, does anybody know what solvent would work other than the solvent in the cleaning cartridges? That stuff is expensive.
 
Top