bull-deano
New Member
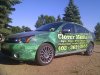
Hey all,
We got round to doing our wrap over the weeked. This is our first 'real' go at it. I did a bit of it in college and few bits here and there over the years and my wife just recently attended the 3M wrap course. Man, its daunting but so much fun at the same time. Those door handles are just insane.
We did hit a few snaggs on the way, mostly cutting seams and the bumpers but eventually got through it. There are a few tidy ups to do but overall we are pretty damn proud of ourselves.
In the future we will more than likely take more care about seam placement but they don't really show up in the real world, unless of course if you are looking for them.
All thats left is the hood, roof, trunk and skirts. We will be using some matte black on there.
Let us know your thoughts.
Thanks.