RichardG
New Member
Hello everyone! I'm new to this site so hope I got this posted in the right place.
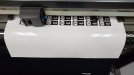
I don't have a lot of experience with maintenance or setup on any plotters. I've tried searching for a post with someone having the same problem but wasn't able to find anything, so hopefully someone can help me out. We have a Graphtech FC8000 and have these small decals about 1.125'" in diameter to cut, but the cuts are coming out off center. I've tried messing with the offset settings but it doesn't seem to make any visible difference. So I'm wondering if I am loading the vinyl incorrectly or maybe there is a setting that is set wrong on the plotter. As I said I am inexperienced on these machines and have no clue how to solve this issue. I would appreciate any advice. Running plotter out of Flexi
TLDR: Graphtech cutting off center circles on print and cut vinyl, please help.
Edit: There has to be a thin line of black going all around the white stickers.
Attachments


Last edited: