• I want to thank all the members that have upgraded your accounts. I truly appreciate your support of the site monetarily. Supporting the site keeps this site up and running as a lot of work daily goes on behind the scenes. Click to Support Signs101 ...

Hand did before and after

signmeup

New Member
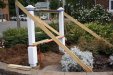
Just got back from installing this one. The old one was completely rotten. It was also internally lit.... entirely made of wood. It sat there for 22 years.

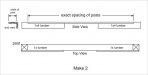
The new one is hand carved HDU with a steel frame inside. The posts are hollow and made from 4 pieces of 1x4 treated decking. The decorative caps are made from scrap HDU. The sign is 57" x 34" ish
 

Attachments

  • SaundersBefore.jpg
    SaundersBefore.jpg
    98.5 KB · Views: 134
  • SaundersAfter.jpg
    SaundersAfter.jpg
    85.2 KB · Views: 125

Jillbeans

New Member
You took that from trailer park looking to fit for a mansion!
Impressive work!
I love seeing and getting to do this sort of job.
Love....Jill
 

signmeup

New Member
Thanks for all the kind words.

Here is a shot of the posts being installed. I tried something new with this installation:

I used to brace my posts together with a cobbled up arrangement of 1x4s and screws and struggled to get the posts square and parrallel. Then I would wrestle the 2 posts with braces into the holes. Then after the sign was installed I had to fill and touch up all the screw holes in the posts. I came up with this spacer/brace that worked great.

The diagram and photo should help explain how it works. The posts are put in the holes individually which is a lot easier on me... no heavy awkward lifting. Then the 2 wood spacer/braces are put between the posts and the ratchet tie-downs pull the posts together and make them square at the same time. The spacer/braces give you a great spot to lay your level too.
Then I screwed the various angled braces to the removable spacer/braces instead of the posts. Worked a treat and no holes to fill in in the posts.
 

Attachments

  • PostBrcesInstalled.jpg
    PostBrcesInstalled.jpg
    94.5 KB · Views: 122
  • SpacerBraces.jpg
    SpacerBraces.jpg
    26.4 KB · Views: 124

skyhigh

New Member
Sign is beautiful. A+++

Your diagram wouldn't open, but judging from the picture, the post install looks like a pain (but clever).

PS. A little shrink wrap around the bottom of the post, is a great help when pouring the cement.
 

signmeup

New Member
Sign is beautiful. A+++

Your diagram wouldn't open, but judging from the picture, the post install looks like a pain (but clever).

PS. A little shrink wrap around the bottom of the post, is a great help when pouring the cement.
Excellent tip with the shrink wrap! Thanks!

My current method is way easier than my previous method. What do you do to install posts exactly square etc.?
 

SignManiac

New Member
I still find it easier to assemble the sign and post, brace the bottom when transporting, then dig holes, dump sign in holes, fill with sand, rocks, or concrete and use the stick with the bubble inside thing. So far, so good!
 

signmeup

New Member
Yeah.... that would be nice but the sign and posts won't fit in my van assembled. And I can't lift the whole mess up over my head and get in the holes alone either.
 
Top