Replaced new: printheads, dampers & o-rings, ink pump, wiper, capping station. Did all the adjustments after setting head rank, using flexi v8.1.
flushed the drain lines did a complete cleanup to maintenace area.
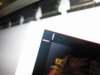
When printing black text on a color background i'm getting what looks like a drop shadow of orange red.
Printing a black background with a white cutting mark. When test printing it about the size of a business card the cutting mark is filled with the orange red. Then at twice that size the cutting mark is 2/3 white with 1/3 the orange red color. It appears as if the amount of drop is unchanged it just looks less in the larger size print.
it would seem as if this is a alignment issue, but i have been unable to adjust it out.
the drop is down (toward front of printer) and to the right(toward key board) other than this the print is good.
printing a photo the effect is nominal, printing vector where text or lines should be sharp is where it is most noticed. so far I haven't seen it with other colors.
thanks in advance, scott
flushed the drain lines did a complete cleanup to maintenace area.
When printing black text on a color background i'm getting what looks like a drop shadow of orange red.
Printing a black background with a white cutting mark. When test printing it about the size of a business card the cutting mark is filled with the orange red. Then at twice that size the cutting mark is 2/3 white with 1/3 the orange red color. It appears as if the amount of drop is unchanged it just looks less in the larger size print.
it would seem as if this is a alignment issue, but i have been unable to adjust it out.
the drop is down (toward front of printer) and to the right(toward key board) other than this the print is good.
printing a photo the effect is nominal, printing vector where text or lines should be sharp is where it is most noticed. so far I haven't seen it with other colors.
thanks in advance, scott