AUTO-FX
New Member
I'll admit, this is kinda my specialty, but I love how some of these newbie kids come on the forum here with their desperate pleas "Does anybody have this graphic for this car, I've looked ALL OVER for at and I gotta have it done by tomorrow"
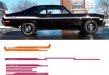
This is for a buddy of mine, and a one off in all likelyhood, so i'm not worried about licensing. I stopped at his house and got some measurements the other day.
I did a google search and bingo, I found a perfect side shot of the car. Almost always can find one.
Drew a rectangle with the measurements I had, imported the photo, and blew it up to match up with rectangle.Sometimes I use wheelbase measurements.
Then I just started drawing! Point by point and using the handles for curves. Not a big deal, a little teadious, but after you do it for awhile, it isnt so bad.
Then i couldnt find the font for the logo, so I googled that, and found a pretty decent picture of it. Did a outline trace in Flexi, clean it up a bit, and there we go. Only took me a couple hours.:Big Laugh
Ps. And no, please dont ask my to send you the file!